


I am so very excited to share this tutorial, because I love the look of mercury glass (especially during the holiday season) but amassing a collection of it could get pretty expensive.
About a month ago I actually tried to recreate the look with regular metallic spray paint, but I wasn't thrilled with the results (I'm picky!) so I was tickled when I stumbled upon Krylon's Looking Glass spray paint.

(Do people still say they're 'tickled'? Because I was.)
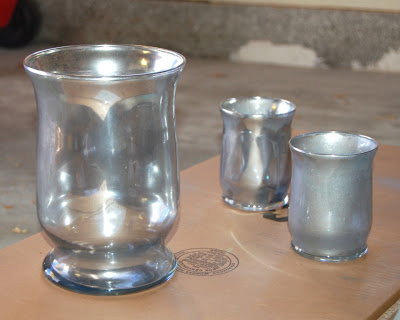
Step 1: Gather some glass that would benefit from mercury-ization (to use a technical term).

The larger hurricane I got ages ago at Walmart or JoAnn or something for less than $10, and the two smaller ones were from a dollar store.
Step 2: Start spraying the Looking Glass paint onto the inside of the glass. I held the hurricanes in my hand so they were laying on their sides and applied the paint in quick bursts, then rotated the glass to get the next area. The key here is to be very light in your applications -- this paint is thin and runny and doesn't leave much room for gloppy errors.
Let it rest for about a minute (it dries fast) and repeat. The instructions call for 5 applications with 1 minute drying time in between each.
After one coat, the glass will just have a bit of a reflective shimmer to it, but you will still be able to see through it.
After one coat, the glass will just have a bit of a reflective shimmer to it, but you will still be able to see through it.
And here below you can see the squeal-inducing magic happening. As the paint dries, it turns from the classic spray paint metallic look to the actual mirror-like finish. You can actually watch it happening, it dries so quickly.

Loooooooove it!
Here are the hurricanes after 5 or so coats:

Now here comes to important/tricky-ish part (don't worry it's not really difficult, just pay attention):
Step 3: Start distressing. (you'll want to read this section, I promise)
I remembered reading on the great blog Vintage Revivals how Mandi had achieved an Anthropologie-like finish on a mirror by using some sort of chemical or acid to eat away at some of the metal on the backside of the mirror... and that gave me an idea; I figured I didn't need any harsh chemicals, since this was paint and not real metal on the back of the glass, so I made a mixture of 50% vinegar and 50% water and put it into a spray bottle. Acidic, right?
After letting the paint dry for 5-10 minutes, I sprayed the vinegar-water solution lightly into the inside of the hurricanes just to cover the surface with little beads:

I tried to get the vinegar only on the bottom half so my hand inside the hurricane didn't accidentally rub off the finish on top while I was distressing the bottom. I did the top part of the hurricane after I was finished with the bottom.
I let the beads of vinegar-water sit for 20 seconds or so, depending on how long I had let the paint dry, and then it was time to begin!
I let the beads of vinegar-water sit for 20 seconds or so, depending on how long I had let the paint dry, and then it was time to begin!
For the purposes of this tutorial, I recreated the distressing process on a piece of glass from a small picture frame so I could take photos to illustrate how I achieved this specific finish:
- I sprayed on the vinegar-water:


- I took a paper napkin, folded it up and dampened it with the vinegar-water solution. I wanted everything that came in contact with the finish to be soft (kind of like fine sandpaper instead of rough, get it?)

- I took the damp napkin and gently dabbed (up and down, not side to side) the beads of vinegar, and voila! The vinegar had started to eat away at the paint (this worked better if I only let the paint dry a few minutes rather than an hour or so... I had to rub a bit more on drier paint).

- Then I gently started to rub the damp napkin in circles to widen those distressed areas and start sloughing off more of the paint. I found that using the pads of my fingers when rubbing with the napkin, versus the tips of my fingers, helped lessen the pressure and the chance of giant flakes of paint coming loose:

- Use your judgment to achieve your 'ideal' look -- I sprayed a bit more vinegar on and then rubbed very lightly because I wanted a scattering of very tiny holes too, not just the larger ones I had rubbed off:

- I finished it off with one or two very light coats of the Looking Glass spray paint, to add a bit of dimension to the spots that had no paint -- I still wanted them to glow, shimmer, look a tad mirror-y... pick your word!

Step 4: (Optional, but recommended) Apply some sort of protective coat, like a clear spray to the inside of your glass. (And remember, don't put live plants or food into a container that you've sprayed)
Here's the finished product:


Update: Wondering if the Looking Glass spray paint is necessary? Check this post out...
Sharing this post at Hope Studios, House of Hepworths, Somewhat Simple, Finding Fabulous, The Shabby Nest, Sew Much Ado, The Shabby Chic Cottage, Domestically Speaking, Just a Girl, Remodelaholic, The Shabby Chic Cottage, The DIY Show Off, A Little Knick Knack, Passionately Artistic, Be Different Act Normal, Tatertots and Jello, Under the Table and Dreaming, Funky Junk Interiors, My Uncommon Slice of Suburbia, a little lovely, Someday Crafts, Krafty Kat, Centsational Girl, Shanty 2 Chic, the CSI project, SAS Interiors, The Stories of A to Z, and the DIY Club's January party...


Oh shut up. This is so awesome and I love it.
ReplyDeleteThe end.
You're a stinkin genious! Im putting this paint on my shopping list for later today. Thanks so much!
ReplyDeleteWOW! I love it! Looks like its right out of a PB catalog!
ReplyDeleteGreat job!
~Tana
Thanks girls!! I'm really happy with how it turned how, using that special paint made all the difference in the world. If any of you try it and post about it, please let me know I'd love to come see it!!
ReplyDeleteBEAUTIFULLY done! I'm sharing this over on my FB blog community page wall for Focal point...
ReplyDeletegreat job!!
:D Lynda
Thanks for sharing, that looks really great and really great directions as well, Thanks!
ReplyDeletegreat job! I've done a couple of faux mercury glass techniques, but I really like yours. I'll have to give it a try.
ReplyDeleteWow! Fantastic! Will have to try this. Thanks
ReplyDeleteWOW! i'm so jazzed that i found this post (through the CSI project, by the way)... love it!
ReplyDeleteOh My.....you and your mad crafty skills. I am jealous of them. I am pretty sure I was born without them, or you stole them from me in my sleep. :) I LOVE this project and talk about MAJOR money saving cutness for everyone! Do you know how much those dang things cost from a for realsies store instead of your crafty world? I am bringing over wine (again) and you and I are going to have to create some cutness for my house....just to make me feel a little less like the milk mans kid. :)
ReplyDeleteThis turned our absolutely fabulous!!!
ReplyDeleteFab.u.lous. Totally doing this for christmas decor. Rockin'!
ReplyDeleteJust added this to my "I so have to do this for Christmas" list. Amazing ... thanks!
ReplyDeleteI think I just found a new idea for Christmas!!!! Love it!
ReplyDeleteI am so glad you did this tutorial for us all! That is a great way to get the look, they turned out just like you buy in the store, amazing! I am for sure going to do this!
ReplyDeleteVery, very cool! I'm going to have to try this!
ReplyDeleteThis is so great!! I have sprayed things with the metallic silver but haven't taken it a step further and done the distressing. I can't wait to give it a try!! Thanks for the great tutorial!
ReplyDeleteI really love mercury glass too - I think this is a project I need to try :)
ReplyDeleteAUGH! I love, love, LOVE this! I'm off to buy spray paint and vinegar! IN LOVE I TELL YOU!
ReplyDeletePlease add this to my link party going on now! Please??? alittleknickknack.blogspot.com
This is so fun! Plus, it looks like a simple way to make something look fancy and snazzy!
ReplyDeleteI think this would be a great way to decorate for the holidays...it's on my list of to dos!
Your results are totally fabulous! I have heard of this paint but not tried it yet. I had also read that another option for creating a distressed look is to spritz the glass ever so lightly with plain water before applying paint. That would theoretically keep the paint from adhering evenly. That might work, but perhaps you'd have to spray the glass between each coat of paint. in any case, your approach seems far superior. Bravo!!!
ReplyDeleteThanks so much! After I posted this, I did stumble upon that pre-paint water spritz method, but I like the end results with my method better as well :) Thanks for stopping by!
ReplyDeleteI've done this to make mirrors and basic decor, because its beautiful and easy. Too bad the spray paints reliese toxins into the air when you burn the candle inside.
DeleteI've done this to make mirrors and basic decor, because its beautiful and easy. Too bad the spray paints reliese toxins into the air when you burn the candle inside.
DeleteThey look beautiful all lit up!
ReplyDeleteI'm your newest happy follower. http://moogieland.blogspot.com/
ReplyDeleteI'm always looking for ideas on how to do mercury glass. My attempts were not that successful. Love the idea of using vinegar. They turned out great!
ReplyDeleteThese look fantastic - GREAT JOB!
ReplyDeleteAnna, I tried regular silver paint too and wasn't happy with the results at all. I've been searching for the Looking Glass spray paint without success (except for ordering it online)--were you able to find yours locally? Your projects turned out so wonderfully!
ReplyDeleteLove it! I just did a tutorial on acid mirrors and I LOVE this idea to death! Its by far the best faux mercury glass that I have ever seen!
ReplyDeleteWOAH! (yes, I just said that a-la Joey Lawrence). That is SOOOOOOOOOO cool! I'm for SURE gonna do this.
ReplyDeleteYou ladies are killing me!! I am loving all these comments.
ReplyDeleteApril, I die. That's the first time anybody's quoted Joey Lawrence to me. Love it!
Meadowsweet Cottage, I actually found it at Hobby Lobby -- I think a larger JoAnn's or Michael's would have it too, but around here we only have smaller versions of those stores.
I am laughing at Emily's comment! haha
ReplyDeleteAnyway, this is great! Great job!
PS I am a new follower! Follow me too @ www.livvyloowho.blogspot.com!
ReplyDeleteWOW, first tut I've seen that really mimics mercury glass. You're genius! Can't wait to check out your whole blog. Thanks
ReplyDeleteOh my gosh.... this is AMAZING!! I am scanning my glassies looking for the first victims! Now to find that paint. Thanks so much in advance for the fun I'm going to have! :)
ReplyDeleteLOVE this! Can hardly wait to try it! Thanks for the tutorial. :)
ReplyDeleteThis is fra.freakin.tastic!
ReplyDeleteThank you for sharing! I am in love with mercury glass and agre...I can do vinegar/water and spray paint much better than spending my paychec at potterybarn! Thanks for sharing!
Ok, I love how yours turned out! I tried making this with the regular silver spray paint as well, and it just didn't work. I am still trying to find the mirror spray paint! I linked to your tutorial in one of my recent posts because it's so great! Thanks!
ReplyDeleteI HAD to tell you that this is a tutorial for MG with THE BEST results I have seen! I think they looked the most realistic of all the different ways people have tried! I just found your site from a link on Just A Girl and can't wait to read the rest. Thanks so much and I will be making lots of faux MG asap!
ReplyDeleteThanks Jeri! Glad to have you here, you'll have to let me know how it goes when you try it. :)
ReplyDeleteThis is by far the most real looking mercury glass tute that I have found! I am in LOVE with mercury glass! Thank you thank you!! Found you over at My Uncommon Slice of Suburbia!!
ReplyDeleteWowsers!!!! I am so excited to find this tutorial!! Who knew? I will be trying this out for sure! Thanks for sharing- stopping by from Kristins :)
ReplyDeleteGreat job! They came out gorgeous! Thanks so much for the visit too!
ReplyDeleteI found the Rust-Oleum Bright Coat metallic finish spray today (the cap is mirror-like, not just silver) so I am hoping for mercury delicious results. The can says 'fast drying - rich shiny finish', so we will see.
ReplyDeleteI love it, I have some glass waiting for me to do something with it, this will be great for Christmas!
ReplyDeleteIs that ever pretty, I'm especially loving it with the candle glow shining through. Will need to look for something to try this on.
ReplyDeleteThx for sharing.
Perfect! I will be pilfering this project! :) Did you use a battery operated candle inside? I'm concerned with paint that a real candle might produce a flame?!?
ReplyDeleteThis is the best make it yourself mercury glass I've seen. This looks like the real thing. I am dying to try it.
ReplyDeleteNo, I use real candles -- I did some research and spray paint isn't flammable once it's dry, which is why I'm guessing it's okay to paint light fixtures and heat registers that get very hot. I think you're safe, but make sure to exercise your best judgement and supervise any open flame in your home :) Be safe!
ReplyDeleteAwesome job! Thanks for sharing...I can't wait to try this one!
ReplyDeleteI can't wait to go get some of this paint! BTW...I say "tickled"...kinda dorky and old fashioned, but sometimes you're just tickled and no other word describes it. Thanks!
ReplyDeleteLove the look and how your transformed an ordinary vase. Great tutorial - Thanks
ReplyDeleteMy best- Diane
I'm tickled with your tutorial. Your tutorial is the best I've seen for making the distressed mercury glass that I love.
ReplyDeleteThis is very cool! I'm thinking about adding a few piece of mercury glass on my son's bookcase. Thank you for providing a great tutorial. I was going to use some silver spray paint but I think I'll wait and get some looks like glass spray paint.
ReplyDeleteGreat idea Anna! I love the final holders - very cool. I featured this on the Sunday Showcase Round Up. Thanks so much for joining in the fun! Hope you are enjoying your week ~ Stephanie Lynn
ReplyDeleteYour tutorial is the most spot on I've seen so far! It looks terrific and I'll be doing it your way! Thanks...
ReplyDeleteFabulous job! They are absoulutely lovely! This is the best tutorial I have ever seen for this! I feel like I could actually do this now! Thank you!
ReplyDeleteYou should come link this up to my weekly Thursday Making It With Allie Link Party! I think it would make a Fabulous addition!
AllieMakes.Blogspot.com
Thanks for sharing your great ideas for creating mercury glass. Great job!
ReplyDeleteOh, I definitely have to play around with this! Can't wait to pick up my first can of the Looking Glass paint! Thank you for sharing!
ReplyDeleteBetsey at b.bar
www.bybbar.blogspot.com
I did this on cheap red votive holders and it looks great that way too!
ReplyDeleteHi Anna,
ReplyDeleteDo you think this would work on the outside of glass? I have two old nasty candle holders that could be marvelous if I tried this...
caroline
[email protected]
I would only spray the looking glass paint on the inside -- it's not made to be pretty on the side you spray it on -- it's made for the back of glass specifically, so the finish isn't metallic or nice at all :) if you had to spray on the outside, i'd use a chrome paint -- take a look at this,
ReplyDeletehttp://takethesidestreet.blogspot.com/2010/11/mercury-glass-side-by-side-paint.html
and then you could do something a bit like this: http://thediyshowoff.blogspot.com/2009/09/week-1-diy-show-off-fall-festival.html
Hope that helps :)
What an awesome idea! It really does look like mercury glass! I would be tickled, too! Sounds like a fun project, thanks so much for sharing!
ReplyDeleteI looove this and cannot wait to try it!!
ReplyDeleteThis is THE best faux mercury glass I've ever seen! The vinegar was a genius idea. It turned out wonderfully! It looks very authentic.
ReplyDeleteHello,
ReplyDeleteThese are beautiful! Thank you for sharing.
Claudia
I love this! I am so in love with Mercury Glass right now and I can't wait to try this project for myself! Thanks so much for posting this!
ReplyDeleteI came over from "Shanty2Chic" link up. These are really cool and I am so going to have to try this. I'm your newest follower!
ReplyDeleteI also found you on "Shanty2Chic" linkup, and now I'm your newest follower! :) Can't wait to try this idea for myself - brilliant. Thanks so much for sharing!
ReplyDeleteI came up with an idea based on this tutorial. I haven't done anything with it just yet, but would like your opinion. Check it out at http://thechandlersblog.blogspot.com/2010/12/what-to-do-what-to-do.html
ReplyDeleteWOW.
ReplyDeleteYou are GOOD!
Love this! Have a bunch of ideas bursting in my brain now that I've got to try. Thanks for the wonderful tutorial!
ReplyDeleteThis is hands-down the BEST faux mercury glass tut I have seen. I love it - I am going to be mercury-izing everything!!
ReplyDeleteVery pretty. You did an awesome job! Thanks for sharing.
ReplyDeleteI LOVE it. You did an awesome job on your hurricanes.
ReplyDeleteThanks for entering the DIY Club project party.
Cheri
I love Mercury glass and these look so real and just as beautiful as PB! Great job, Anna!
ReplyDeleteRoeshel
These are gorgeous. This is the best faux mercury glass technique that I've seen!
ReplyDeleteGorgeous - I have never heard of looking glass spray - you did awesome! Thanks for linking up to Saturday Spotlight!
ReplyDeleteBeautiful! I was thinking this might make beautiful table numbers for a wedding if I made took picture frame glass and taped off a number on them and "mercury glassed" them, then framed them. Do you think that would work?
ReplyDeleteThank you, thank you, thank you for this DIY post! I did some this past weekend and they turned out to be fabulous!
ReplyDeleteOk!!! This tutorial is AWESOME!!! I have been trying to get my hands on this stuff for quite some time but can't find it anywhere!! I guess I will be ordering online!!
ReplyDeleteI would love for you to link this one up too at my new link party!! Show Me How!!! ~ Friday ~ Tips, Tricks, & Tutorials ~ No. 1 ~
I'm not above begging, lol!! :))
LOVE FROM TEXAS!!
~~Michella~~
www.michellamarie.com
~~~~~~~~~~~~~~~~~~~~~
I've been passively reading several posts on HOW TO DIY mercury glass but this one inspired me to DO instead of just read. I'm going to give it a try soon. Thanks!
ReplyDeleteThese vases look so beautiful. The tutorial was easy to follow. Will give it a try sometime soon. For now, I have shared it on my blog. Included a link to your page... expect high traffic and loads of comments :)
ReplyDelete-Tanya
http://tanyaanurag.blogspot.com/
Thank you so much! I was so jazzed to come upon your tutorial. Awesome! -Can't wait to do this project and check out the rest of all your good stuff!
ReplyDeleteRochelle
Huntington Beach, CA
This is by far one of the best tutorials I've read. I haven't tried faux mercury yet and I'm so glad I waited until I found your tute.
ReplyDeleteHey, it pays to visit old Christmas linky parties on a Saturday night!
Great article. Thanks!
ReplyDeleteLove, love, love it! I have about 100 votive Ikea candle holders left from my daughters wedding. I now know what I will do with some of them! It's off to Home Depot I go!
ReplyDeleteYou're a genius. Dangerous, almost. I may mercury glass-it up on all my plain glassware!
ReplyDeleteBrilliant.
EllieJo
Thank you so much for posting this tute!! I love mercury glass, but you're right, it's expensive!! Ill be doing this soon for x-mas gifts!!!
ReplyDeletePinning this! So clever and resourceful!
ReplyDeleteThank you so much for this. I am going to make 25 centerpieces for my wedding and you just saved me a ton of money!!!
ReplyDeleteI've seen a lot of tutorials for achieving the look of mercury glass, but I have to say, this one beats them all. It looks like the real deal for a fraction of the cost. Very cool!
ReplyDeleteWhere did you get the mirror paint? I looked at four different stores today and I'm thinking it hasn't made it to the west coast yet.
ReplyDeleteCarole, I found mine first at Hobby Lobby but have also seen it at my local Michael's. Check the glass paint section instead of the spray paint section?
ReplyDeleteMy friend and I did this today! It definitely took us what felt like a zillion and a half coats to make it perfect before we distressed, but WELL WORTH IT! It totally works! Thank you so much for this post!
ReplyDeleteSo glad it turned out so well for you! :)
ReplyDeleteWhat about this look on items such as candlesticks that can't be worked from the inside? Is there a method for that? I bought my paint yesterday and can't wait to get started. Thanks
ReplyDeleteI found it at a larger Hobby Lobby store. The smaller store here told me to go to a larger store and they keep it in stock. It was in the next town, but worth the trip, because the shipping costs for online ordering can get expensive for a combustible product; about half the cost of the product!
ReplyDeleteThank you Anna. :-) We don't have Hobby Lobby here in the NW, but I did ask at Michael's and now have a can to play with. Definitely something I'll want to use my coupons on (spendy). lol
ReplyDeleteAnon - I have something that can't be worked from the inside as well, so I'm going to experiment with Krylon Chrome. It probably won't be shiny enough, but I might come up with something interesting anyway.
Btw, Amazon does have the mirror paint, and shipping is free (or was the last time I checked).
ReplyDeletePaint
I tried this out last night! It was SOOO easy! I picked up a large wine glass looking vase from the thrift store for $3 and followed your instructions. Genius! I am using mercury glass in my wedding and wanted to see if I could emulate the look of some votives I already had. The only thing I didn't follow 100% was the instruction to wipe the vinegar solution in a circular motion... in retrospect, that would have been better because I got some straight across wipe marks. But, all in all, it looks awesome! Thank you for the tips, you ROCK!
ReplyDeleteI found the paint at Michael's and bought one can to play with.
ReplyDeleteYou're not kidding about the paint being thin. I'm not an amateur when it comes to spray painting, but using this stuff is difficult. I tried quick bursts as suggested, but it wasn't easy on such a small piece. I ended up rotating the votive, allowing the paint to spread over the glass. I continued rotating until it was nearly dry. Four coats in and the glass was still fairly see through.
It's been too cold to try spraying again, but I will at a later date. I hope I can get the hang of it because I love the look.
Thanks for your tutorial. :-)
Do you know of a good sealer paint that i could use, so that i could put a real candle inside? im nervouse about an open flame with all the paint....
ReplyDeleteI haven't had any problems with mine, but I did let them sit for several days before using them and the flame is never *right* next to the paint :)
ReplyDeleteThank you for this tutorial! I'm doing this to a dozen or so glass containers for my wedding, and they look BEAUTIFUL! Like an earlier reviewer, quick bursts did nothing for me, so I sprayed it on fairly thick and then rotated the glass to allow the paint to spread around until it dried.
ReplyDeleteI found a Faux Mercury Glass pendant at Fergusons but it was so expensive and I need four (I'm remodeling the kitchen). Can I do this project on glass for a pendant and use it as a light fixture? I really want MG for my new space.
ReplyDeleteSo.. good news: Krylon looking glass is 3.99 at Michaels right now...bad news? The salesman said they would no longer be carrying it. I bought the two cans they had left... if anyone is wanting to do this tutorial, you better hurry before they are all gone :(
ReplyDeleteI've done this twice. The second time I used a magic eraser instead of the vinegar and water. I think it turned out much better and was easier to control the amount of paint that was removed and where it was removed. Magic eraser is a miracle!!!
ReplyDeleteVarious types of glasses are available in market but the best use of glasses is in farm of wearing glasses which are in different designs and different colors it is the beauty touch of glamorous in recent era.
ReplyDeleteFor those on the west coast, Orchard Supply Hardware just started carrying this paint. $10 a can there, vs. $20 a can at Beverly's Fabric and Crafts, which also has it in stock in my area (near Santa Cruz).
ReplyDeleteMy daughter's wedding is over and the centerpieces were beautiful thanks to the finding of this tutorial!!! I used 5 cans of paint for 25 large milk can vases and 50 small milk can vases. We put votives in the small ones, and 3" pillars in the large ones - they looked fabulous when placed on a round mirror that was on top of a 24" square "wedding theme" fabric with three votives surrounding the vases and a sprinkle of fake rose pedals .... we found this to be a much more affordable option to flowers - and plus - now I have them forever ........... or until I decide to craigslist them....
ReplyDeleteMy local Ace Hardware store was able to get this for me in 3 days!! It was $12.99/can!! OUCH - but worth every penny!!!
ReplyDeleteI plan to try this on a curio cabinet I got as a wedding gift in 2000. Its dated and I still want to use it, just give it a different look. I'll try to send before and after pics. It's that honey oak color now, but I want to stain it black possibly, and I've been wondering what to do with the side mirrors, this is perfect! Thanks!
ReplyDeleteCan anyone advise how many cans I should purchase?
ReplyDeleteI intend to do 75 small candle holder (9cm high, 5.5cm diameter). No idea how many holders I could do with one can...
Hi! Your tutorial is great! I wanted to let you know I am using your technique to paint glass shelves for my office, and I link back to your post at my blog today: http://thatmommyblog.blogspot.com/2012/09/cuz-everyday-im-shufflin-new-office.html
ReplyDeleteJust "WONDERFUL"!
ReplyDeleteI really want to do this for my wedding with flowers. I saw that you said "no flowers" do you think I can spray the outside instead of the inside and use it with flowers?
ReplyDeleteBrittany
The paint is made to be sprayed on the reverse side of glass, it won't have the same effect if sprayed on the outside... so I'd just set another container inside of the mercury glass container to hold the water/flowers?
DeleteGoing to be using in my Wedding Centerpieces ,so lovely, Thank You !!!
ReplyDeleteThis is so easy and beautiful. I am signing off and heading to Home Depot. Thanks for the great tutorial
ReplyDeleteI just got married a week and a half ago and used mercury glass votives in my centerpieces. I SO wish I had seen this tutorial before that so I could have done more with it. Still, I will definitely try this for my own candle holders at home. So genius!!!
ReplyDeleteI've now tried two different techniques for faux mercury glass...One that calls for using plain water, and this one. I haven't found the plain water technique to look much like 'real' mercury glass, but this technique offers way better results.
ReplyDeleteI used the vinegar/water solution on a piece that I had done with the previous technique, and it looks more like the real thing now.
I was curious about real candles myself, but I tend to use LEDs (tealights and pillars) so it's not much of an issue for me. I had considered a shot of sealer, on the other hand, once the paint itself is thoroughly dry it shouldn't be an issue anyway.
Thanks again.
This was the closest to Mercury glass tutorials I have ever found, and trust me I have looked at a BUNCH. Thanks for the share. http://onecreativeprocrastinatinggal.blogspot.com/
ReplyDeleteWhat a great tutorial!! I have a few vases I want to spruce up. Time to give this a try. Thanks for sharing! ;)
ReplyDeleteWow, can't wait to give it a try!
ReplyDeleteOn the mercury glass vases....will water / flowers do alright in the finished product without ruining the 'mercury' look?
ReplyDeleteThanks!
I've been trying this on 3 different vases and none of it is working. I let it dry for more than 1 minute in between coats and nothing seems to change - the paint isn't sticking at all. Not to mention there is no way that there aren't any runs regardless of me spraying the approximate 8 to 10 inches away.
ReplyDeleteI'm lost. I was so excited to start this project for my wedding; thank god I did a test run before I ruined 30 vases and candle holders.
I'm so upset because I wanted this to work out. I've tried other blogs tutorials and I just don't get what I am doing wrong.
:/
Why did I never think of this..a friend wants this for her daughter's wedding..gotta do a practice run before I suggest it to her..THE END PRODUCT is certainly worth the effort. glam, glam glam or ous.
ReplyDeleteJonell
Hi Anna
ReplyDeleteLove what you did here , I'm gonna do some some as well, love the look when you have time go like my facebook vintage store page www.Facebook.com/unicoleimpressions I would love your feedback.
I just did this technique on a mirror and am in absolute love with the results! I had a hard time finding it locally (Michael's, Lowe's, etc) but low and behold, WALMART carried it! I was surprised how fast the vinegar worked-almost instantly. Thank you for this, I am sure I will use it again in the future!
ReplyDeleteKellie
Hi, I've done a link in one of my posts to your lovely post and only wanted to ask, if that's ok for you :)
ReplyDeleteThanks
Nicole
I really want to make gold mercury glass. Any suggestions?
ReplyDeleteI really want to make gold mercury glass. Any suggestions?
ReplyDeleteIt's been a long time-but I'm just getting into this! I just love how yours turned out-the ones I (finally!) made don't look as cute, but I'm going to be on the look-out at yard sales. I hope you don't mind if I link to you so everyone (who hasn't made them yet!) knows how it's done.
ReplyDeleteThank you,
Kudzu
www.kudzukween.blogspot.com
WOW! This is incredible. I stumbled on your blog while looking for ways to get THAT SMELL out of old furniture. Well the furniture is going to have to stink a while longer 'cause I need to make some mercury glass. SO GORGEOUS!
ReplyDeleteLove all of your advice!! Going to go and have some fun!! Thank you!!!
ReplyDeleteHey, has anyone used this technique on a mirror? I'm looking to cover part of a mirrored wall, and a different website suggested the "faux mercury" technique to soften the harsh look of a total mirror. Anyone know anything about that? Thanks!
ReplyDeleteWhat a great tutorial!! I have a few vases I want to spruce up. Time to give this a try. Thanks for sharing! ;) www.ranklikes.com
ReplyDelete
ReplyDeleteشركة كشف تسربات المياه بالرياض
كشف تسربات المياه بالرياض
شركة عزل اسطح بالرياض
شركة عزل خزانات المياه بالرياض
شركه عزل مائى بالرياض
شركة عزل حرارى بالرياض
شركة ترميم منازل بالرياض
شركة مكافحة حشرات بالرياض
شركة رش مبيدات بالرياض
شركة تسليك مجارى بالرياض
ReplyDeleteشركة تنظيف بالرياض
شركة تنظيف منازل بالرياض
شركة تنظيف فلل بالرياض
شركة تنظيف خزانات بالرياض
شركة رش مبيدات بالرياض
شركة كشف تسربات المياه بالرياض
شركة تنظيف مجالس بالرياض
شركة جلى بلاط بالرياض
شركة تنظيف واجهات زجاج بالرياض
شركة تنسيق حدائق بالرياض
شركة دهانات بالرياض
شركة عزل اسطح بالرياض
شركة نقل اثاث بالرياض
Phone: 0555618071
website: https://www.alrayyanclean.com
ReplyDeleteشركة كشف تسربات المياه بالرياض
كشف تسربات المياه بالرياض
شركة عزل اسطح بالرياض
شركة عزل خزانات المياه بالرياض
شركه عزل مائى بالرياض
شركة عزل حرارى بالرياض
شركة ترميم منازل بالرياض
شركة مكافحة حشرات بالرياض
شركة رش مبيدات بالرياض
شركة تسليك مجارى بالرياض
شركة كشف تسربات المياه بالاحساء
كشف تسربات المياه بالاحساء
شركة عزل اسطح بالاحساء
شركة عزل خزانات المياه بالاحساء
شركه عزل مائى بالاحساء
شركة عزل حرارى بالاحساء
شركة ترميم منازل بالاحساء
شركة مكافحة حشرات بالاحساء
شركة رش مبيدات بالاحساء
شركة تسليك مجارى بالاحساء
شركة ترميم منازل بالاحساء
Thanks...
ReplyDeleteثبت شرکت
ثبت شرکت
ثبت شرکت
طراحی سایت
ثبت شرکت
طراحی سایت
طراحی سایت
ثبت شرکت
طراحی سایت
طراحی سایت
Thanks...
ReplyDeleteثبت شرکت
ثبت شرکت
ثبت شرکت
طراحی سایت
ثبت شرکت
طراحی سایت
طراحی سایت
ثبت شرکت
طراحی سایت
طراحی سایت
شركة تسليك مجارى بالرياض
ReplyDeleteشركة تنظيف منازل بجدة
تنظيف بالرياض
شركة تنظيف بالرياض
افضل شركة تنظيف بالرياض
شركة وادى الرياض
شركة تسليك مجارى بالدمام
شركة كشف تسربات المياه بالدمام
شركة نقل اثاث بالدمام
شركة تنظيف شقق بالدمام
ReplyDeleteشركة تنظيف بيارات بالدمام
شركة رش مبيدات بنجران
شركة تنظيف فلل بالدمام
شركة مكافحة حشرات بالدمام
شركة تنظيف منازل بالدمام
شركة مكافحة النمل الابيض بالدمام
شركة مكافحة حشرات بخميس مشيط
شركة رش مبيدات بالدمام
شركة مكافحة حشرات بالرياض
شركة مكافحة حشرات بجازان
شركة تنظيف بابها
Mở bán an binh city geleximco hà đông
ReplyDeleteMở bán dự án an bình city hà đông
Giới thiệu dự án an bình city cổ
Giới thiệu chung cu an binh city cổ
Giới thiệu dự án an bình city cổ nhuế
Giới thiệu dự án an bình city cổ nhuế
Chủ đầu tư dự án an bình city phạm văn đồng
Giới thiệu chung cu an binh city cổ nhuế
Giới thiệu chung cu an binh city cổ nhuế
Giới thiệu chung cư an bình city cổ nhuế
Giới thiệu chung cư an bình city cổ nhuế
Giới thiệu chung cư an bình city cổ nhuế
Giới thiệu chung cư an bình city cổ nhuế
Chủ đầu tư chung cư brg park phạm văn đồng
Chủ đầu tư gelexia riverside tam trinh phạm văn đồng
Chủ đầu tư gelexia riverside hoàng mai phạm văn đồng
Chủ đầu tư chung cu gelexia riverside phạm văn đồng
Mở bán chung cư royal park lê văn thiêm hà đông
Mở bán royal park lê văn thiêm hà đông
Ra mắt dự án five star cầu giấy hà nội
Ra mắt palm garden lê văn lương hà
Mở bán chung cu gemek 2 hà đông
Mở bán hong ha tower thinh liet hà đông
Mở bán du an 82 nguyen tuan hà đông
Mở bán lien ke the green daisy hà đông
Mở bán du an flc ha dong hà đông
To buy trustworthy and true LinkedIn Endorsements, Connections and Followers, you can speak to us. This can help you to enhance your professional identity on the internet. link to buy linkedin followers
ReplyDeleteCăn hộ an bình city
ReplyDeleteChung cư an bình city
An bình city
seo bất động sản
biểu tượng cảm xúc
Cách vào facebook
Seo blogspot
Ty ren
Kích tăng
Cây chống
Chốt chữ A
Sâu coppha
Cùm giàn giáo
Teplates blogspot bất động sản
Phụ kiện coppha
Khóa kẹp ty xuyên
Rip templates blogspot
Ty ren
ReplyDeleteTy ren 12
Ty ren 17
hongloveseo.blogspot.com
hình xăm đẹp
ReplyDeletechung cư royal park
canada goose jackets
ReplyDeletemichael kors
ugg boots sale
asics shoes for women
curry 3
rolex watches
ladies cartier watches
los angeles clippers jerseys
timberlands
christian louboutin outlet
new york knicks jerseys
gucci outlet online
coach outlet online
mbt shoes
michael kors outlet online
adidas originals
ugg uk
coach factory outlet
coach outlet
concord 11
boston celtics jerseys
jordan concords
ralph lauren outlet
hermes birkin handbags
cheap air jordans
coach outlet
coach outlet
coach outlet store
moncler coat
jordan retro 4
louis vuitton outlet online
gucci outlet
kate spade handbags
kd 7 shoes
michael kors outlet
ugg boots paris
coach factory outlet online
rolex watches
cheap air jordans
toms outlet
20168.22chenjinyan
chung cư tân hoàng minh Trần duy hưng
ReplyDeleteTân Hoàng Minh Quảng An
Chung cư Tân Hoàng Minh Quảng An
شركة تنظيف بالرياض
ReplyDeleteشركة نظافة بالرياض
شركات تنظيف بالرياض
شركات نظافة بالرياض
شركة تنظيف فلل بالرياض
شركة نظافة فلل بالرياض
شركات تنظيف فلل بالرياض
شركات نظافة فلل بالرياض
شركة تنظيف مجالس بالرياض
شركات تنظيف مجالس بالرياض
شركة تنظيف كنب بالرياض
شركة تنظيف موكيت بالرياض
شركة تنظيف سجاد بالرياض
شركة جلى بلاط بالرياض
شركة تنظيف واجهات زجاج بالرياض
شركة تنسيق حدائق بالرياض
شركة كشف تسربات المياه بالرياض
tai game cho android
ReplyDeleteLife-time Replacement is something which you barely find, as you Buy facebook reviews. Only a few excellent suppliers are offering this. buy facebook 5 star review
ReplyDeleteDự án Vinhomes Giảng VõBa Đình,
ReplyDeleteDự án Vinhomes Nguyễn TrãiThanh Xuân
Dự án Vinhomes Phạm Hùng Cầu Giấy,Dự án Vinhomes Sky Lake Phạm Hùng Cầu Giấy,Dự án Vinhomes Giảng VõBa Đình,
Dự án Vinhomes Nguyễn Trãi Hà Nội, Vinhomes Phạm Hùng Hà NộivàVinhomes Smart City, Dịch vụ Vinhomes Cao Xà Lá
شركة تسليك مجاري بالرياض
ReplyDeleteشركة تسليك مجارى بالرياض
level تسليك المجاري بالرياض
افضل شركة تنظيف بالرياض
تنظيف شقق بالرياض
شركة تنظيف منازل بالرياض
شركة غسيل خزنات بالرياض
افضل شركة مكافحة حشرات بالرياض
رش مبيدات بالرياض
شركة تخزين عفش بالرياض
شركة تنظيف مجالس بالرياض
تنظيف فلل بالرياض
ابى شركة تنظيف بالرياض
Be mindful while you Buy YouTube likes. It might be a fraud. Speak to us for support and information. youtube views
ReplyDelete
ReplyDeleteثبت شرکت
ثبت شرکت
ثبت شرکت
طراحی سایت
ثبت شرکت
ثبت شرکت
طراحی سایت
طراحی سایت
طراحی سایت
طراحی سایت
ثبت شرکت
AGEN QNC JELLY GAMAT MAKASSAR
ReplyDeletemakanan untuk penderita perlemakan hati
cara mengobati asma yang sering kambuh
obat penyakit kondiloma
bahaya penyempitan usus
it's soooo beautiful! Thanks for the tutorial, and for your comments
ReplyDeleteI'm going to try it, because of you!!!
Hunting for honestly created reviews and ratings for android apps? Forget about your anxieties, we provide Android App marketers with impartially created reviews with elegant rating. buying app ratings
ReplyDeleteThis will likewise guarantee that the work is done well and you can stay away from future incidents happening because of an awful repair or utilization of low quality glass. glass company in New York
ReplyDeleteafter you do this can you burn candles inside or is it flammable?
ReplyDeleteYou just need a fans page, and after that order for likes and comments to come. Any time you buy facebook video views from a specified territory, the page will be observed by some others also. purchase facebook video views
ReplyDeleteIs Procuring GEO Targeted Facebook Followers Genuine: An Assessment Learn How Facebook Fans USA Can Strengthen The Business Performance. buying usa facebook likes
ReplyDeleteFor getting an increased publicity for your products or personality, Folks expend bucks to Buy Facebook Comments to very easily get direct exposure instantly. buy fb comments
ReplyDeleteبسم الله الرحمن الرحيم
ReplyDeleteشركة وادى الرياض تقدم بعض اعماله لكى الكل يعرف شركاتنا واننا نعمل من اجل العمل الرائع الذى يصعب على اى شركة اخرة ونبداء بشركة
شركة تنظيف بجازان
شركة تنظيف بجازان من المناطق الصعبة وذاتة حرارة كبيرة جدا ويصعب على اى شركة تبقى فهذا المكان الحار الصعب غير شركة وادى الرياض
شركة مكافحة حشرات بجازان
وكذالك شركة المكافحة اصعب من التنظيف لان المكافحة تحتاج الى المبيدات الازمة ولذالك نستورد المبيدات اللزمة فى رش المبيدات والتى تعمل فى صمت حفاظا على ارواح البشر وخاصة على الاطفال عزيزى العميل انتا فى ايد امنة فلا تشغل بالك ابدا
شركة مكافحة حشرات بخميس مشيط
مكافحة الحشرات فى خميس مشيط الامر الهام الذى يعنبروة العميل صعبا ولاكن مع شركة وادى الرياض تجد كل شىء سهل فلا تعتل اى هم لذالك من المكافحة او رش المبيدات
شركة تسليك مجارى بالدمام
شركة تسليك مجارى من افضل الشركات حتى هذة اللحظة الحاسمة والتى يعرف عن صعوبة هذا الامر فى مجال التسليك لذالك شركاتنا تنفذ اكبر عمليات التسليك حتى الان
شركة تسليك مجارى بالرياض
افضل شركة تسليك مجارى بالدمام
شركة تنظيف نجران
شركة تنظيف بابها
شركة رش مبيدات بجدة
شركة تنظيف منازل بجدة
شركة مكافحة حشرات بمكة
شركة رش مبيدات بمكة
اننا شركة وادى الرياض نعمل من اجل العميل ولدينا مهارات عالية وعمالة خاصة من او على اعلى مستوى تتخيلة فلا تشغل بالك مهما كان الشىء الذى تطلبة من شركاتنا سواء تنظيف بيتك ولدينا كذا طريقة لنوصل للانتا تريدة وسوفا تكون راضى عن شركة وادى الرياض
To find a greater publicity for your facebook account, People expend money to Buy Facebook Followers to conveniently obtain exposure on internet. buy followers on facebook
ReplyDeleteobat radang empedu
ReplyDeleteobat thalasemia minor
cara menyembuhkan fistula
Have you been trying to get good revelation to the talents and professional capabilities on LinkedIn? The best resolution is thru Buying LinkedIn Followers, Endorsements and Connections. buy linkedin endorsement
ReplyDeleteخدمات متطورة وحديثة في العمل استمتع الان بالكثير من الخدمات المتميزه افضل شركة نقل عفش بالمدينة المنورة الان علي اعلي مستوي من التقدم في العمل استمتع الان بالكثير من الطرق الحديثة والمتميزه في شركة نقل عفش بالمدينة المنورة باقل الاسعار .
ReplyDeletehttp://www.forsan-elkhaleg.com/20/Moving-furniture-company-in-Madinah
لدينا الكثير من الاقسام المتميزه لدي الشركة علي اعلي مستوي من التقدم في العمل استمتع الان بالكثير من الخدمات المتميزه شركة تنظيف بالدمام علي اعلي جودة بالمملكة العربية السعودية الان شركة تنظيف بالدمام علي يد متخصصين .
ReplyDeletehttp://abraj-dubai.net/%D8%B4%D8%B1%D9%83%D8%A9-%D8%AA%D9%86%D8%B8%D9%8A%D9%81-%D9%85%D9%86%D8%A7%D8%B2%D9%84-%D8%A8%D8%A7%D9%84%D8%AE%D8%A8%D8%B1/
الان عندما تلاحظ ارتفاع في فاتورة الكهرباء فعليكم اولا التواصل مع كشف تسربات المياه حتي تستفسر علي سبب ارتفاع الفاتورة مع شركة اللويمي سوف تعالج شركة كشف تسربات علي مستوي عالي الجودة استمتع الان بالكثير من خلال موقعنا .
ReplyDeletehttps://www.allowaimy.com
تعرف الان على اكبر شركة تنظيف خزانات بمكة لدينا افضل عروض وخصومات سارع بالتواصل معنا حتى لاتفوتك عروض شركة تنظيف خزانات بمكة فتنظيف الخزانات من اهم الاشياء التى يجد ان تقوم بها بصوره دوريه لان الخزانات تتراكم بها الميكروبات والجراثيم بصوره كبيره فقط يمكنك الاعتماد علينا فى تعقيمها جيدا تواصل معنا الان
ReplyDeleteلاشك ان شركه الحورس تعد افضل شركه خدمات منزليه التي منها (التنظيف/رش مبيدات/مكافحه حشرات/تسليك مجاري/كشف تسربات المياه/تنظيف خزانات..)وعديد من الخدمات التي تلزم البيت او الفله نحن بخدمتك عزيزي العميل.
ReplyDeleteشركه رش مبيدات بالطائف
شركه نقل اثاث وعفش بالطائف
شركه تنظيف بالطائف
شركه مكافحة حشرات بالطائف
شركه كشف تسربات المياه بالطائف
شركه تنظيف خزانات بالطائف
نحن افضل شركة خدمات وصيانه منزليه
ReplyDeleteشركة نقل اثاث بالمدينة المنورة
شركة نقل عفش بالمدينة المنورة
شركة مكافحة حشرات بالمدينه المنوره
شركة مكافحة حشرات بالمدينة المنورة
شركة مكافحة النمل الابيض بالمدينة المنورة
شركة تنظيف خزانات بالمدينة المنورة
شركة غسيل خزانات بالمدينة المنورة
شركة نظافة خزانات بالمدينة المنورة
شركة غسيل شقق بالمدينة المنورة
شركة تنظيف منازل بالمدينة المنورة
شركة غسيل كنب بالمدينة المنورة
شركة شراء اثاث مستعمل بالمدينة المنورة
تسليك مجارى بالمدينة المنورة
التقوى اسطول الخدمات بالمدينة المنورة 0550617882
شركة تنظيف خزانات بالمدينة المنورة
شركة مكافحة النمل الابيض بالظهران
ReplyDeleteمكافحة النمل الابيض
شركة مكافحة الصراصير بالدمام
شركة مكافحة الصراصير بالخبر
شركة مكافحة الصراصير بالظهران
شركة مكافحة الصراصير بالقطيف
مكافحة الصراصير
شركة مكافحة الفئران بالدمام
شركة مكافحة الفئران بالخبر
شركة مكافحة الفئران بالظهران
شركة مكافحة الفئران بالقطيف
مكافحة الفئران
شركة رش مبيدات بالدمام
شركة رش مبيدات بالخبر
I love to see and read these kinds of DIY and home improvement blogs, because it gives the homes some personality. Its almost like the home gets a soul.
ReplyDeleteKhu vực chung cư 148 giảng võ nằm ở 148 Giảng Võ trung tâm của thị xã Ba Đình, một vị trí thuận lợi của thành phố hà nội, ko với 1 Dự án nào có thể so sánh đang được. Mỗi cư dân ở tại đây chỉ mất 2 phút để đến Hồ Gươm, 5 phút tới Hồ Tây, 10 phút ra bến xe Mỹ Đình, 20 phút đến sân bay nội bài, xung uanh là lược đồ hành chính, lược đồ các đại sứ quán, và các trọng điểm thương mại, những khách sạn cao cấp, tầm cần một đôi thôi bạn sẽ thu giãn kiêm toàn một thể tích từ Chung cư Vinhomes Gallery đem đến.
ReplyDeletethị xã Ba Đình là 1 thị xã trọng tâm của Thủ đô nhưng lại diện tích khiêm tốn- nhỏ nhất. Nên tính khan hi hữu về Dự án ở đây cũng tăng lên. Hơn nữa, giấy phép xây dựng cao ốc cao tầng Khoảng dành cho các chủ đầu tư uy tín như tổ chức Vingroup - một công ty lớn của Việt Nam với nhiều chất lượng uy tín cũng như với thâm niên về Công trình cũng như tay nghề từ giới bất động sản hiện nay. Dự án vinhomes giảng võ nằm trên nền tảng khu trọng tâm triển lãm Giảng Võ cũ vốn xưa nay sở hữu long mạch phải chăng cho việc buôn bán và kinh doanh. bên cạnh đó vị trí quận Ba Đình là một thị xã quy tụ các cư dân sở hữu trình độ dân trí cao, an ninh tốt, với phổ biến thương gia cũng như người nước ngoài định cư và sinh sống
شركة مكافحة حشرات بخميس مشيط
ReplyDeleteشركة تنظيف
خزانات بالجبيل
chungcuthekparkhadong.com
ReplyDeletewww.coppha-viet.com/
azaseo.blogspot.com/
Insect Control Company
ReplyDeleteشركة مكافحة حشرات بالرياض
Cleaning Company in Riyadh
شركة تنظيف بالرياض
Furniture storage company
شركة نقل عفش بالرياض
Furniture transfer company in Riyadh
شركة تخزين عفش بالرياض
The best services provided by Al-Amjad Company, all you have to do is contact us on our numbers shown when opening the site:www.alamgad.net
This comment has been removed by the author.
ReplyDeletehttps://tatiomax.vn/
ReplyDeletehttp://tatiomax.com.vn/
Deletehttp://azwhite.org/
شركة ابيات الخليج للتنظيف
ReplyDeleteYou will obtain all the invested cash back in terms of profits as well as your revenues will be surge greatly with time due to the fact that you need not to purchase great deal numerous options for marketing your brand, from now on! buying usa facebook likes
ReplyDeleteyeezy boost
ReplyDeleteadidas yeezy
fendi handbags
adidas nmd
birkenstock outlet
pandora jewelry
longchamp outlet
pandora
birkenstock shoes
red bottoms
mt0706
ReplyDeleteالان يمكنكم الاستمتاع بافضل الخدمات المتميزه والمتطورة استمتع بالكثير من الخدمات المتميزه شركة مكافحة حشرات بالخبرعلي اعلي جودة استمتع بالكثير من الاعمال المتطورة والحديثة شركة مكافحة حشرات بالدمام علي مستوي متقدم في المملكة .
افضل الخدمات المتميزه والمتطورة في العمل استمتع مع شركة مكافحة حشرات بمكة علي اعلي جودة استمتع مع شركتنا بافضل الخدمات المتميزة والمتطورة في العملى استمتع مع شركة ابادة حشرات بمكة علي اعلي جودة .
ReplyDeleteالان في جمهورة مصر العربية علي اعلي مستوي من التميز استمتع بالكثير من الخدمات امتطورة والحديثة في العمل رقم توكيل كاريير بافضل الخدمات الحديثة والمتطورة في العمل صيانة كاريير علي مستوي عالي من التقدجم في العمل
ReplyDeleteتجهيزات علي مستوي عالي من التقدم في العمل علي اعلي جودة في العمل تجهيزات فنادق علي اعلي مستوي من التميز في العمل استمتع بالكثير من الخدمات المطورة والحديثة في العمل تجهيزات مطاعمعلي اعلي جودة من العمل .
ReplyDeleteشركة تنظيف بالجبيل
ReplyDeleteشركتنا الشركة الاولي في مجال التنظيف حيث ان شركتنا لديها افضل عماله مدربه علي اعلي جوده واعلي
وافضل المواد العالميه التي تستخدمها الشركه
حيث ان شركة تنظيف بالجبيل لديها فريق عمل مدرب علي اصعب انواع البقع الصعبه التي تواجهه كل ست بيت اثناء تنظيف المنزل
فلا داعي للقلق بعد الان شركة تنظيف بالجبيل لديها خبره تتعدي العشرون عام مما تجعلها رائده في مجال التنظيف
كما ان شركة تنظيف بالجبيل
تستخدم مواد ليس لها تاثير ضار علي صحتك او علي صحه اسرتك
حيث ان الشركة حاصله علي موافقه من وزاره الصحه
كما تقدم الشركة خدمات تنظيف السجاد والموكيت الكنب باعلي جوده وبتقنيات حديثه مثل تقنيات البخار
التي تجعل السجاد\ والكنب والموكيت والمجالس وكانها جديده
ككما تقوم الشركة بتنظيف المجالس المصنوعه من الجلد بافضل انواع الزيوت العالميه التي تجعلها نظيفه
وتضيف لها لمعان وتزيل اثار احتكاك الاجسام بها واثار تعرق جسم الانسان بها
فلا داعي للتردد شركتنا الاولي والافضل في مجال التنظيف تقدم الشركه افضل العروض وافضل الخدمات التي تناسب جميع العملاء
باقل تكاليف واعلي جوده وافضل حدمه فالشركه تتميز بالدقه والسرعه في تاديه خدمه التنظيف
كما يمكنك التعاقد مع الشركه للتتنظيف اسبوعيا او شهريا باقل التكليف ما علكي سيدتي الا الاتصال علي شركة تنظيف بالجبيل
واتركي لها زمام الامور
شركة تنظيف مسابح بالرياض
ReplyDeleteالمسابح شئ مهم لا يمكننا الاستغناء عنه وخصوصا في فصل الصيف التي تكون درجه الحراره به عاليه
يقضي بعض من الناس وقت كبير في المسابح لتخلص من درجه الحراره العاليه ولالحصول علي نسبه من الرطوبه
لذلك لابد من الاهتمام بتنظيف المسابح اول باول للتخلص من الشوائب والاتربه والحفاظ علي المياه
وحتي لا تكون سبب في نقل الامراض والفيروسات لذلك لابد من تنظيفها اول باول للتخلص من الشوائلب والطحالب والاوساخ التي تنتج من جسم الانسان
وايضا من اشاعه الشمس المضره فاذا لم تقومي بتنظيف المسابح اول باول فقد تكون مصدر كبير لانتقال الامراض والفيروسات من جسم الي جسم
وقد تسبب العيد مكن الامراض التي نحن في غنا عنها فلا تتردي سيدتي في التعامل نع شركة تنظيف المسابح بالرياض
حيث ان شركتنا يوجد لديها فريق عمل مدرب باعلي جوده
كما ان الشركة تقوم بتفريغ المسبح من المياه بالكامل ثم تقوم باالعمل علي تنظيفه باعلي جوده وبافضل المواد التي لا ضرر لها علي صحتك كما انها حاصله علي موافقه من وزاره الصحه كما ان لالشركة تستخدم مواد امنه لتطهير المياه كما يمكنك التعاقد مه شركتنا بشكل اسبوعي او شهري لتنظيف المسابح والحصول علي اعلي جوده
كما ان شركتنا تقدم افضل الاسعار التي تناسب جميع عملائها كما تقوم الشركة بالخدمه بافضل جوده ودقه
ReplyDeleteتقدم شركه كشف تسربات المياه بالقطيف
الي عملائها افضل خدمه في مجال كشف التسربات بافضل جوده ممكنه جيث ان شركتنا الاولي في مجال كسف التسربات ولها تاريخ كبير في هذا المجال
كما ان الشركة تقوم بخدمه كشف التسربات دون الحااجه الي تكسير الحوائط او السيراميك المياه لديك ضعيفه بسبب تسربات المياه فلا داعي للانتظار
حيث ان هذه المياه توثر علي منزلك وقد تكون سبب في انهيار ذلك المنزل وزياده الرطوبه بالحوائط والجدران مما يجعلها تتلف الطلاء
وايضا تساعد علي انتشار الحشرات بشكل كبير وتساعد علي تكاثرها
وانتشارها داخل المنزل فلا داعي للانتظار لا عليكي سوء التعامل مع شركة كشف تسربات المياه بالقطيف
واتركي لها زمام الامور فالشركة تتميز بالدقه والامانه والسرعه العاليه في تاديه الخدمه كما
ان الشركه يوجد لديها فريق عمل مدرب علي ايد خبره في مجال كشف التسربات ومدرب علي افضل المعدات التي لا تحتاج الس تكسير لكشف مكان التسربات شركتنا
تسعي ان تكون الاولي دائما في مجال كشف التسربات لذلك تعمل علي تطوير الالات والاساليب التي تستخدمها اول باول للحصول علي اعلي جوده في مجال كشف التسربات
وحتي تكون لاولي والافضل دائما لا عليكي سيدتي سوء ان تتركي لها زمام الامور
ولا داعي للقلق علي منزلك مع شركة كشف تسربات المياه بالقطيف
Be cautious as you Buy YouTube Views. It may be a scam. Contact us for help and guidance. buy youtube subs
ReplyDeleteThanl you, i love it! tải liên quân mobile đài loan lên đồ Murad
ReplyDeleteThis comment has been removed by the author.
ReplyDelete