


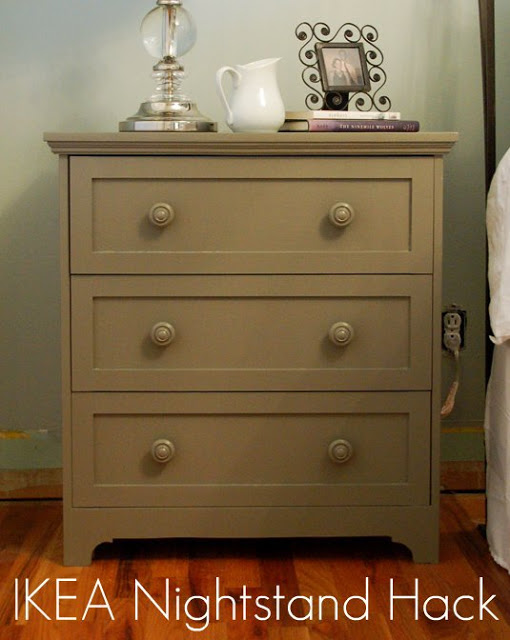
Yesterday I showed you my fancy new nightstands, and today I'm outlining the steps I took to construct and finish them. Buckle up, because here are the steps to make your own!
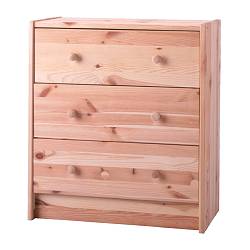
Step 1: Assemble RAST nightstand per included instructions.
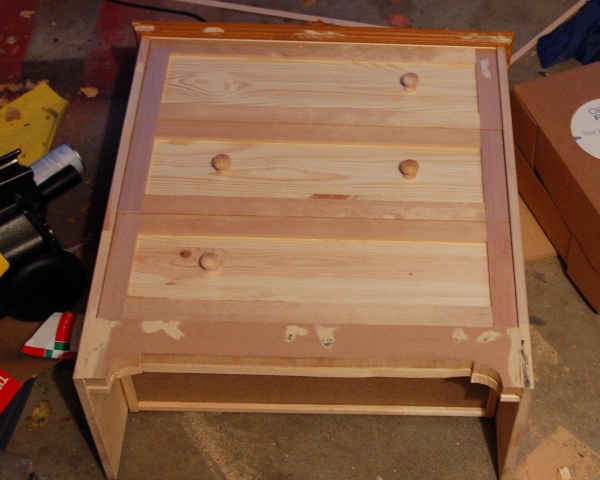
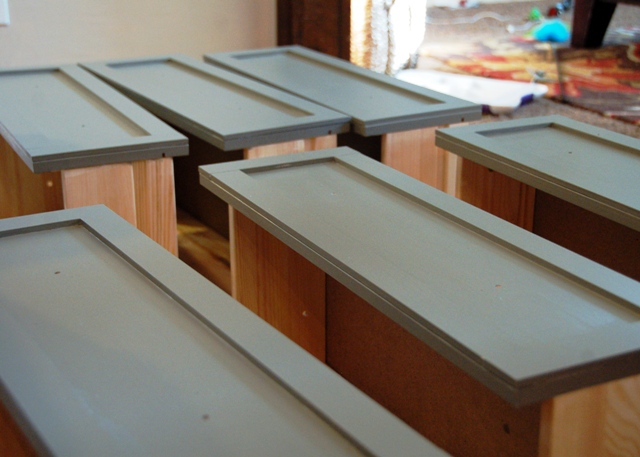
Step 2: Cut and glue lattice on drawer fronts.
I purchased a few sticks of 1/4" hemlock lattice at my local HD. It's nice and smooth, great for crafts - if you can find it. It took me forever to locate it in my store even though it was just in the regular moulding department... I struggle. I cut it into 7 7/16" lengths and 20 3/16" lengths and attached it with wood glue. Instead of clamps, I used heavy cans of food to hold the lattice in place until it dried - we're super professional over here.
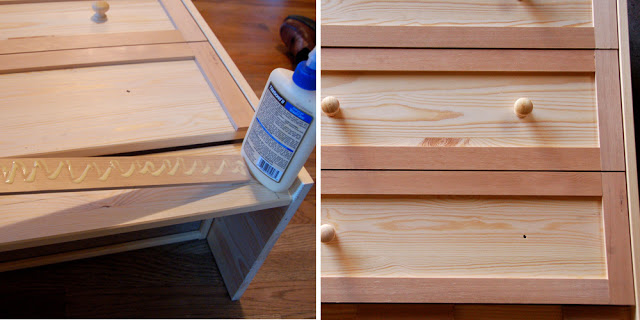
I decided against mitering the corners after looking at several nightstands I liked and noticing this style of joint on their drawer fronts. I'm a total copy cat.
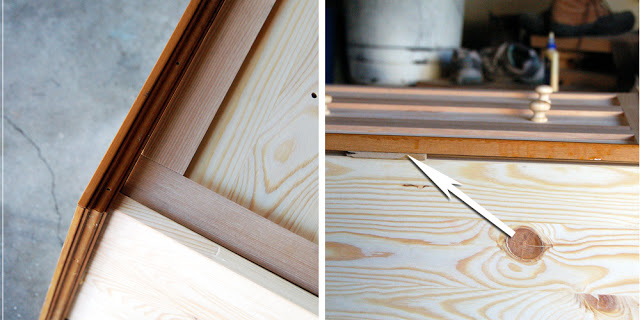
Step 3: Attach decorative moulding to top
Next I used small moulding (removed from various places in my 1960 house, layers of old yellowed poly included free of charge!) and trimmed out the top of the nightstands. I used a thin piece of scrap lattice to fill and reinforce the gap along the front created by the nightstand's wider side pieces.
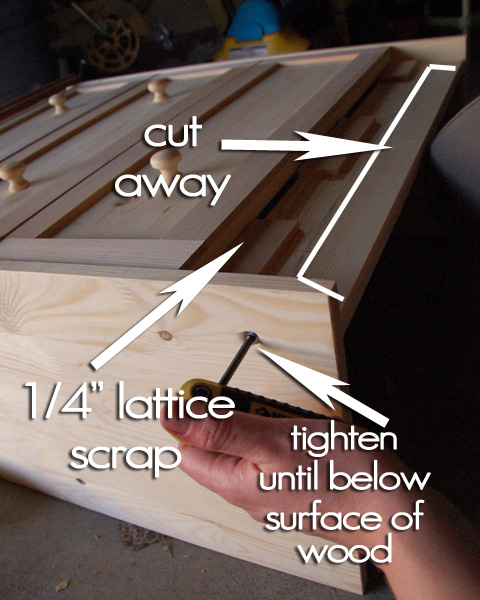
Step 4: Details!
- Tighten any visible screws until they suck up into the wood so you can fill them with wood putty and sand them flush.
- Cut away a rough opening in the toe kick-thingy with a jig saw.
- Add a few pieces of scrap lattice to the top of the toe kick so that a 3/4" piece of MDF placed on top of them will sit flush with the front of the nightstand.
Step 5: Cut out decorative front piece with jig saw
I drew a template, traced it onto two pieces of 3/4" MDF pieces that were each 23 1/8" x 3 13/16" and went at it with a jig saw. Mine has a little twisty knob that helps make sharp corners, and I just tried to get them as close as possible. Mine are definitely not perfect - I used my orbital sander with rough grit sandpaper to smooth them out and help conceal any boo-boos. After they're done, attach them to the nightstands with glue and nails through the sides and where the 1/4" lattice scrap is.
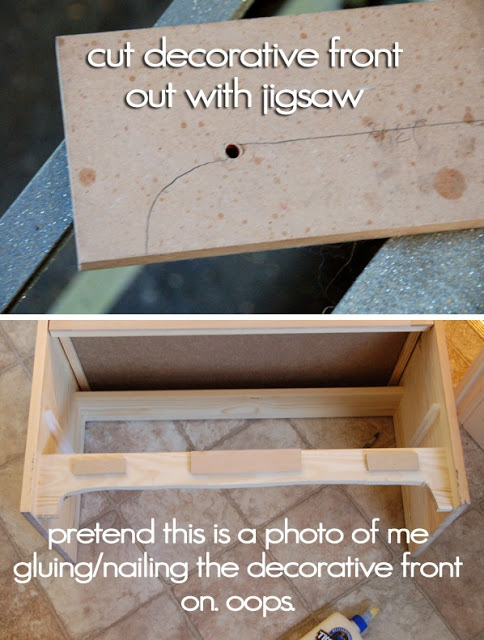
One quick tip: I stood the nightstands up when I fit the decorative front piece on to make sure it was flush with the bottom of the nightstand and to help prevent any issues with the bottom drawer opening if it was placed too high.
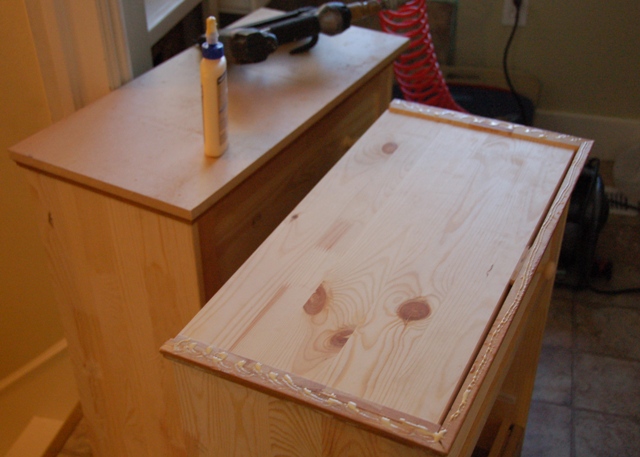
Step 6: Attach table tops
Cut a piece of MDF a little larger than the size of the nightstand + decorative moulding. My tops were 26" x 12 3/4". Attach them with glue and nails.
Step 7: Caulk if you want - I only caulked between the table top and the strip of moulding, I purposefully left the tight joints on the drawer fronts as is. Also fill any nail holes and seams with wood putty, then sand smooth.
Step 8: Prime with oil-based primer (remember, it's MDF and raw wood. Oil-based!)
Step 9: Finish with paint of your choice.
I used Martha Stewart paint in Mushroom (love) and a little bit of Floetrol, an additive that helps minimize paint and roller lines in latex paints (there's also something called Penetrol for oil-based paints, FYI)

I used an angled brush and a small high-density foam roller to apply two coats of paint.
After the paint dried, I applied a non-yellowing water-based poly with a foam craft brush -- do not use a roller as that will result in bubbles. Promise. Coat an area with poly and then work your way back across the entire surface, pulling in one direction to help minimize any lines.
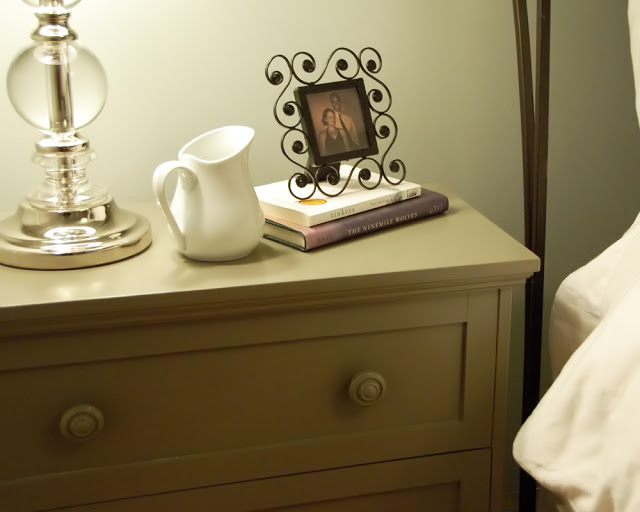
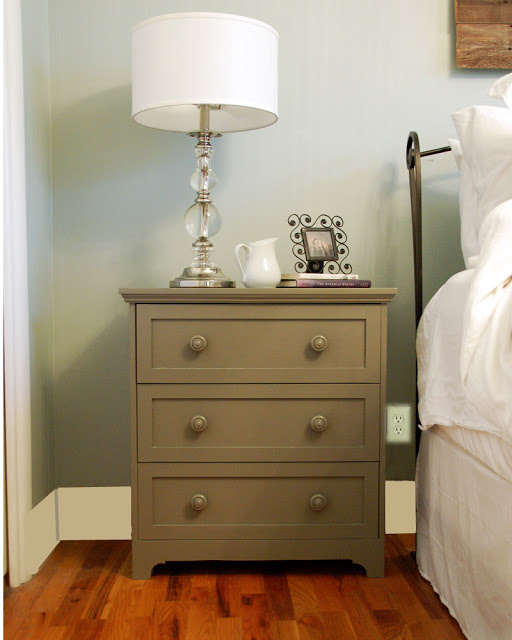
Let that dry, add some knobs and voilà! You have a nightstand. Or two!
Hopefully it doesn't take you 4 months like it took me! I took my time to uh...make sure... everything was perfect. Or something.
Updated to add: Apartment Therapy already featured these nightstands! A couple observant people over there commented on the lack of baseboard/outlet cover in an otherwise nice photo (y'all know how I struggle with baseboard... le sigh.) So, for fun, I made up a pretend photo so we can all imagine it's done and everything's pretty-like.
Ahh. Much better, right? If only it was really that easy!
Sharing at My Uncommon Slice of Suburbia, Home Stories A to Z, Thrifty Decor Chick


Between this hack and the one on A Charming Nest I am completely motivated and going to be a copy cat. Off to Ikea I go.
ReplyDeleteThat looks so great and I would never have guessed it was originally an idea piece! Really like the paint color too.
ReplyDeleteIsn't it nice to know that you've created a unique piece of furniture? Under the circumstances four months was pretty darn quick :-)
ReplyDeleteLove it!! Thanks for the how-to! The cut-out at the bottom is extra nice and takes away some of the "clunkyness" of them. Is it ok to ask how much each nightstand came to after trim+paint, etc. ?
ReplyDeleteHmmmm. Nice.
ReplyDeleteIt looks great! I love the colour choice!! You would never guess that it started out as a boring little Ikea piece...
ReplyDeleteWow . . . I LOVE IT!!! you have inspired me to think outside the box. Love your blog :)
ReplyDeleteYou are a genius! I have to buy a jigsaw now!!!
ReplyDeleteOk so floetrol and a foam roller - mental note - thanks!
ReplyDeleteI love it! I think I'm going to do this in my bedroom. I love that the knobs are the same color as the nightstand. Did you just paint them with a brush? Seems like a messy job that would never be perfect.
ReplyDeleteOh my goodness, these are GORGEOUS! Just my style. I may copy this idea! Congrats on getting featured too!!
ReplyDeleteGorgeous! You did a great job! I think my failure would be the "details" part!
ReplyDeleteVery cool little hack! Love how it turned out! :)
ReplyDeleteKate (house185) - about painting the knobs, I did use a brush... I stuck the knobs (with screws attached) through the top of a box to keep them upright, and painted them by hand after spray priming them. It did take a little while, but because of the floetrol I added they smoothed out nicely :) Hope that helps!
ReplyDeleteI need skills. I'm so impressed!!
ReplyDeleteI'm crazy inspired by this project...this is exactly what I have been looking for in the master bedroom! I am so excited by your brilliance. And I totally cracked up with your fake baseboard and outlet. You funny lady, you. :)
ReplyDeleteHow soon can I go to Ikea!?!
ReplyDeleteI have been searching for the perfect, aka cheap, nightstand solution for YEARS!!! I am so in love with this idea!!!
Beautiful!
ReplyDeleteGorgeous! What a difference -- you are one handy gal. :)
ReplyDeleteVisiting from Tuesdays Treasures.
super cute..looks completely different!
ReplyDeleteI recently hacked a rast dresser for my son, but this one is definitely more elegant. Beautiful job!
ReplyDeleteWOW this is fabulous!! Love the color you picked too, I will be featuring it tomorrow.
ReplyDeleteXO
Kristin
This is so great Anna! Awesome tutorial and what a great upgrade to a basic nightstand. Your end result, including the awesome color, is, well, awesome!! Congrats on the feature at MUSOS. I'm so happy to be your newest follower!
ReplyDeleteKarah
Thanks you so much!
ReplyDeleteWonderful project!!!
ReplyDeleteThis looks amazing! I'm still finding it so hard to find affordable nightstands that are the right dimension. This seems like a lot of work, but I think I can handle it. One quick question - did you add a new top piece too? I can't seem to find that info in your post but it looks like it from the photos.
ReplyDeleteOh my word!!! Your nightstand is lovely! Where did you find those darling knobs? I must have them for my Tarva hack to come...
ReplyDeleteSaw your nightstands on Pinterest and made my way to your post. Love the RAST hack and love the rest of your site too! I'll definitely be coming back to see more of your projects. Thanks for the great how-to.
ReplyDeleteYou are a genius! Love how it turned out! :)
ReplyDeleteThis is awesome! I'm so thrilled to have found this site. I love doing things for my grandchildren and this site is all around awesome! Thank you from a 70 yr old granny!
ReplyDeleteI admire your brilliance. Very classy piece of furniture, who would ever know there's a rast in there?
ReplyDeleteI admire your brilliance. Very classy piece of furniture, who would ever know there's a rast in there?
ReplyDeleteLovely! Thanks for the step by step- can't wait to try it!
ReplyDeleteThanks for the inspiration! I think I might try the bunk beds at some point too.
ReplyDeleteWow, this looks really good! I wish I had the immagination to come up with things like this! But anyways thanks for letting me steal your ideas :D
ReplyDeleteLOVE your design!
ReplyDeletethe knobs are gorgeous!
did you get these at home depot too?
kathy
LOVE your design!
ReplyDeletethe knobs are gorgeous!
did you get these at home depot too?
kathy
Was the side of the nightstand such that when you added the lattice it was flush? Or did you alter something else to make that happen? It looks like a perfect match, but I am not sure if that was intentional or accidental. Looks great!
ReplyDeleteI'm struggling with the moulding part for under the new top...you said found yours around your house. Any idea what the measurements were and where I could find something similar? Both HD and Lowes doesn't seem to have anything I could use unless I'm just not thinking about it the right way. :-/ In the middle of my build and stuck.
ReplyDeleteI would just look for small decorative moulding. Here's a link to some examples, I think the one I used is actually included: http://www.homedepot.com/b/Building-Materials-Moulding-Millwork-Moulding/Cove/N-5yc1vZara1Z1z135ps
DeleteHi, I really like the color you used. I cannot find anything called Mushroom from Martha Stewart. Any information you can provide would be appreciated. Beautiful night stand.
ReplyDeletebài viết rất thiết thực, cảm ơn vì đã chia sẻ, tôi đã chia sẻ cho bạn và đồng nghiệp của tôi cùng học hỏi :)
ReplyDelete------------------------------------------------------------
vinhomes giảng võ - vinhomes gallery
We mentioned different types of floors above. Some of them are the conventional floors, whereas there are some others that are the modern innovations. But, in all these flooring types, the conventional methods are more or less used. Low Profile Floor
ReplyDeleteGarden sheds usually incorporate shelves for storing pots, garden and yard tools. You can even put in potting benches. Extras such as drawers and bins for storage of small hand tools, gloves, etc are really useful. woodworking plans
ReplyDeleteArticulately written and well figured out.
ReplyDeleteInstaport
Amazing! Congratulations. I'm at my weight loss journey also. I lost 30 pounds and have 30 more too loss. Thank you for your story. God bless z day hearts of heroes hack
ReplyDeleteWhat a lovely surprise, thank you. The hack is 100% legit, at least in my case, worked perfect. Just follow the instructions carefully, and voila, works perfect.mini golf king hack 2019
ReplyDeleteH MY GOD I LOST 3 INCHES FROM MY WAIST. I AM TOO SHOCKED TO BELIEVE IT AND I LOST WEIGHT TOO. DON'T THINK TWICE BEFORE DOING IT JUST DO IT.
ReplyDeletelandlord real estate tycoon hack
t's actually a myth that you can lose weight from particular areas by "targeting" them, according to current exercise textbooks and professors. You simply need to lose weight. What you can do though is increase muscles within that area to look aesthetically better, which, when combined with weight loss, makes it seem like those areas were targeted for weight loss.
ReplyDeletemarch of empires hack
seaport hack this has worked perfectly for me, it's easy and fast to do and it adapts very well to the device where it is done, thanks for sharing it
ReplyDeletezombie gunship survival hack Ur editing is next level man. I hv also seen brawl stars by ea. But this is fantastic
ReplyDeletemini golf king hack I am a BIG FAN of getting up at 5AM. It's perfect for quiet time, CREATIVE time and connection time. I hope to make videos as GREAT as yours in the near future. (I just created my first 7 day EPIC LIFE challenge
ReplyDeleteThank you for this, definitely will try out some of these just to try getting a summer body for our August beach trip!
ReplyDeletewar machines hack
After a year, analysing all kinds of diets, finally understood that we should eat normal foods that are grown locally from our native home town... no packed or imported foods. This is the trick but nobody ill like this comment!! factory inc hack
ReplyDeleteit's working fine for me! Thank you for sharing this with us dominations hack
ReplyDelete