


All right, guys! Time to build a table, woohoo! Who else is totally excited????
Oh... just me? Hmm.
In all honesty though, I really appreciated all your kind comments about the shortish legs on my sofa table, and I'm still working on making peace with it. In the meantime, I wanted to start getting some instructions up so that if any of you wanted to wanted to make your own Ikea Hemnes-inspired table, you could figure out how to do it here.
Unfortunately I don't have any fancy CAD program to make a polished plan, but I'm going to do my very best to make it as easy to understand as possible. Feel free to overwhelm me with questions if you need clarification.
So without further ado...
Sofa Table Plan
So without further ado...
Sofa Table Plan
Material list:
1 sheet 3/4" MDF (4'x8')
2 - 1x2, 6-ft long
4 - 1x3, 8-ft long
2-inch nails for your nailer (I used an 18-gauge brad nailer)
1 1/4" nails for nailer (for the trim in part 2 only)
wood glue
2-inch nails for your nailer (I used an 18-gauge brad nailer)
1 1/4" nails for nailer (for the trim in part 2 only)
wood glue
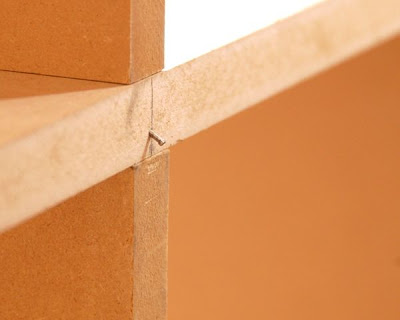
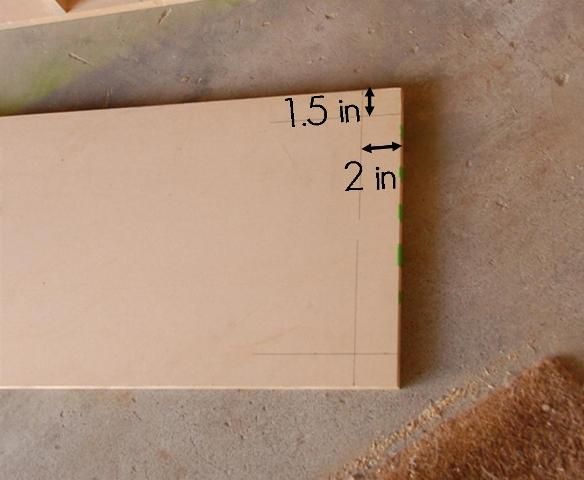
Note: If you buy 1x2 and 1x3s that have the sharp corners it's going to be easier to hide any seams. I think these boards were a higher grade and cost a bit more than the ones I've used before with the rounded corners, but it's going to make a nicer finished product. I think it was definitely worth the extra cost.
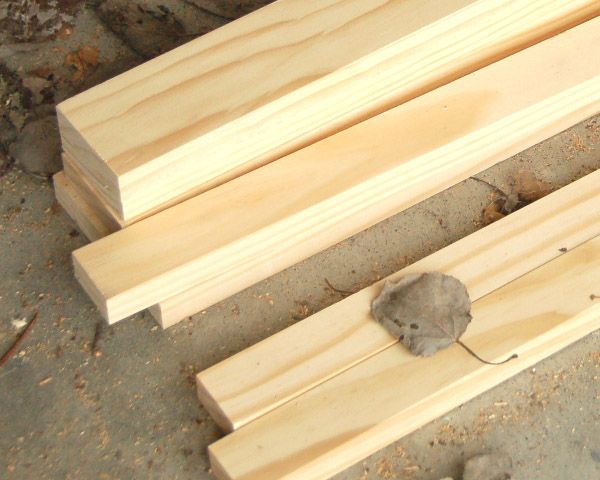
(See the sharp corners?)
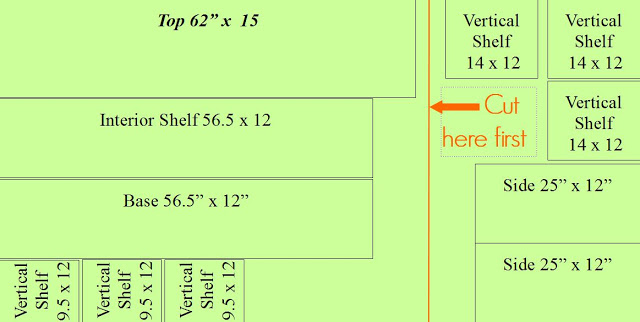
Cut list:
(1) 62" x 15", MDF - top
(2) 56.5" x 12", MDF - interior shelf & base
(3) 9.5" x 12", MDF - small cubby dividers
(3) 14" x 12", MDF - large cubby dividers
(2) 25" x 12", MDF - table sides
(4) 1x2x28" (If you want your legs an inch or two longer I think it would be fine)
(4) 1x3x28" (again, make these longer if you want your legs longer)
(4) 1x3x54.5"
(4) 1x3x9"
Note: Each 8' long 1x3 will give you a 28-inch, 54.5-inch and 9-inch piece.
I'm including a diagram I made of how I had my brother-in-law cut the MDF (remember how I'm afraid of table saws?) -- we got all the needed MDF from one sheet, but it was close in a couple spots (remember, each sheet is actually 49" x 97" inches so you do have a teensy bit of room for saw cuts). Use your own discretion and be smart!
Instructions
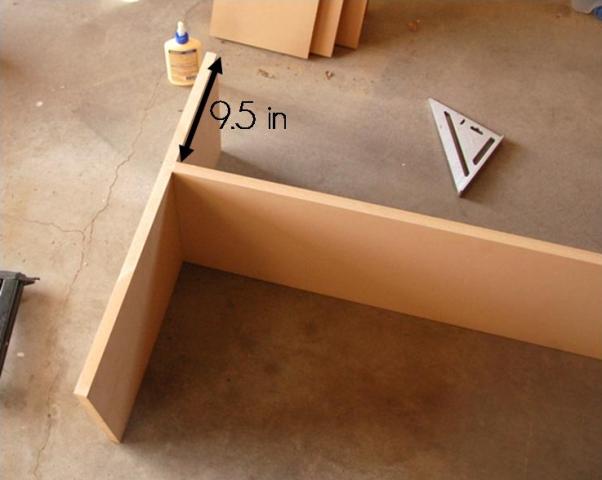
Step 1 - (a) Using a nail gun and wood glue, attach the 56.5" interior shelf to both of the 25" sides of the table.

(b) Do the same with the 56.5" base (yep, the photo below is flipped) to create the start of the larger, bottom cubbies.


Step 1 - (a) Using a nail gun and wood glue, attach the 56.5" interior shelf to both of the 25" sides of the table.
(b) Do the same with the 56.5" base (yep, the photo below is flipped) to create the start of the larger, bottom cubbies.
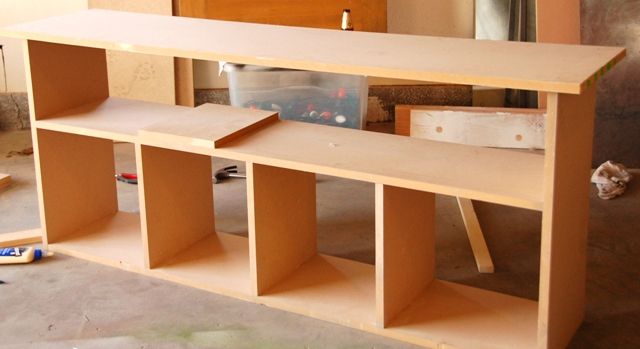
Step 2 - (a) Find the middle point of the base or interior shelf, and center your first 9.5" vertical divider on that line (orange line in diagram below is center of base). Make sure it's straight, then use wood glue and nailer to secure the divider to both the base and the interior shelf.
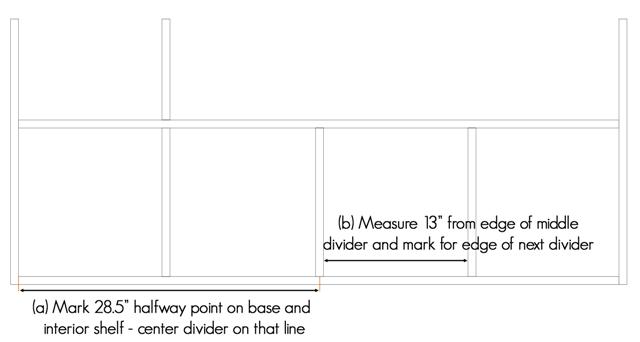
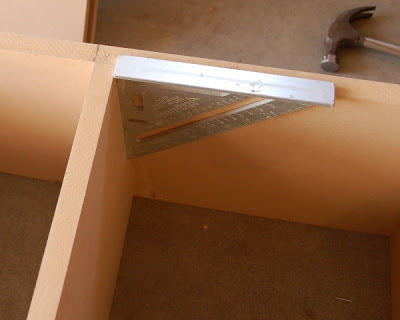
(b) Measure 13" from the edge of your newly secured center divider and mark a line for the next divider. Make sure it's straight (tip: use a speed square as in photo below) and secure with wood glue and nailer through both the base and interior shelf.

Step 3 (a) - Mark the underside of the top pieces to help you center on the table.
(b) - Apply glue to the top ends of the table sides, flip the tabletop onto the base, center it using your marks on the underside, and attach it with a nailer. Do not worry about the fact that the table sags a little in the middle and it wobbles from side to side. All in good time, friends. All in good time.
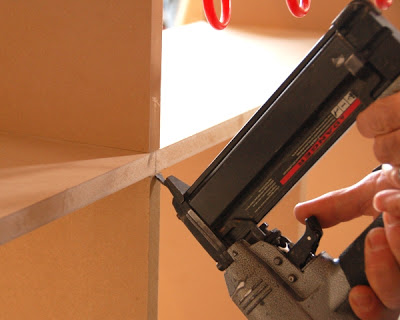
Step 4 - Attach the shorter, 9.5" dividers, using the measurements you used for the larger dividers. Take extra care to line them up with the bottom dividers to create a clean line. Don't forget to apply glue before you slide them in! Nail from the tabletop, and up at an angle from below on either side (that's called 'toe nailing', heehee).

(PS. Not my hands! Stand-in toe nailing hand model used.)
Don't be worried if you're left with this:
You can just cut the nail with wire cutters and set it with a nail setter. After you use wood putty you'll never even know it was there!
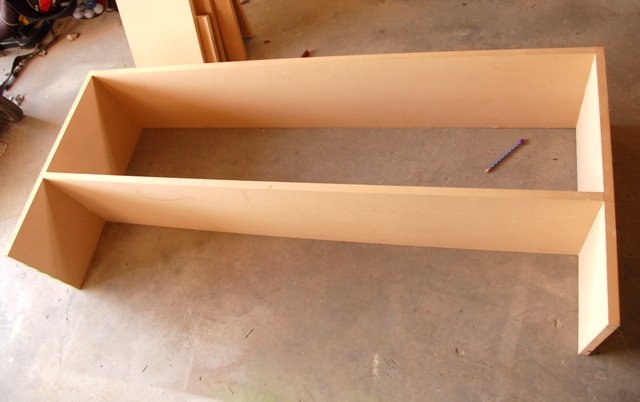
After all those steps, you'll have something that resembles this...
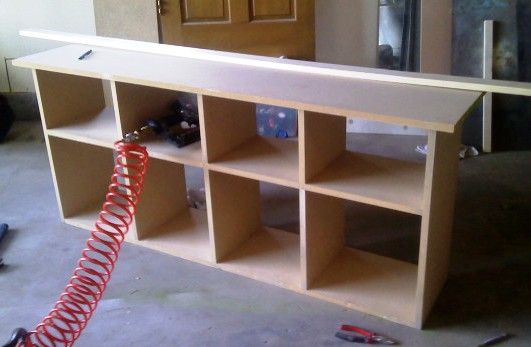
... and it will still wobble. Like I said, all in good time. Stay tuned for part 2 later this week!
Update: Check out part 2 of the sofa table plans!


I'm going to have my dad cut the MDF for me next week to make this project! Thanks for the great tutorial - I think I can actually do this. :)
ReplyDeleteJust found this on Pinterest! Thanks! I love it, I want to make one! -Anne
ReplyDeletethis is going to be my next project, I have just the space for it, Thank you so much for the directions and pics.
ReplyDeletecheryl
Just thought i would let you know that your measurements have to be off. On the side of the MDF that is 4', your measurements do not add up to 4'. They add up to 4.5'. We built the table but we had to modify the design because it wouldn't work with the 4'x8' sheet.
ReplyDeleteIt actually adds up to 48.5", and the width of the board is 49" so it is cutting it close, but there is just enough room with saw cuts :)
ReplyDeleteThe 15" wide table top + 12" wide base shelf + 12" wide interior shelf + 9.5" tall dividers = 48.5" :) You just have to run those last 3 dividers longwise, because they're 9.5 x 12 and will only fit one way :)
Hey there! Just wanted to let you know we featured you in our Favorite Find Fridays post over at Whimsically Homemade. We used one of your pictures. If that's a problem let us know and we'll remove it immediately. Thanks for your great inspiration!
ReplyDeleteThe size of the cast iron table saw top is also important: the larger the better. When you are sawing large objects, you want as much flat table surface as you need to support the work piece flat to the blade for accuracy.https://simplehandyman.co.uk/best-jigsaw-saws-uk-reviews/
ReplyDeleteThat’s really amazing and extraordinary blogs & can help those who get issues in searching this type of information. best sofa futons
ReplyDeleteI know your expertise on this. I must say we should have an online discussion on this. Writing only comments will close the discussion straight away! And will restrict the benefits from this information. living room furniture
ReplyDeleteQueenbet bahis sitesi Curacao lisansı ve Betconstruct alt yapısını kullanmaktadır. Ödemede sorun yaratmayan Queenbet bahis şirketi canlı bahis oran çeşitliliği ile biliniyor.
ReplyDeleteTempobet bahis sitesi 2007 yılından beri Türkiye'den üye kabul etmektedir. İngiltere merkezli Tempobet, İngiltere Premier Lig ve İspanya La Liga'ya sponsorluk yapmaktadır.
ReplyDeleteArtemisbet bahis sitesi en yüksek spor bahisleri oranları sunmaktadır. Artemisbet bahis şirketi, EveryMatrix alt yapısı ile 30 dakikada ödeme alabileceğiniz gibi canlı bahis imkanı da sunmakta.
ReplyDeleteBetpara bahis sitesi Betconstruct alt yapısını kullanmaktadır. Spor bahisleri, canlı bahis, casino ve canlı casinoda güvenilir ödeme için Betpara bahis sitesine üyelik açabilirsiniz.
ReplyDeleteCasinometropol Bets10 güvencesi ile casino oyunları sunar. Casino ve canlı casinoda en seçkin oyunlar için Casinometropol bahis sitesini tercih etmelisiniz.
ReplyDeleteCasinomaxi giriş adresini kullanarak online casino oyunlarına en hızlı ulaşın. Casinomaxi bahis sitesi güvenilir kaçak casino bahis sitelerinden bir tanesidir.
ReplyDeleteGüvenilir kaçak bahis sitesi İlbet ile anında ödeme ve limitsiz bahis keyfini doyasıya yaşamaya hazır olun. İlbet
ReplyDelete