


Today I'm going to finish the instructions for the sofa table that I just built, so bear with me if you have zero interest in constructing furniture. In the interest of keepin' it real, I don't have crazy amounts of interest myself; I just like to save money! I also look at building things like I'd look at a giant, 3D puzzle. It sounds overwhelming before you start, but it's just a matter of taking it one step at a time. If you've never given it a try you should consider it.
If you're looking for part 1 of these instructions, go here.
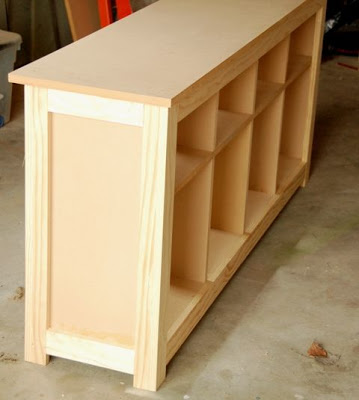
If you recall, when we last saw our heroine at the end of part 1, the bones of our project still wobbled from side to side a bit. This is because part 2, the trim, is what is actually going to hold the table together as a solid piece.
Here's a recap of the cuts we'll need for this part of the plan:
(4) 1x2x28" (If you want your legs an inch or two longer I think it would be fine)
(4) 1x3x28" (again, make these longer if you want your legs longer)
(4) 1x3x54.5"
(4) 1x3x9"
scrap (I used a random bit of 2x6 from the bunkbed I made my kids last summer)
Instructions
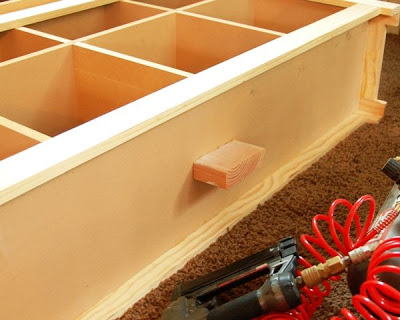
Step 1 - (a) Using glue and 1 1/4" nails, attach one of the 28" lengths of 1x2 to the side of the table, making sure it is flush with the front as in the photo below:
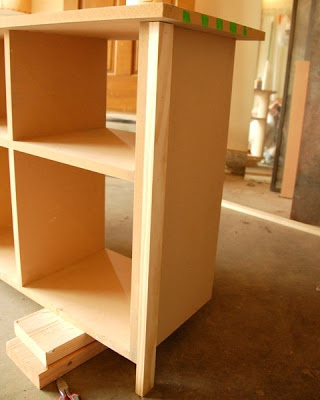
(b) Spread glue over the front edge of both the MDF and the 1x2. Attach a 28" length of 1x3 to the front, keeping it flush with the 1x2 in order to create the appearance of a solid leg. Make sure to nail the 1x3 into both the MDF and the 1x2, just in case. (I'm a better-safe-than-sorry kind of girl, and we're going for strength here, people!)
Go around the table, repeating this step for the other three legs.
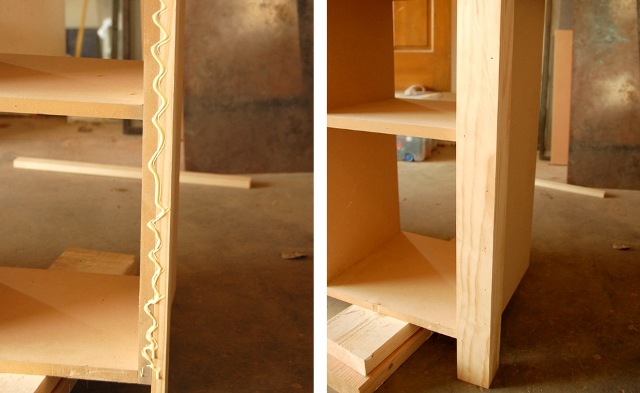
Here's a side view of what it'll look like:
(left side is finished, right side still needs the front 1x3 attached)
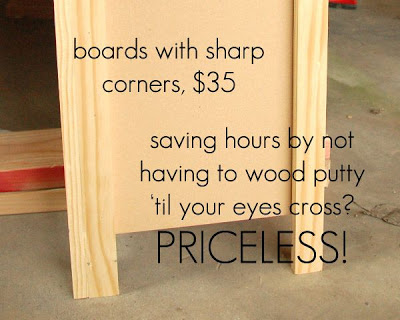
Aren't you glad you sprang for the boards with the sharp corners? It will save you hours with the wood putty, I promise. It's really tricky and time consuming to fill those rounded edges and make it look smooth like a solid leg, plus it requires gobs of putty. Gobs!!
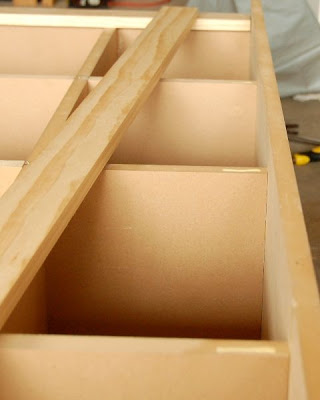
Step 2 - Place the table on its back in order to apply the 54.5" horizontal pieces of trim to the top and bottom of the table's front. The top piece will be pushed up under the base of the tabletop, and the bottom piece of trim will be flush with the bottom of the base cubbies (you'll want to slide baskets out, not lift them out),
Important Note: Apply glue to every surface where two pieces of wood will be touching -- don't skip this as these pieces of trim are going to be doing the majority of the stabilizing and we don't want wiggly tables. Glue the tops of the cubby dividers, the sides of the 1x3 trim you just attached... you get the idea. Glue it, baby.
Repeat on the back side of the table.
Optional plan change: You can buy a thin piece of plywood or masonite and nail it to the back side if you want a solid back, but otherwise do not skip trimming out both sides of the table. Stabilizing, remember?
Step 3 - Attach the 9" pieces of 1x3 to the top and bottom of both sides of the table. Make sure to line up the bottom pieces with the other trim along the bottom to create a clean line.
Step 4 (optional, but recommended) - This is another just in case step, but I think it's wise. Cut a random piece of scrap to 3" (the length from the bottom of the table to the ends of the feet) and add a middle supporting foot. You won't see it, but it will ensure that your table won't sag over time.
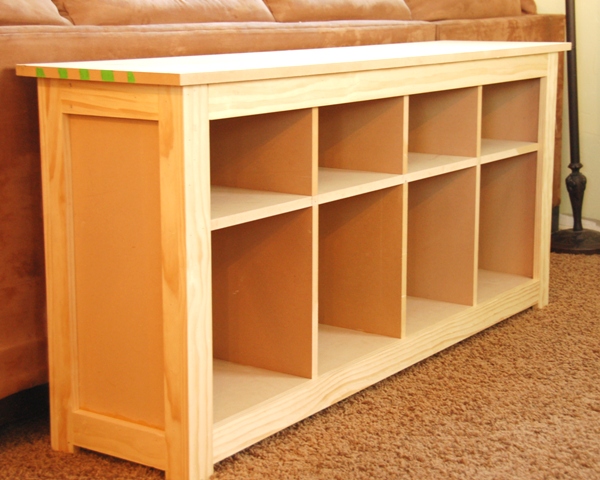
And there you have it, a completed sofa table.
Now let's break the costs down:
Inspiration table cost: $149-$169, depending on your finish.
(plus 7 hour round trip travel time and oodles of gas, in my case...)
My table:
1 sheet MDF: $35
wood trim: $35
Total construction cost: $70
So that leaves at least $80 for my finishing budget just to break even (not including the ridiculous amount it would have cost me in gas). And since I'm not going to cover the table in gold leaf, I think I'm going to come out way ahead when all is said and done.
Score! NOW who wants to make their own table?? Go from the posts or download the directions.
(Update: See it painted!)


Great project-- I'm new to your blog and am looking forward to more reads.
ReplyDeleteKelly
simplykellyblog.com
BEAUTIFUL! I am uber-impressed. Can't wait to see how you finish it!!
ReplyDeleteThanks ladies! :) Glad to have you here, Kelly :)
ReplyDeleteWow am I ever impressed. I don't think I could do that but would love to try. I am not that skilled. But I want one.
ReplyDeleteYou do amazing work.
beautiful! (:
ReplyDeleteI just featured this loveliness here at my blog. Feel free to grab a featured button on my left side bar :o)
ReplyDeleteAwesome sofa table! I love it! I really like the Hemnes collection at IKEA! You have totally encouraged me to try this!! Thanks for sharing!!!
ReplyDeleteThis is a really awesome tutorial! I've been lamenting over the costs of tables for my entry way and this may be what I end up doing instead! So glad I happened on your blog via Pinterest!
ReplyDeletethis is so impressive and it came out so beautifully! it could come from a crate & barrel catalogue! bravo and thanks for sharing!
ReplyDeleteI am also new to your blog! I love it. Is the table sturdy? Where did you pick up those baskets? Thanks for putting this up! Looks great!!!
ReplyDeleteCan you tell us the finished dimensions? I think I figured out the top is 62 wide and 15 deep, and the shelves underneath are 12" deep. But the finished height? (and correct me if I estimated incorrectly).
ReplyDeleteThank you SO much for taking the time to post these instructions with all the great photos.
Can you tell us the finished dimensions? I think I figured out the top is 62 wide and 15 deep, and the shelves underneath are 12" deep. But the finished height? (and correct me if I estimated incorrectly).
ReplyDeleteThank you SO much for taking the time to post these instructions with all the great photos.
Magnificent beat ! I wish to apprentice while you amend your website, how could i
ReplyDeletesubscribe for a blog web site? The account aided me a acceptable deal.
I had been tiny bit acquainted of this your broadcast offered bright clear concept
Here is my page - finanzen
I am going to attempt this project with the help of my wonderful uncle who is great at things like this. I noticed there was a PDF file mentioned but I didn't see where to download this. Can anybody help me find this?
ReplyDeletePlan Download Link:
ReplyDeletehttps://docs.google.com/file/d/0B2czzIk31X0XNUV4UHFMdlhHeEU/
AWE-MAZING! Good job! Can I pay you to make one for me. LOL! I'm kidding!
ReplyDeleteHas anyone determined the finished dimensions?
ReplyDeleteHas anyone tried this with plywood?
ReplyDeleteHas anyone tried this with plywood?
ReplyDeleteWhat a cool tutorial! Thank you for sharing!
ReplyDeletepictaram