


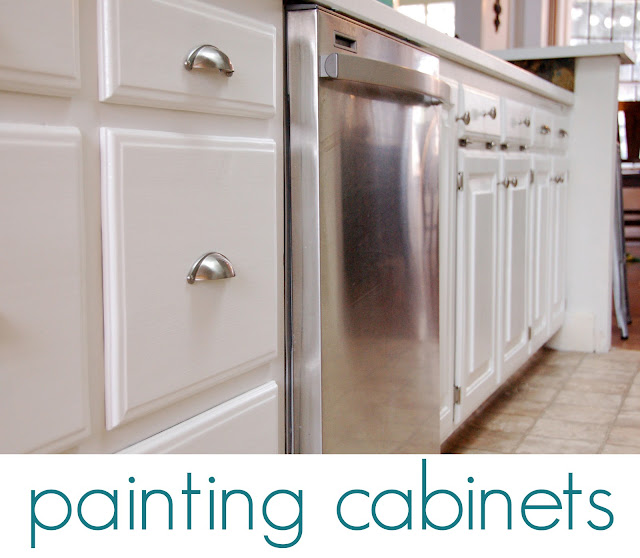
Earlier this month I wrote a post about prepping the kitchen cabinets for paint, so feel free to hop over there for a review. Today I want to talk about the paint I chose, how I applied it, and my thoughts on the product now that I've finished.
Paint
The paint I used for my doors was Sherwin Williams ProClassic Waterbased Acrylic-Alkyd. I chose this relatively new product because I wanted a paint that was self leveling to help eliminate brush strokes, and one that would dry to a really hard finish, both characteristics of oil (alkyd) paints. This paint combines those traits with a water based (acrylic) paint's lower VOC levels, a non-yellowing finish and water cleanup. It sounded too great to pass up!
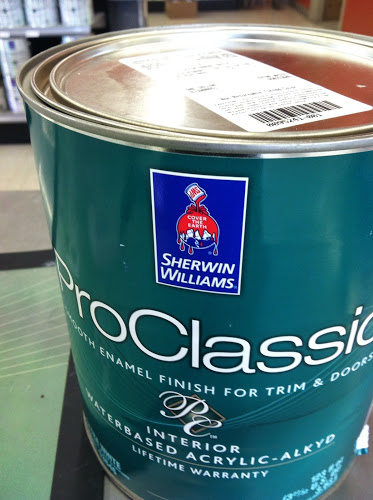
The color I chose was a custom mix called "L4 white" that my Sherwin Williams mixes for a lot of painters - I don't know if it's a company-wide or a regional thing, but I first heard about it from our contractor friend and have been using it for my trim ever since.
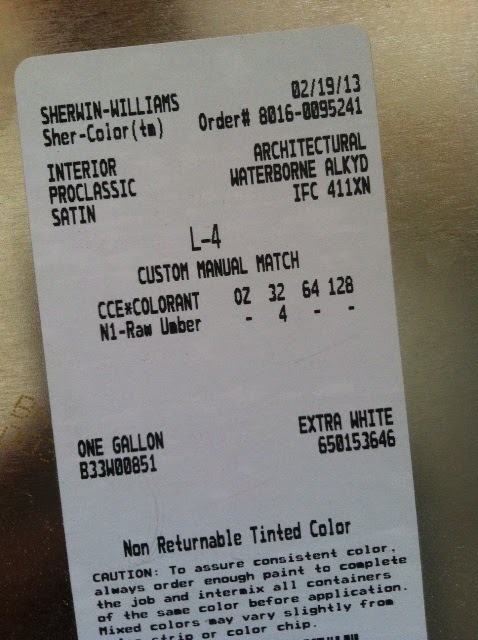
It's regular white paint with just a touch of raw umber to tone it down the tiniest bit. It reads as a true, bright white that goes with everything but doesn't have the glowy, almost flourescent brightness that pure white paint can have. I had zero desire to flip through 50 white paint chips or read blogs about the right white. The right white for me is white. Ha :)
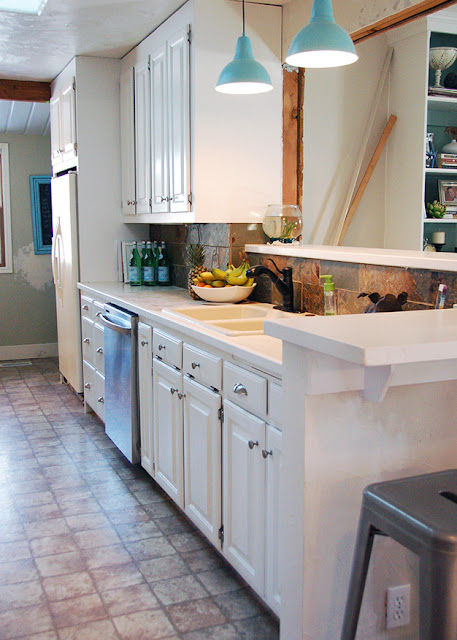
As you can see in the photo above, I went with a satin sheen because I have a sneaking suspicion my cabinet doors were homemade, and they have little warps, dips, and knots in them that I wanted to minimize. The lower the sheen, the more imperfections it hides -- and the Sherwin Williams product webpage says this satin paint is cleanable, so I went with it!
Application
I used a 2" angle sash brush, like this one:

It's my favorite type of brush, and the one I use for my trim projects too.
When painting, I started on the edges/details and worked my way toward the center. I painted quickly and put a thick enough layer on that I could smooth it out over the entire door. The goal is to have complete coverage without any little spots, patches, or lines where the paint skimmed or "hopped" over. This allows the paint to level itself smoothly across the entire surface.
However, don't apply it so thickly that it starts dripping off any higher details. (the door may be horizontal when you paint but I will bet that it's not perfectly flat, and if there are height differences the paint can drip or pool!)
I will say that this paint is a bit trickier to apply than wall paint, but not so tricky that it would or should be intimidating. It's a good reason to paint the backs of your doors first, so you can practice your technique!
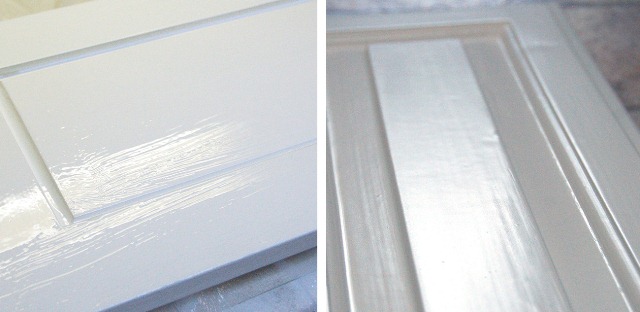
(Left: a cabinet right after application with visible brush strokes; Right: a cabinet after being left to dry for an hour or two.)
My Thoughts
I'm really pleased with this paint. True to the product description, it did clean up easily with water, there was no oil-based paint smell, and I feel like the finish, when applied carefully, is excellent and smooth. It was a little drippy in places and I can still see minimal brush strokes in a few spots, but I picked up a few tips that I'm sharing with you at the end of this post that I think will make a difference in your experience if you decide to try this paint on your next project.
The satin finish has a nice glow to it that I'm happy with, and the lower sheen hides a lot of the weird cabinet imperfections while still cleaning up nicely from the couple of jam spills we've already had.
I think my cabinet frames (painted with the ProClassic acrylic enamel by mistake) got that hard, finished feeling to them faster than my doors have, but the frame paint didn't have the oil-based component that takes longer to cure. I'm sure I'm going to be happy with the extra strength this paint will bring to my doors and I'm willing to baby them a little for a week or so while they set up!
All in all, it's a win. I'm going to remember this paint!
Tips:
- Don't skip sanding if your surface is glossy at all. There were a couple doors where I missed a small spot when sanding down the high gloss paint, and this paint would bead up during application. I'd wipe the wet paint off, let it dry then re-sand. If you want your finish to last, remember: prep, prep, prep.
- Wash your brush each day - I felt like a soft, clean brush made for a much smoother finish, and when I saved the brush and wrapped it up overnight, the stiffer brush left deeper marks in the wet paint that didn't fill in as well when the paint leveled.
- Don't overbrush. You hear it a lot, but apply the paint, smooth it out a little and then walk away.
- Apply thin coats on vertical surfaces. Since this paint is self leveling, it will flow together after application and on a vertical surface this means it's prone to dripping, so be careful with how much you apply and don't forget to watch it.
- Paint the backs of your doors first so you can practice and also so they can have a head start drying and you can carefully re-hang them a day after the fronts are painted. (if you're impatient like me)
- To replace your cabinet hardware soon after painting, just leave the screws loose and keep the cabinets open for a week or so to help prevent sticking while the paint cures (the water may evaporate quickly but the oil-based part of the paint takes a little longer to fully dry and harden.)
(I'm not affiliated with Sherwin Williams and I received no compensation or products from them for this project -- I simply wanted to share my thoughts and experience with this paint!)


You are amazing, brave, and awesome with a paint brush. I stand in awe!
ReplyDeleteWhat cabinet finish did you start with? We have oak from the 1990's. Dreading sanding, but your completed product looks so good, I am tempted. BTW, change your profile pic to the sassy new 'do!
ReplyDeleteThis time around it was already painted, but when we first bought the house it was glossy orange knotty pine! You just need to stick a primer step in there after the first sand, and then sand the primer lightly too (that's super easy though, barely even counts as a step!)
DeleteSanding is the worst part, but then prep always IS... I say go for it. :) And thanks for the picture reminder, I'll get on that!
LOVE the cabinets! It really does look brand new & custom though you only made small changes. And, it was worth all of your hard work.
ReplyDeleteI like your new haircut too :)
The kitchen looks so pretty. I'm going to check out your blog. I love those blue kitchen lights.
ReplyDeleteHi, Im a painter by trade. Yes SW's ProClassic is stellar product. A little overpriced though, like all their stuff. Whatever. Yes, properly sanding down previous sheen is a MUST. Then prime with best primer on market Zinsser's shellac (alcohol)-base, to prevent bleed-through of existing finish and to enhance adhesion of new product (yes Im well aware ProClassic is self-priming, doesnt matter, you want it done right or not?) For future reference, the best way to coat the open faces of the doors and cabinetry is with a foam roller to ensure proper millage and finish. [email protected] / follow me on Twitter: @MatincheckLee BucketManager.com
ReplyDeleteThank you so much for these tips! The kitchen is coming along beautifully.
ReplyDeleteWhere did you get your drawer pulls?
ReplyDeleteHi there! I can't remember for sure which one, but it was definitely Lowe's or Home Depot.
DeleteI have painted a lot of cabinets with waterborne alkyds. The Ben Moore Advance product is never let me down. Sherwin Williams - there have been times buddy, but maybe it was me. I have learned too with cabinets that if you can remove the primer with thumb nail effort before you paint either 1) the primer is not dry or 2) you used the wrong primer. Match the paint to the primer and the primer to the surface - STIX is great for Maple doors, BINs (oil base) for the oak to prevent yellow stains (especially if your going to paint the oak doors white).
ReplyDeleteBeautiful cabinets. we are getting ready to paint our oak cabinets that were made by a local craftsman. I am considering this paint or the benjamin moore alternative. I see its been about 2-3 yrs since you painted. can u tell me how they have held up? This is our biggest concern.
ReplyDeleteBeautiful cabinets. we are getting ready to paint our oak cabinets that were made by a local craftsman. I am considering this paint or the benjamin moore alternative. I see its been about 2-3 yrs since you painted. can u tell me how they have held up? This is our biggest concern.
ReplyDeleteI second Tammy's comment(s)! Anna, would you please let us know how your kitchen cabinets held up from the 2013 white paint job with Sherwin Williams ProClassic Waterbased Acrylic-Alkyd? Like you, if I paint trim, doors, or cabinets, I don't want to have to redo them for a LONG time!
ReplyDeleteme too! Please update us.
ReplyDeleteUpdate? We're all dying to know...
ReplyDeleteMe toi!
ReplyDelete