


One of the most important factors in the quality of a finished paint job is the quality of the prep work. We can't help but look forward to that gratifying moment when we apply the first strokes of color to our walls or a piece of furniture, but the longer we take to get to that happy point, the more professional our final result will be.
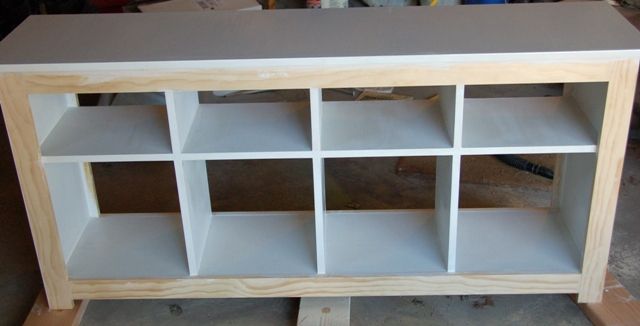
Today I'm talking about MDF, or medium density fiberboard, and how to prep it for paint.
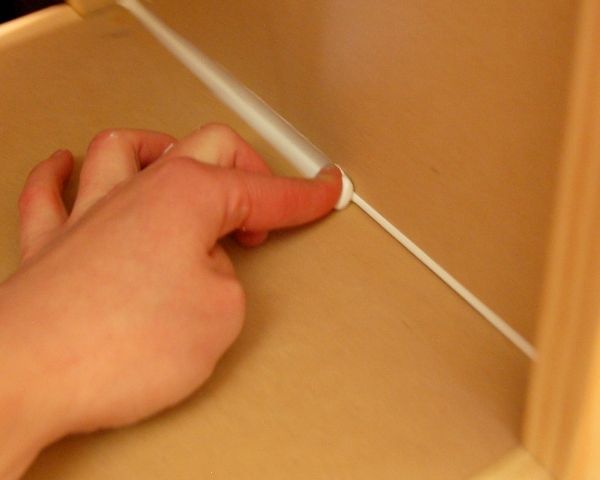
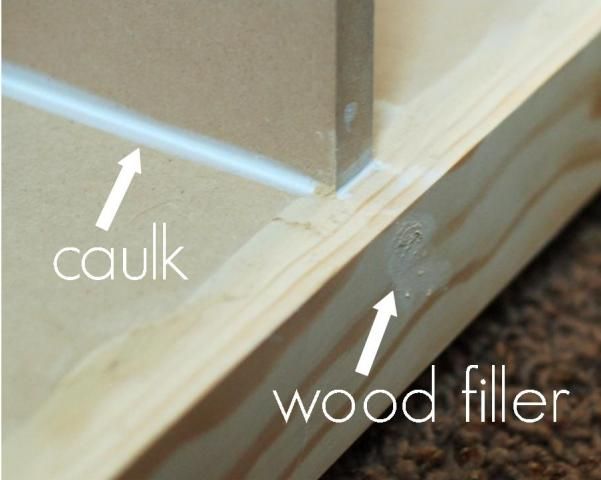
1. Apply caulk and wood filler. After your project is complete, the first step is to fill any holes or seams. I listed both caulk and wood filler here because I use them both for different applications.
- Caulk is well suited to corners, and it goes a long way in making a collection of wood look like one solid piece of furniture. I don't like using it for flat surfaces because you can't sand it smooth so you'll have visible edges and the remnants of nail holes visible through your paint job. Keep the hole small, and maintain constant pressure and speed as you apply the bead. Oh, and have a wet rag handy 'cause if you're anything like me, you'll end up making a mess. Good thing caulk is cheap, right?
- Wood filler is best for nail holes and any seams that lie on a flat surface because you can sand it smooth. Wood filler contracts a bit as it dries, so I overfill the holes a bit. Don't go crazy with the overfilling unless you want to spend the next three evenings sanding down giant lumps of cement -- wood filler is like spackle but much harder. If after sanding there is still tiny divot where the nail hole was, use a tiny bit more filler and then sand very lightly, and you should be left with a perfectly smooth surface.
(** p.s. don't use spackle, okay? That stuff is just gonna dent and possibly flake off the first time your furniture gets rammed into by a matchbox car... and matchbox car/furniture accidents happen a lot around these parts.)
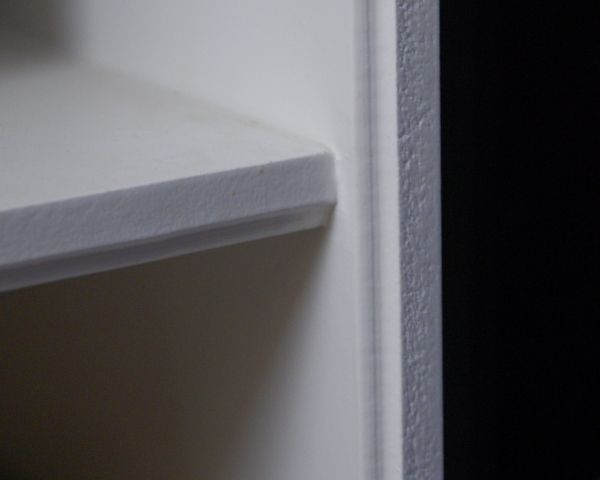
2. Sand, sand, sand. You just finished sanding the wood filler and you're feelin' pretty proud. Pat yourself on the back but don't throw a party yet. Pick up the sanding block, and attack all the visible cut ends of MDF or wood. I promise, you'll want to do this. Cut ends are rough, but they also drink up any paint you apply so the resulting finish isn't going to be consistent or pretty. Did I mention they're rough and that's not pretty?

Here's a real world example, so prepare yourselves. A couple years ago, my brother-in-law built the shelves in my living room. I hired a painter, and his assistant missed sanding one of the vertical edges of a shelf. The painters didn't notice, I didn't notice, and now I'm stuck with......
Aaahhh!
All right, so it's not going to be the basis of a new horror movie franchise. It still doesn't look as nice as the horizontal shelf right next to it, which you can tell has been sanded.
All right, so it's not going to be the basis of a new horror movie franchise. It still doesn't look as nice as the horizontal shelf right next to it, which you can tell has been sanded.
3. Clean the surface. Use a shop vac, wipe it down with a damp rag or a tack cloth to get it as clean as possible in preparation for the next step...
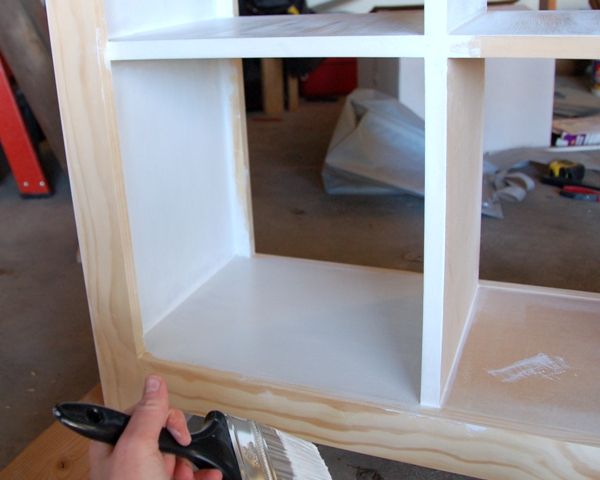
4. Prime. This is really important. And don't use a fancy paint and primer in one and think you're outsmarting me, either. MDF needs to be primed with an oil-based primer. I am a fan of cutting corners whenever possible, and I'm telling you that it is not possible here. Have you ever seen MDF get wet? It swells right up and you're stuck with misshapen, bloated baseboard and a chip on your shoulder. Do yourself a favor and seal that baby now to save yourself some trouble down the road.
5. More sanding! I'm sorry I had to go there again, but it's time to put down your post-prep celebratory strawberry daquiri and pick up the sanding block again. This will be quick, though -- just a light sanding over the dried primer makes all evil bumps and painted on dust bunnies disappear. The cut edges will be miraculously and fabulously smooth. You will jump for joy!
Okay, now you can pick the daquiri up again... but go easy, you have a paint job to start!
(If you're interested, here is the plan for this table...)
(If you're interested, here is the plan for this table...)


Tell me, how long did it take to fill, prime and sand this particular piece?
ReplyDeleteOh, when all is said and done maybe an hour and a half, two hours without drying time :) But I just sat out in my garage while the kids were playing.
ReplyDeleteI have a question about MDF board.
ReplyDeleteDoes it hold weight. I need some shelves built into an old Armoire for storage, some of the books are heavy.
Would MDF or plywood be better.
Thanks
Dee
Yep, it holds weight. I used 3/4" MDF for this, my son's bunkie board (what his mattress rests on in the top bunk) and the built in bookshelves that my brother in law built in my living room.
ReplyDeleteI think it might come down to your desired finish. You have to paint MDF but it's really smooth and looks great once painted. If you want to stain it then MDF isn't what you want :) Hope that helps!
I love your DIY's. I'm passing on to you the Versatile Blogger Award.
ReplyDeletethank you for this info. I have an mdf board that I'm planning on painting. I would've gone at it willy nilly without oil based primer. ahh! the horror. It really makes sense, though!
ReplyDeleteAny suggestions on types of paint to use? can I use spraypaint?
Sure, you should be able to use any sort of paint you want to, but I would recommend an actual brush-on oil-based primer to create a good solid layer to protect the MDF. I use Zinsser Cover Stain with the brown label. :)
ReplyDeletehow come you didn't prime the pine also, and did you use 1 1/4 brads for everything????
ReplyDeleteI didn't prime the pine because I was originally going to distress the face of the able for a more aged look and wanted the wood to come through, not primer.
ReplyDeleteAnd nope, I used 2 inch brads for the table, and 1 1/4" for the trim -- you can download the plan with materials and instructions here: https://www.takethesidestreet.com/2011/05/table-is-complete-next-comes-styling.html
love the table! What kind of paint did you use for your final coat after the primer?
ReplyDelete