Thursday, September 30, 2010

Lamp re-do, pt 1

My mother recently asked me to make her guest room cuter, and I was happy to oblige. I'm a big fan of making things cuter, especially when I get to spend other peoples' money -- it's much more fun than spending my own. Mostly because you can't buy very much with $5, which is pretty much how much my husband is allowing me to spend right now...something to do with my overwhelming desire to constantly change our paint colors I think?

So here's the before: 


I bet my mom's embarrassed right now. In her defense, the messed up bedding was totally my fault. But the Winnie-the-Pooh wallpaper border? I take zero ownership for that.  My parents didn't even buy this house until after I had gone to college.

My first task was to get my parents a set of matching guest room lamps that wasn't brass. My mom loves her set of brass lamps, and to each her own. So we'll just move those bad boys into her bedroom. I checked out some thrift stores to find some I could makeover but didn't find anything I liked, so I just went for Wal-mart lamps. Each lamp base clocked in at $17.98, and the matching, fabulously nondescript drum shades were $14.99 I believe. I also purchased a set of finials at Kmart because the harp came with reaaaally unfortunate ones:


Ouch. Not cute, 'Better Homes and Gardens' brand 8-10 inch adjustable harp. Not cute.

Here's the fancy before:


The first step was to prep the lamp for painting! I sure do love paint. I wiped the lamps down really well to get rid of any dust or dirt, and covered several inches of the cord and any electrical parts that might not function as well covered with spray paint. I used blue painters tape for the cord and aluminum foil for the light bulb-doohicky part.


I also secured the finials by setting them on the sticky side of some painters tape.


Then... I primed! I used Rustoleum Painter's Touch white primer spray.


Ooooh. They already look so much better. These lamps were not meant to be white, though.  They were meant to be...


Orange! Well, technically 'Cinnamon' -- another Rustoleum Painter's Touch spray paint. The cap looked like it had a bit more red in it, a little spicier. But I'm still happy with the color.

After a glossy topcoat...


...part one of my lamp re-do is complete.


Stay tuned to see how I'm going to make those basic lamp shades look a bit more custom, a whole lot cuter!

Linking up to:
Under The Table and Dreaming

Tuesday, September 28, 2010

Maybe I should have knocked on wood...

Just when I thought things were getting better, they got worse! What. the. heck. So late yesterday afternoon, I decided to get sick again (because it was so much fun the first time). But this time, I decided to take Mike and my almost-3-year-old son down with me, since misery loves company.

Long story short, last night was horrible and I woke up feeling old and achey, while my son was back to 100% by 7:00 this morning. Add "longer recovery time" to my list of cosmically unfair things that happen when you get older (another example: wrinkles and pimples at the same time? Who decided that was a good idea?)

Hopefully I'll be back in better form tomorrow, but I felt like I needed to post to keep everyone in the loop. Plus... my older sister told me I had no choice because my mission in life is (apparently) to keep her entertained while she's at work. And I could never, ever let my fabulous sister down. Mostly 'cause she hits really hard.

Monday, September 27, 2010

I've got a case of the Mondays...

...well not really. But I do have a stomach bug, graciously given to me by my oldest son (who knows sharing is the nice thing to do).

I'll be back tomorrow, but in the meantime I'll let you ponder this thought: When your child gets sick in the living room, what is it about men that makes them look at the situation and think: 'Oh no! What needs to be cleaned off first? The boy... or the remote control?'

Want to venture a guess as to which one got rescued first? :)

Sunday, September 26, 2010

weekend chandelier part plea

Umm... so I know I don't have a huge following or anything, but I'm hoping someone out there in the internets can help me with this, because I'm stuck.

One day, my two boys were messing around, being crazy, and swingin' from the chandelier. No, really. They were literally swinging from the chandelier above my bed. Nothing expensive and/or pretty was broken during the making of the mischief, but they did bend several of the metal rings connecting crystals -- and even lost one.

So now, instead of the chandelier being in one piece, like it's supposed to be, I have this:


Please don't look at my hand too closely. I'm sure I need a manicure or some lotion or something.

Anyway, my question is... does anyone know where to buy these?? 


The closest things I've found are these paper key tags, but I don't think the metal rings are the same size. I want to fix this as subtley as I can, since the big dangley thing that's no longer attached to my chandelier happens to be the middle, largest-of-all crystal dangley, so it's noticeable. Blerg.

Friday, September 24, 2010

Pumpkin scones!

Another pumpkin recipe! Because I love Fall! And pumpkins! And exclamation points!

Everybody loves scones, right? If you don't, just lie to me... I can't handle the truth.

I set out to find a recipe that could replace this place's pumpkin scone recipe, and I found one on a recipe site called Pinch My Salt. I tweaked it just a teensy tiny bit to suit what I had in my cupboards, and both my sister and I (Certified Baked Goods Deliciousness Experts, I'll have you know) decided they were quite fabulous and in fact better and more moist than the coffee shop original. Onward to the recipe!

Disclosure: I took these pictures late last night in my poorly lit kitchen. I'm welcoming donations for a kitchen re-do or a giant spotlight. ;)

First, mix all the wet ingredients together -- half and half (I used fat free half and half because that's what was in my fridge), pumpkin puree, brown sugar, and vanilla.


When you're done mixing it, it'll look like orange goo. And if you need to see what that looks like, please reference this recipe. Different goo, same effect. Put this bowl into the fridge to keep it cold.

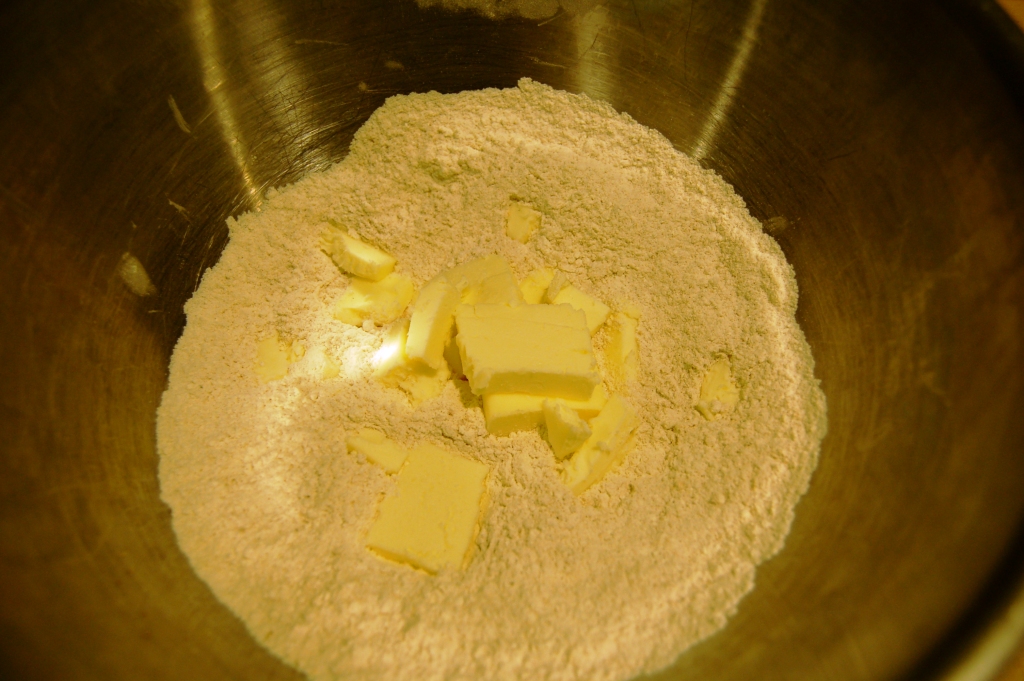
Mix the flour, baking powder, and spices together and then cut your butter into small chunks (I was sort of lazy and they were only smallish) and add it to the flour.


See? Only smallish.

Cut the butter into the flour mixture with forks (not a fan), a pastry blender, or your hands. I started with a pastry blender because it's faster than forks in my opinion, and when it was pretty well incorporated I used my hands to make sure I didn't have any butter-less deposits of flour. I'm nothing if not thorough. (stop laughing)


It should resemble coarse crumbs at this point.

Next, add the wet ingredients all at once and mix until just barely moistened.


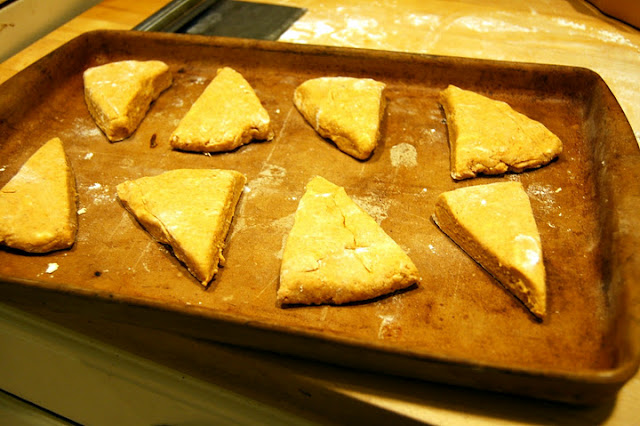
Turn it out onto a lightly floured surface and smoosh it together with your hands. It'll hold together nicely, and you want it to be moist and a little sticky (dry scones = less fabulousness). Pat it into a circle about an inch thick, and then cut it into 8 pieces like a little scone-pizza.


Put them on a pan so they're not touching...


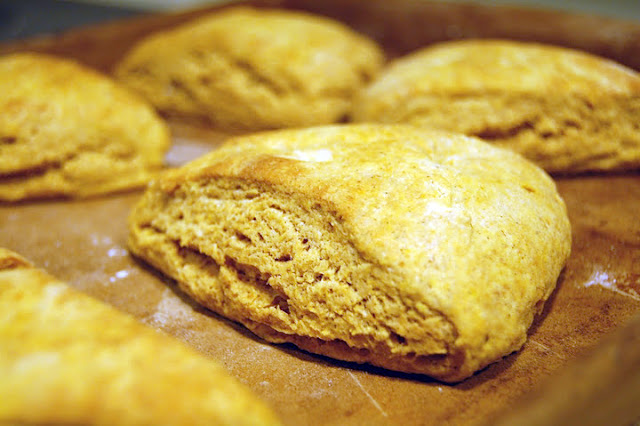
And bake at 425-degrees for 15 minutes. They won't be dark, just barely light brown on top when they're done.


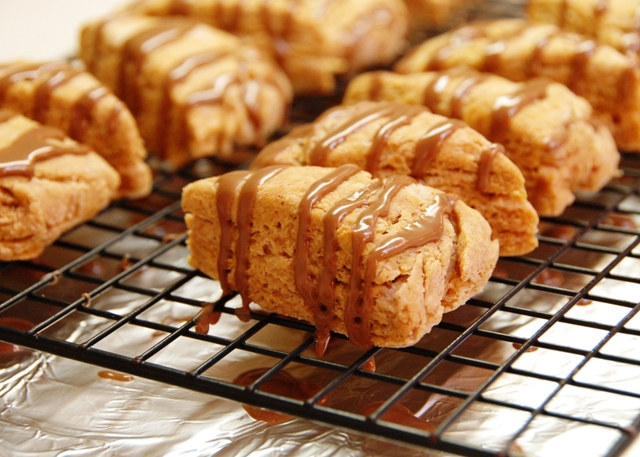
You can mix up a fancy little glaze or icing and drizzle on top for extra yumminess. I made a molasses-ginger glaze for this batch which was really quite delicious (and the recipe for that is at the bottom of the post as well). My original plan was to make a maple glaze, but my bottle of maple flavoring broke and splattered all over my kitchen like a crime scene -- it was like an episode of "Dexter" except that it was maple flavoring and not... you know... blood. A maple glaze would be even more fabulous if you used real maple syrup instead of the flavoring.

Whatever you decide to do, the next step is easy. Eat. A whole bunch of them. Preferrably with coffee or some other warm fall-time treat. Call a girlfriend over to keep yourself from eating all 8 of them... because it's possible. Don't say I didn't warn you.


Pumpkin Scones (adapted from Pinch My Salt)

2 c. flour (I used all-purpose instead of cake flour or something fancy, but I'm scandalous like that)
6 Tbs. cold butter (I only had salted, and it turned out just fine)
1 1/2 tsp. baking powder
1/2 tsp. salt
1/2 tsp. ground cinnamon
1/2 tsp. ground nutmeg (woohoo!)
1/4 tsp. ground allspice
1/4 tsp. ground ginger
1/3 c. pumpkin puree
1/3 c. half and half
6 Tbs. brown sugar
1 tsp. vanilla

Mix pumpkin, half and half, brown sugar and vanilla in a small bowl, then place in the fridge to keep cold.
In a separate bowl, mix flour, baking powder, salt, cinnamon, nutmeg, allspice, and ginger together. Take the butter from the fridge and cut it into small pieces, and cut it into the flour mixture with a pastry blender. Add the wet ingredients all at once, stir until just moistened, and turn out into a lightly floured surface. Use your hands to lightly push all the dough together into a ball, knead it once or twice to finish any mixing, and then pat it into a small circle about 1 inch thick. Cut the scone dough into 8 pieces and put them on a pan so they are not touching. Bake at 425-degrees for 15 minutes. Scones should be light brown on top -- don't overbake.

Ginger Molasses Glaze (also adapted from Pinch My Salt)

2 Tbs. Molasses
2 Tbs. half and half
1/4 tsp - 1/2 tsp. powdered ginger (depending on your taste... I like a little ginger kick)

Then mix in enough powdered sugar for your desired consistency. I like it thick, so I think I used around 1 c. of powdered sugar... but don't quote me.
 
or try...
Maple Glaze (as seen in first photo)
2 Tbs. maple syrup (real, please!)
2 Tbs. half and half
Powdered sugar to your desired consistency


(I'm linking this recipe to
Just a Girl's Show and Share Day
 Be Different Act Normal's Show and Tell Saturday
House of Thrifty Decor's Show off Sunday
Under the Table and Dreaming's Showcase Sunday
Tatertots and Jello's Fall linky party
and Chic on a Shoestring's Flaunt it Friday... go check them out!)

Thursday, September 23, 2010

Um, wow.

Friends! I'm addressing you on this, the most momentous of days in my life. A day when pigs learn to fly and worms miraculously grow ears. A day when I, a most uncrafty person, get a project featured on a craft blog.

...seriously. Stop laughing!


Can you believe it? I'm excited about it since I'm a big fan of validation 'cause I'm needy like that. :) But really, I'm totally shocked. Because I am not a crafty person. Do I have an unhealthy obsession with paint colors and painting everything in sight? Sure do! Do I like to cook while I try to make my house cute and attempt to hold my own in conversations about the merits of different window coverings? Uh, for sure. But do I do it well? Hmm... that's up for debate. :)

My point is I do not make pretty dried floral wreaths and my sewing abilities are pretty much limited to straight lines on flat pieces that won't be inspected too closely. (The idea of making something that comes to a three-dimensional point, like a slipcover for an ottoman, makes me break out in a cold sweat. Or ruffles, heaven forbid. Yikes!) So either my perception of 'crafty' is way off base and outdated, or my little world just flipped upside down and we have to patiently wait for the universe to sort itself out.

In the meantime though, I'm faaaaaaamous.

Wednesday, September 22, 2010

plaster leaf garland

All right, friends. It's time to share one of those projects I promised. I wanted to create something beautiful out of something inexpensive (and maybe not so beautiful). As a reminder, here was my $1 Dollar Tree garland before:


And here is is after:


Ooh. Me likey. Never you mind that it's not hanging since I have nothing to hang it from that my kids can't get to. The sadness of having no mantles in my home. Sigh.

One day I was sitting in my house, minding my own business (and probably cleaning up some matchbox cars that are constantly littering my floors) when I started thinking that white leaves would look so great! Why did I think that? No clue! I think I might be obsessed with white decor. Anyhoosies. I grabbed that garland at the dollar store, and quickly decided that (1.) I didn't know how well painted leaves would turn out, since the garland would continue to flex - what if it cracked or peeled? And (2.) I must have too much time on my hands.

But back to the garland -- I thought I'd have better luck getting the leaves to look good if I could somehow harden the leaves. I started pondering - and I'm really not a very creative person - so the first thing I saw in my basement tub o' crafts was a big container of plaster of paris.

"Of course!" I said. "I'll just dip the leaves in the plaster!"

Brilliant, right? Well, it turned out to be a touch harder than that, because I apparently have no idea how to work with plaster of paris (why I had some in my basement escapes me). I cut all the leaves off the garland,  and first tried painting the plaster on with a brush. Well that was just plain time consuming and ridiculous. I like wasting time, but not on painting leaves with white goop. Not when there are books to read and toenails to paint.

So I mixed some more plaster in a cup, and dunked the leaves one by one.  Then I laid them out on a sheet of wax paper and let them dry.

Hmm. Not quite what I was going for...

The next day, I decided they needed a second coat (anyone surprised?) This time I poured the wet plaster onto a disposable paper plate (one of the deeper ones with a wax covering) since the leaves had hardened with the first coat of plaster.


I coated each leaf, did my best to shake off the excess goo, and returned them to the wax paper overnight.
Finally, I cut a length of twine (or whatever I had -- think it was actually hemp jewelry rope stuff) and folded it in half to find the middle, which I then marked. I also cut several short lengths of twine to tie the leaves to my new garland.


I wrapped a short length around the garland, tied a knot in it and inserted the end of a leaf into the knot before I tightened it.


I pulled it tight to (hopefully) prevent the leaf from sliding along the length of the twine garland.

Next, I took a measuring tape and marked 8 inch lengths on my garland with my son's trusty pumpkin pen (Why did I pick 8 inches between leaves? Not a clue. It looked good, perhaps) And repeated the process down the length of the garland.


Note: It might be a good idea to secure each knot with some hot glue or super glue? Just a thought.

Voila!


And let's just pretend my kids would leave it alone for a moment....


I'm linking this up to:

Today's Creative Blog
Lucky Star Lane
Me and My Bucket
Blue Cricket Design
Someday Crafts
My Backyard Eden
This Blessed Nest
Hope Studios
Just A Girl
Centsational Girl
Finding Fabulous
Remodelaholic
Serenity Now
Be Different Act Normal
Chic on a Shoestring
C.R.A.F.T.
Under the Table and Dreaming
Ain't She Crazy!
The DIY Show Off
Tatertots and Jello

Tuesday, September 21, 2010

Autumn lovelies

I was inspired by this post over at Our Suburban Cottage yesterday, so I wanted to share some of my newest loves. I'm a big fan of window shopping online (and real shopping too, much to the chagrin of my husband), and if you don't know about my intense love of list making, you'll soon learn. Here are some of my favorites for fall:

Cable-knit throws
This one from Pottery Barn just shouts Fall to me... so cozy! Like your favorite sweater, right? Perfect for curling up in with a good book and a cup of coffee.


I can't find a picture of a less expensive, similar version at Target -- but I know it exists! I promise. It's cream, I saw it on an endcap near the fashion bedding. It even has a matching cable-knit pillow, cuuuuuute!


Chai lattes with a shot of espresso
Or without espresso, whatever makes you smile. Don't worry, I love pumpkin spice lattes too! (I don't want to offend anyone, and I know these are considered by many to be the drink for Fall... but if you haven't tried chai, please do so.)

Scarves
Like this one from Anthropologie...


Or if you want to save a little money (for a chai, I'm sure), here's a really similar one I stumbled across at Kohl's last weekend:


Jackets
Pretty much I love all jackets. Last month I bought a classic trench which made me supremely happy, but today I was reading spark! and I seriously died when I saw this jacket from Target's juniors department:


Why did I die, you may ask? Um, because for over a year I've been secretly lusting after this sort-of-similar-but-way-more-expensive jacket at Victoria's Secret,


And I also want her glowy skin and skinny behind. How do I add those to my shopping cart?

And lastly,

Hats
Specifically, those cute ones you see everywhere with the bills... maybe I'm not really making sense. Are they called newsboy hats? Lurve. I'm not sure they're at the cutting edge of fashion, but they look dang cute and they're great to throw on with a ponytail when you just don't have the time to get yourself looking like the Victoria's Secret model above. I have a great charcoal grey one I picked up at the Buckle last year, around the same time that I foolishly ordered this pattern off etsy:


You see, I forgot that I don't know how to crochet. Silly me.

What things are you loving for Fall?


Monday, September 20, 2010

weekend with the grandparents

Does anyone else have problems with tall boots trying to strangle your calves? I blame the boots. I don't have giant calves, but they are on the muscular side (I am, after all SUPER athletic... heh.) and while wide-calf versions tend to make me feel like I'm clomping around in rubber rain boots, I feel lucky when I can pull on a regular tall boot and zip it up. The heavens open up, angelic choirs start singing, and I just might start doing the cabbage patch in the middle of the store in all my joy. Might.

You might be asking yourself, 'what on Earth does that have to do with your weekend?' My answer is...well, pretty much nothing. The whole boot issue is a big deal to me though. So let's discuss, okay?

About the weekend though...we had a nice, relaxing weekend with the grandparents that ended with a picnic lunch in the canyon and a little playing in the river. (Another thought for discussion: the kids ignore our swingset, but gladly spend hours outside at grandma & grandpa's swinging their little hearts out. What gives?)


Hope you all had a great weekend too!

Friday, September 17, 2010

hook nook plan

My house is cute. I love it, I really do. But there are...places. Areas I am less than thrilled with. My entire kitchen being one, but we can get to that story another day. Behold, the area between the kitchen and the garage, my nook of shame:

I SWEAR it was clean about a week ago. So embarrased right now. Sigh. Wanna see what the space looked like when we bought the house?


Class-say. See the wire poking out of the wall to the left of the desk? That's where a sconce was. Nice height for a sonce, wasn't it?   The problem with this area, besides the apparently ugliness and sheer amount of orangey wood, was that it was wasted on us. I thought I'd make it a cute desk area with basket storage  but then I realized I hated having my desk there, so NOW I have a new, fancy, bespangled plan of form meets function cuteness. Because I? love plans. And projects. And project plans.

Ahem:


(I originally had these plans written out directly on the photo because it looked cool. But then I heard my mother calling me to complain about how it was hard to read and how function needs to come before form or something like that, and I got scared into making the list this new way)

1. Remove cat.
2. Paint door (my entire kitchen was this color when I moved in... shudder.)
3. Remove world's ugliest light strip and put in cuter lighting from the paneled ceiling.
4. Speaking of that ceiling, paint it white to make it more cottage and less hang-a-deer-head-on-the-wall cabin.
5. Do some sort of awesome paneling (beadboard? board and batten?) and hang cute hooks on the wall across the windows.
6. Get rid of the big pile of junk desk.

And finally....

7. Storage bench in the hook nook! Brilliant, I tell you.


Don't be jealous of my photoshop skills.

Thursday, September 16, 2010

my front door, and a sneak peak

One thing I loved about my house the moment I saw it was the bright red front door. You have to love such a brave color. The outside of my house is dark brown and it's hidden in a front yard with a lot of trees, so I love how this door really helps keep the house from fading into the background.


Last summer I ordered the vinyl numbers from an etsy shop that's now closed, and I looove them. They were really easy to apply, even for a non-user of vinyl such as myself.
.
The wreath was actually a free gift from a consultant of a home decor company when I had a party a few years ago... can't beat free, right?


The wreath "holder" is actually a scrap of brown material left over from a pillow I made. I just sewed it in into a tube (for lack of a better word) to hide the raw edges, and used a couple flat thumb tacks to attach it to the top of my wood door.


For a free, 10-minute project I love how it looks!

Now for the sneak peaks...

I always get compliments on this chalkboard, which I use for a menu in my kitchen.


 So I've decided to show you how I made it and finished the frame to give it a new, cuter life!


I also have another little project in mind, one which required this little beauty:


And if by beauty you know I meant "cheap $1 garland that is NOT so pretty" then we're on the same page. I actually picked this particular garland because the leaves were a little sturdier feeling than a lot of the cheaper garlands with flimsy, nylony leaves.

I can't wait to show you both of these projects!

Linking this post to My Uncommon Slice of Suburbia's front door link party...
Related Posts Plugin for WordPress, Blogger...