Friday, June 29, 2012

Secret Agent Party Invitations

Today the invitations for Aidan's birthday party are going out in the mail...  I think I might be more excited for this party than he is -- so many fun ideas!


I had a fun time putting them together, and they were the easiest invitations I've ever made. No Photoshop required, holla! We're keeping the party plan a secret from Aidan too, so that he gets to go through secret agent training too.


Each 6x9 manila envelope has a red "Top Secret" stamp printed on it and is finished off with a fabulous Christmas stamp, which is hands down my favorite part of the whole package. Talk about throwing enemy spies off the scent ;)


I'll post about the party when it's all done but I wanted to share these fun invitations right now because I'm geeking out hard over this one. Moose and squirrel, y'all. moose and squirrel.

Thursday, June 28, 2012

What's in Your Bag?

If you're anything like me, the answer to that question is usually, "pretty much everything." A couple weeks ago I kept setting off metal detectors in stores and it took me a day or two to realize it was because I was hauling around our (empty?) DVD case for "Despicable Me" with the anti-theft sticker still inside. Fifteen pens? Check -- I like pens. Receipts from 2011? Um, maybe. No judging.

So when I got an email inviting me to participate in a fun collaboration with Gussy Sews called "What's in Your Bag?" my first thought was, "fun!"

My second thought was, "crap! The shame!"

I was lucky though -- I just changed bags so it hasn't gotten too crazy bananas up in here yet. I should post photos of what is still in my last bag... but I won't! (I changed right before we ran out the door to Sun Valley so there was no cleaning of the previous bag happening, I just hung it in a closet. It still weighs 5 pounds. I'm hanging my head in shame.)


See how cute my new bag from Gussy Sews is? It's a large zippered pouch and I heart it a whole bunch.

Clockwise, from top: My new pouch from Gussy Sews; my iPhone; a first aid kit that was supposed to make it into my glove box but hasn't yet; my "Chicken Poop" brand chapstick; a notebook and 4 pens (it's a new purse -- it'll most surely be in the double digits by next week); my zippered bag full of business cards from SNAP! that for some reason I had to take along when I changed my purse; two unopened kids' meal toys from the ride back from Sun Valley; my wallet; mini thing of kleenex.

I have to share what I'm using this new pouch for though, because it rocked my world. I was reading the description of pouch sizes and it said the large pouch was great for toiletries or computer cords, and right then and there the heavens opened; cords! I have so. many. cords.

I gave it a test run on our trip last weekend -- I stuffed it chock full of phone chargers and camera batteries and assorted cords... probably some of them I didn't even need but I packed them anyway because I could. I'm usually rifling through suitcases trying to find a phone charger at 2 in the morning... but no more, no siree.


My heart is swelling. Baby steps toward organization, people.


Now that I'm home I'm still using it for the cords I get into a lot like the USB cord for my camera. Now that I can find them I might not need several scattered around in strategic locations anymore... ;)


And just because I love you and have no shame, here's all the stuff I just pulled out of my last bag:


 (lots of papers and receipts, including a flyer from the photo session that must not be named. A single child's sock, white glue, jewelry parts (I don't make jewelry so figure that one out), a pair of goggles... you know. That's just how I roll.)

Now you need to make me feel better -- what's the weirdest thing you've carried around in your bag?

P.S. Head over to Gussy Sews and use the code WIMB10 for 10% your purchase through August 30!

Wednesday, June 27, 2012

Simple Upholstered Headboard

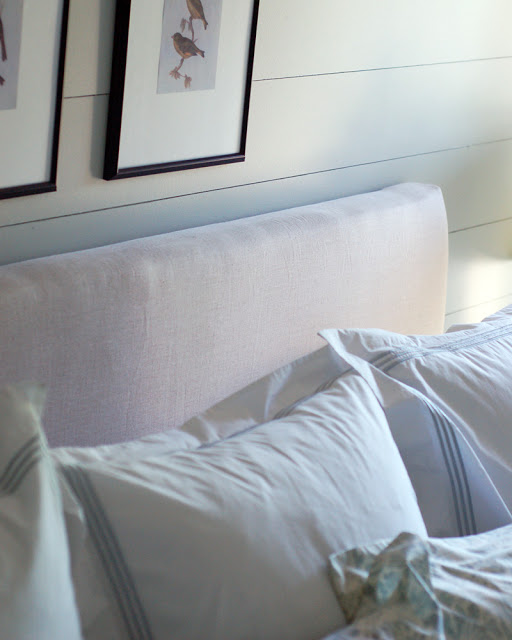
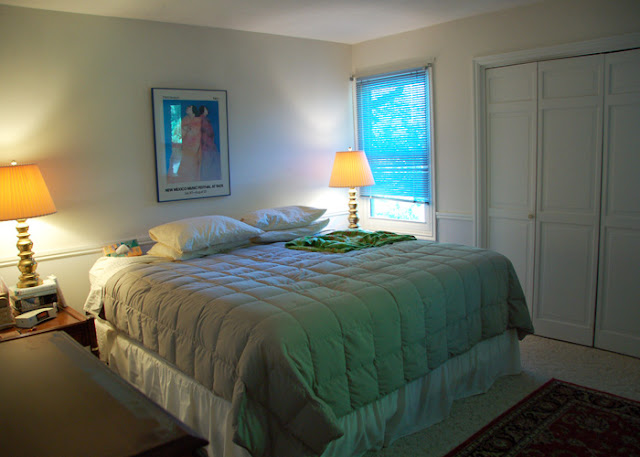
One of the projects that went into my mother's room makeover was the creation of a simple upholstered headboard. I would have loved to have put a metal headboard into her room, but that wasn't in the cards (or the budget) so I had to figure out how to make an easy headboard so the room would still have a nice, finished look.


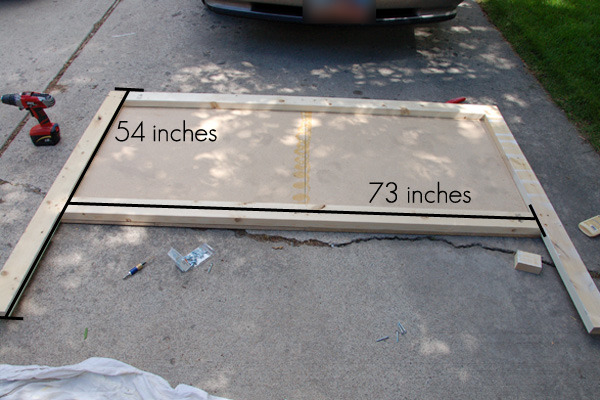
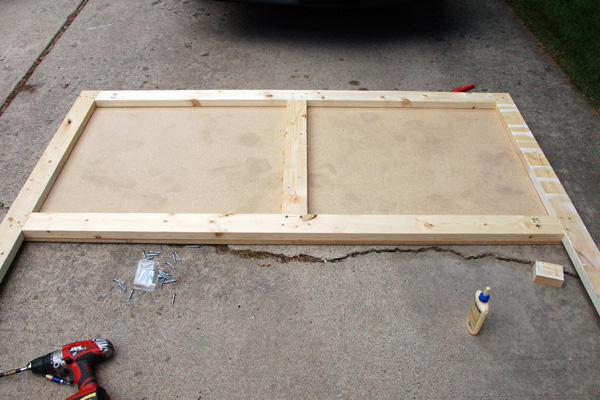
My mom's bed is king sized, so the headboard is large but it was still pretty simple and quick to put together. I went to Lowe's after I got into town and bought a sheet of 3/4" particle board then had the store employees cut it down to a piece 36" x 80" -- then because it wouldn't fit in my car like that I had them cut it in half so I ended up with two pieces that were both right around 36" x 40" (the saw blade through the middle took off a negligible amount of width).

Note: If you can get a 36" x 80" piece home, don't cut it! The board will be much stronger if you don't have to piece it back together. Having said that, I think my finished headboard is plenty strong.

I also bought a few 2x4's and primed then painted the bottom section of two of them (that will become the visible legs of the headboard). I cut the leg pieces to 54" which will be the overall height of the board, and I glued then screwed them onto the particleboard base. Next I cut two more 2x4's to 73" and ran them between the legs as horizontal supports to help secure the two pieces of particleboard. I secured them with glue and screws.


Last I added a center piece of 2x4 along the particleboard seam to fit. More glue, more screws.


I flipped the entire headboard over and then added a few more screws through the 2x4's from the front side -- of course, no photos of that! I'm a fan of making things secure.


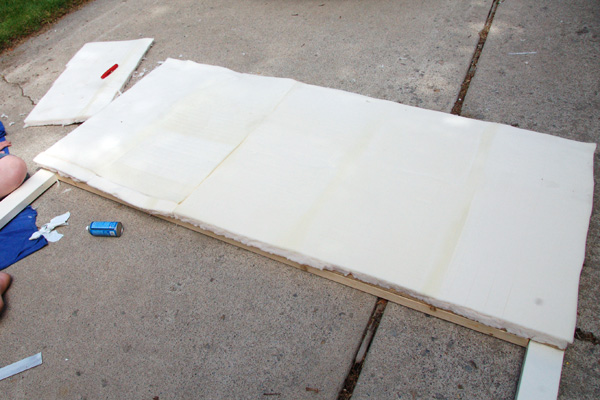
Next I used spray adhesive to adhere a layer of foam to the board. To save money I purchased a full sized memory foam topper from Walmart for $30 and cut it up. Some people use electric knives to cut through foam but I carefully used a utility knife and it worked fine -- I would probably advise against cutting with regular scissors as the edge will look very ragged and that will be noticeable under the fabric.

Another tip to achieve a smooth edge is to put the factory edge of the foam on the top of the headboard and the cut side on the bottom -- the upholstered part of this headboard goes almost to the box springs so it won't be visible if it's not perfect.


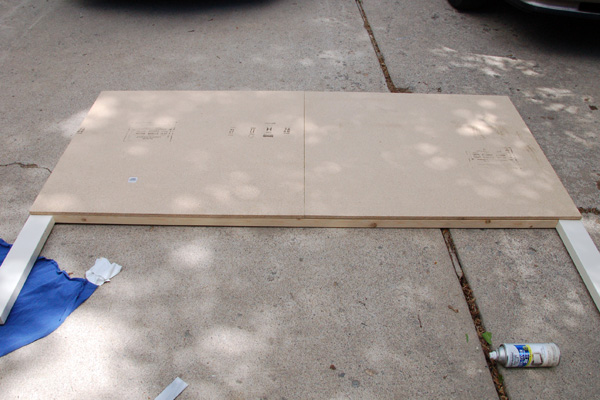
At this point I carried the headboard inside to finish the job.

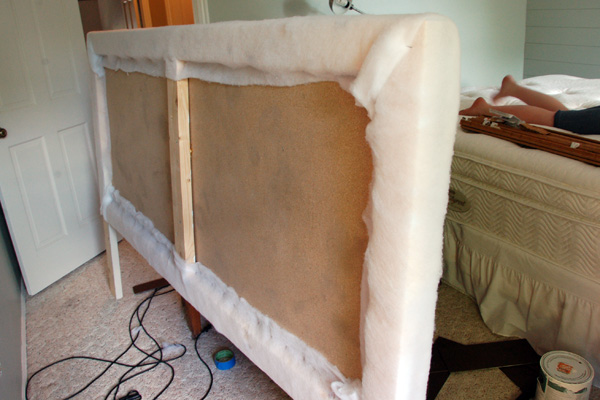
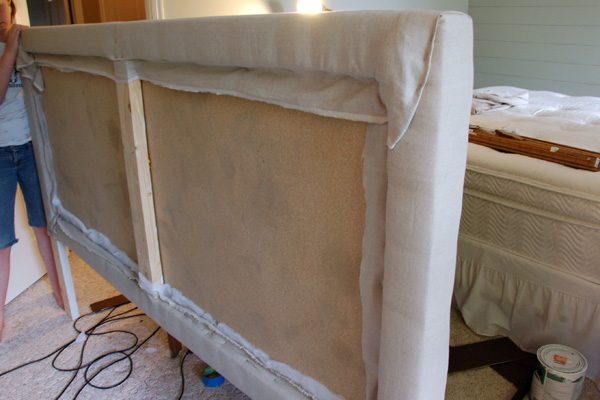
After the foam was on the next step was to wrap it with batting and adhere with staples This added a bit more softness and will also keep the foam from shifting.


After the batting was securely stapled on, it was time to pull out the fabric. I bought a few yards of linen from JoAnn with a 40% off coupon (plus a 20% off total purchase coupon from a competitor, scoooore!) and had my sister iron it for me since she was a captive helper and I hate ironing.

I carefully draped the fabric over the headboard and lined it up so that the weave was nice and straight across.


I stapled the fabric in the center of each side first to hold it in place and then started working my way around slowly with the stapler.

Whenever I upholster I tend to go side to side, top to bottom, pulling the fabric tight and stapling in a symmetrical pattern as I work my way around until it's nice and secure. I save the corners for last because they're dumb. I'm also a fan of using lots of staples. If you pull it tight and then skip 4 inches before you put the next staple in, the foam will bulge between the staples and you'll have a scalloped headboard (which sounds better than it would look simply because the word scalloped sounds so fancy and crafty. It would look bad, I promise!)


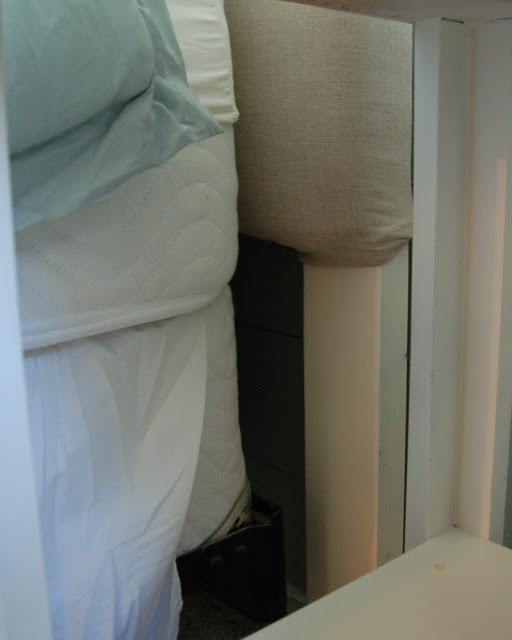
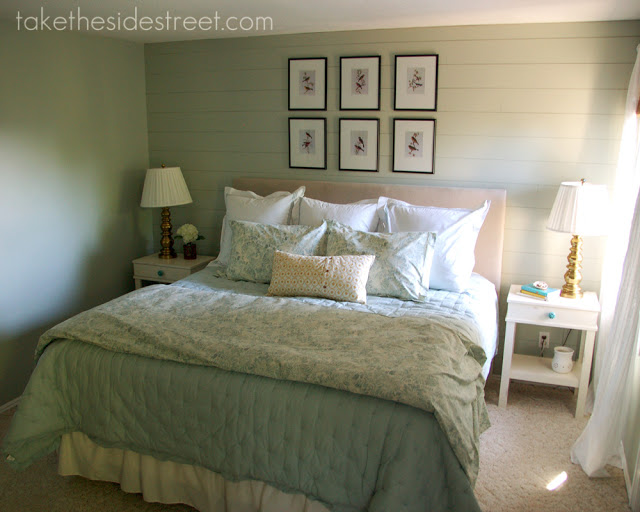
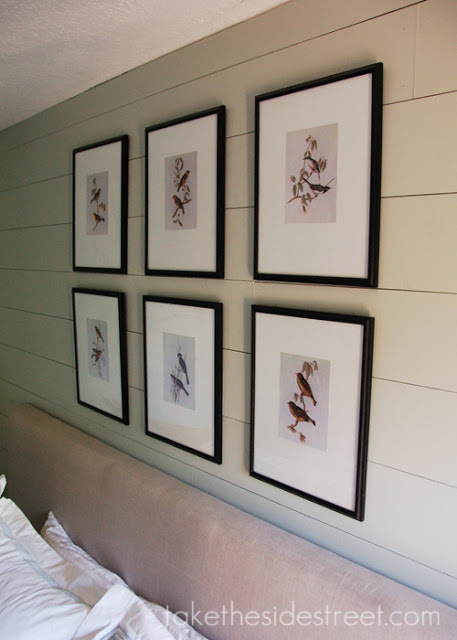
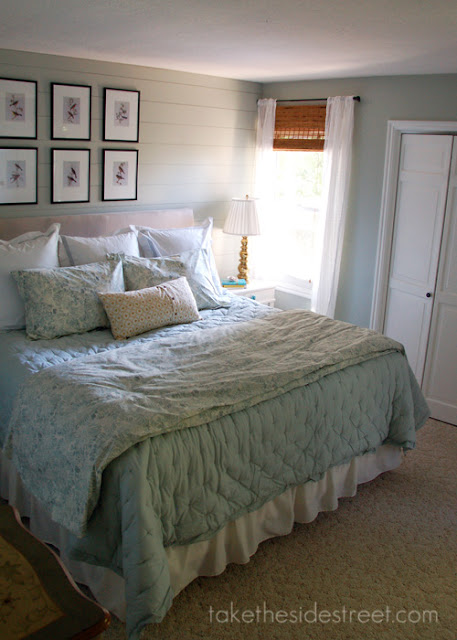
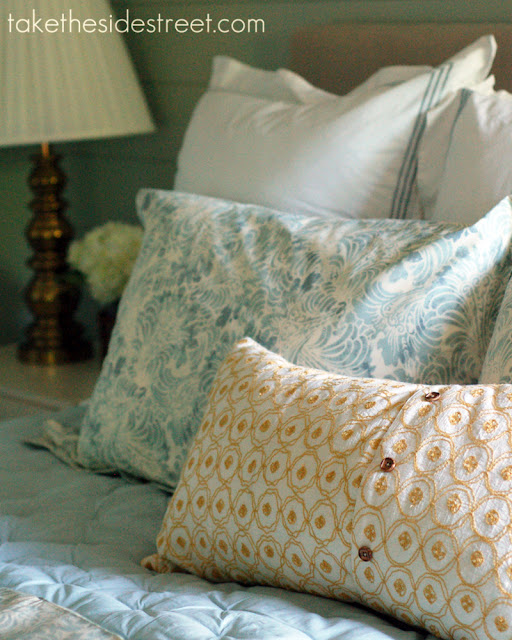
After the headboard was complete I just moved it behind the bed and used the gargantuan weight and height of the bed to hold it in place. It's not going anywhere. However, if you have a less obscenely heavy bed or the headboard doesn't go down as far behind the mattress as this one does, you can attach it to the wall if you prefer. I used a french cleat to hang my guest room tufted headboard and they're wonderful for hanging heavy objects.


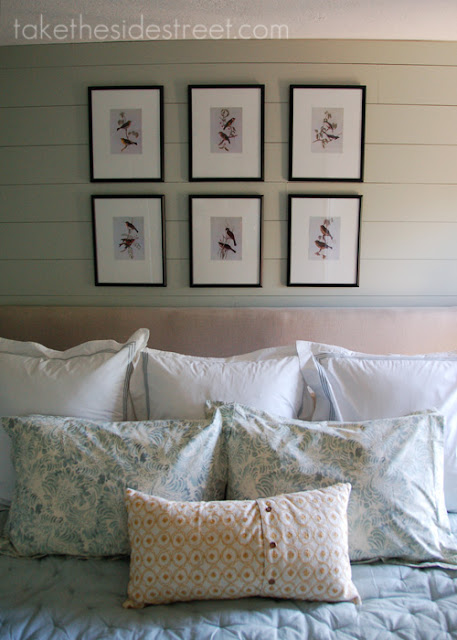
And there you have it, voila! All in all the entire headboard probably took a couple hours to build... definitely doable! Headboards for everyone!

Sharing at: Home Stories A to Z, 

Monday, June 25, 2012

Check Out the New Project Gallery

It's taken a few months of hard, hard procrastinating work but I've finally put together a sort of project gallery for the blog -- you can see it's been added to the blog header! I wanted to make Take the Side Street more navigable for regular readers and new visitors, and hopefully this will be a giant step toward accomplishing that goal!

Go check it out and let me know if anything is confusing, or if you can't find something you know exists and you're looking for, or if you just want to say "good job, you deserve a doughnut!"

P.S. I found a couple more progress photos of both the bunks and the tufted headboard, both BB (before blog) projects so I updated the posts to include them!

Friday, June 22, 2012

Happy Friday

While I'm sadly not at Haven Conference 2012 this weekend, I am nursing my wounds by relaxing in Sun Valley with Mike and without kiddos which is also quite fabulous. I'm also over at House of Hepworths saying hello to Allison's readers in a summer series she has going... hop over and check out her amazing blog if you aren't already familiar with it!

And now, to the most important part of today's post... it's the question for the ages: do chickens like watermelon?


Yup.

What are your weekend plans?

Wednesday, June 20, 2012

DIY Masonite Faux Paneled Wall

For my mom's room, I knew I wanted to create the look of a horizontal planked wall behind her bed -- but I didn't have the budget to make it a reality, so I got creative. I figured that whatever material I used, once it was installed wall to wall you wouldn't be able to tell how deep it was and it would look (pretty much) like a regular paneled wall.


So with kiddos in tow, I ventured into my friendly neighborhood Lowe's where I had them cut 3 sheets of 1/'8" Masonite hardboard (like pegboard but without the holes) into 6" strips for me. Lowe's has a generous cutting policy that is great for projects such as this. 

After getting them home the first thing I did was prime them with oil-based primer. I'm always glad when I pre-prime; you should save yourself the hassle and pre-prime (and even pre-paint) things like this or like board and batten. You'll thank yourself when it's on the wall and there are nooks and crannies you don't have to contend with.


Next I marked the studs on the wall and started nailing the panels up. 

I marked pieces that covered outlets and scored them with a utility knife before breaking the unwanted pieces of Masonite off -- another advantage of working with material that's only 1/8" thick.

I wanted it to appear random so I didn't worry very much about it -- I'd cut a piece to fit with a miter saw and then use the rest of the same board as the first piece for the next row as I worked my way up -- sometimes things lined up, sometimes they didn't. Sometimes I cut a random piece on an arbitrary line if I felt like my lengths were getting too patterned. I made it up as I went along and it worked great. 


I made sure to nail each strip of Masonite into the studs for stability and I also put two nails into each board's short end, one at the top and one at the bottom of each strip like this:


I used craft (popsicle) sticks as spacers between rows so there would be a natural looking gap between my faux boards.


And of course, I ran to the store for that one last piece of Masonite for the two dark boards in this photo -- talk about frustrating!

Last, I filled all nail holes except the pair in each Masonite strip's ends (I like how they looked) and  coerced invited my dear sister and niece to help paint. Mwahaha.


For about $32 in Masonite, I think it looks fabulous! It was a quick, easy way to add some detail to the room and it was definitely worth it.


Definitely a manageable way to add some character to a room in your house, don't you think?

Tuesday, June 19, 2012

Ragnar 2012

I'm popping in tonight to share some pictures from last weekend -- I do have so much fun at these Ragnar Relays! They're held all over the country now, though the Wasatch Back one in Utah was the original and is having its 10th anniversary in 2013. Have you ever raced in one?

starting line

4 of us, including my husband who I "volun-told" to run.  I'm the one who needs self-tanner.

This year was my third Wasatch Back, first year in Van 2 though (the two vans each carry 6 of the 12 team members and leapfrog each other along the course while each runner runs 3 separate legs for a total of about 200 miles).
 our rental car

our sweet spray paint tattoos

Van 2 is harder, y'all. I had a 3.2 mile run in the hot afternoon wind, a (surprisingly wonderful) 10 mile run at 3:00 am, and a (ridiculously brutal) 4.5 leg that involved walking (yeah, not running) up the bottom half of Guardman Pass -- a gorgeous but insanely steep, steep climb in hot weather.
 my Ragnarly climb

It was mostly the hills, and the nighttime run that made it difficult... oh, and the heat of the mid-afternoon runs. Oh, and the fact that van 2 seems to be where all the teams put their "real" runners so I kept seeing people whiz by me and my 9:45 pace! Ha :)

We had such a fun time, though -- talking and eating, running (of course) and getting sleep when (and where) we could, and crossing the finish line as a team.
sleeping on a trailer hitch rack
running toward the finish line 

 This was going to be my last year, but umm... now I'm not sure that it will be -- next year is the 10th anniversary, after all. It's truly an addictive race experience with some amazing scenery and unforgettable team experiences. I sound like an advertisement, I know... but really? I love these things!

Monday, June 18, 2012

Mom's Serene Bedroom {Reveal}

I'm home from the race this past weekend and I finally have a few moments to share the final photos of my mother's bedroom makeover; I wanted to wait until she returned home from vacation on Friday and was able to see it herself -- so now it's your turn! As a reminder, here's the story of my fabulous mother and why I felt like she deserved a surprise room makeover.


I spent several days down in Utah two weeks ago as a single mother / bedroom makeover project foreman. This was a big job to complete in 4 1/2 days as it entailed painting walls and trim/doors, building and upholstering a king-sized headboard, finishing two new nightstands and spending ridiculous amounts of time at Lowe's taking advantage of their generous cutting policy so I could make the paneled wall behind the bed.

Here's a reminder of what the room looked like before:


And here it is after:


Recognize those nightstands? Yep... not actually for my guest room. Mwahaha. Thanks again to Joe for building them.


A giant thank you goes out to my sister Buffy and my niece Ruth, who spent a great deal of time with me helping me paint, ironing and sewing, learning the wonderful nuances of Top 40 pop, keeping my kiddos happy, and then feeding us dinner each night (thanks Hart!!).

Room details will be coming in a day or two... hope you all had a wonderful weekend!

Updates:
Room details & sources
Masonite faux paneled wall 
DIY tufted headboard


Sharing the post at: Home Stories A to Z, One Project Closer's Before & After Party

Wednesday, June 13, 2012

Framed Bird Prints

Well, I'm home from my mother's and now my in-laws are visiting... they're all here because we're running in this weekend's Ragnar Relay down in the Salt Lake City area. (excitement!) 

I'm excited to share my mother's room makeover on here but I want to wait until she gets home at the end of this week and sees it for herself... so for now we'll have to be satisfied with a couple peeks!

First I wanted to share some art I made for the room... when I put together my mom's design board she really liked the set of six prints shown above the bed so I decided to recreate them on the cheap in a responsibly budget-conscious manner.


I searched online at the New York Public Library Digital Gallery (which is a great place to look for old photos and drawings) and found several engravings of birds that I liked. I downloaded them, cropped them to 5x7 and printed them on a color laser so they would be as high quality as possible.


Next I found sets of 11x14 frames JoAnn for 50% off so they each only ended up being $5 (woot) and I bought six of them - they are plastic but unless you're hanging all over them you can't tell. To save on the cost of mat boards and cuts I went and bought a couple large sheets of poster board for $1 each and cut them to fit inside the frames.

Using a piece of card stock as a template, I attached each bird 'print' to the poster board's matte side with double-sided tape...


And stuck the whole thing back into the frame:
 
Easy peasy! I can't wait to show you how they look in the room! Come back Saturday for the reveal!

Costs:
bird prints: $0
poster board $2
frames: $30
$32 for six framed bird prints
Related Posts Plugin for WordPress, Blogger...