Friday, October 29, 2010

Favorite Fall Soups

I love soup -- please tell me I am not alone in my fandom.

Making or eating a hot bowl of soup is supremely satisfying, especially on a chilly day.

When I first met my husband, he actually turned his nose up at all soups - and a lot of other foods, for that matter - so I've spent the last nine years trying to convince him of the merits of some fabulous items: tomatoes, onions, cheese and of course, soups. I've had lots of great successes; in fact, the only thing he still completely refuses to eat is cheese.

The fact that cheese makes the world go 'round and I die a little inside everytime I walk by wheels of Brie in a grocery store is a story for another day, though.

Back to today's story: soup. I like to prepare soups and stews regularly during fall and winter, and my husband and I enjoy eating them while my children act like I'm trying to feed them poison-noodle-soup. You win some, you lose some; and I will keep on makin' those soups, all the while pretending to be oblivious to the melodramatic groans and cries coming from the "dinner haters" in my house.

I have a few favorite recipes, and this one for italian sausage soup is definitely in heavy rotation at this time of year. It's quick, simple, hearty, and delicious. And it's even better the second day, true to its soupy form.


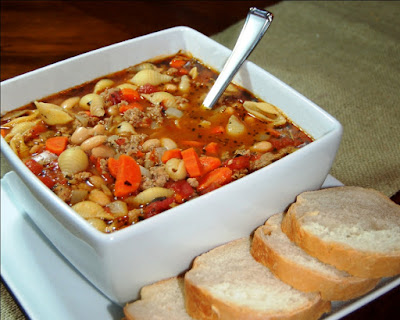
Italian Sausage Soup (adapted from an Allrecipes recipe)

2 Tbs. olive oil
1 onion, chopped
2 medium carrots, chopped
2 garlic cloves, minced
1 lb. sweet turkey italian sausage (equivalent to 4 links - look at you being so healthy with the turkey!)
1 tsp. dried basil
1 tsp. dried rosemary
1/4 tsp. dried crushed red pepper flakes
1/4 tsp. dried sage
1 (14.5 ounce) can diced tomatoes (try fire roasted!)
3 cups chicken broth
2 cups water
1 can cannellini (white kidney) beans
1 cup dried pasta shells

In a large pot, saute onion and carrot in olive oil until softened, then add garlic and cook a minute more. Add turkey sausage and brown while breaking it into small bits. Add basil, rosemary, red pepper flakes and sage to pot, stir to combine. Add tomatoes, broth, water, and beans, bring to a boil over medium-high heat, reduce heat and simmer for 20 minutes. Stir in pasta shells, simmer another 5-10 minutes until pasta is cooked, and serve.

Linking this post to Just A Girl,
Be Different Act Normal,
Katie's Cucina,
Under the Table and Dreaming
and Tatertots and Jello... go see the other projects people have submitted!

Wednesday, October 27, 2010

Guest Room Reveal

I'm so excited to "unveil" my parents' new guest room today!


Remember the old version?
(sad face)


Who else is delighted that my parents' guest room doesn't look like that anymore?

I apologize to all the Winnie-the-Pooh wallpaper fans in the audience.

 I used their great headboard and beautiful Pottery Barn bedding as a jumping off point, so I really just did some relatively minor things to transform the space. I'm happy with how it's turned out. (Even though the paint is not quite what I wanted... it's close. ish.)


Here's a breakdown of what I did:
  • Painted ceiling & walls
  • Installed new ceiling fan with light kit (If by "installed" I meant "let my husband install" then I'd be telling the truth.)
  • Added new bedside tables & lamps
  • Replaced ugly unfinished wood closet door knobs
  • Hung a curtain rod and new drapes
  • Brought in some accessories: a round "blanket" basket, a new cable-knit throw (be still my heart) & a vase with curly sticky things for increased cuteness.
  • Installed new CARPET!
Admittedly I had nothing to do with the carpet, but my parents sure timed it well. I got to spill paint to my heart's content and then two days later somebody came in and made it all disappear. If only it was always that easy, right?

Here's a reminder of what their carpet used to look like...


1980's chic, maybe? What was the trend of putting different colored carpet in different rooms, butted up against each other all about, anyway?

And here's the new carpet, which they've also installed in the upstairs landing, down the steps and into the family room.


Soooo much better, right?

My parents just finished a kitchen remodel this summer and now they're adding hardwood to their living and dining rooms, adding a skylight and fancy chandeliers... pretty much what I wish I could be doing at my house right now. (Napoleon Dynamite: "Lucky!")

And here's one of my favorite paintings...


which now lives in the guest room so that I can enjoy it whenever I'm visiting!


What do you think?


 Sharing this post at:
Stories of a House,
The CSI Project,
House of Hepworths,
The Shabby Chic Cottage,
The DIY Show Off,
My Uncommon Slice of Suburbia,
Frugal Mom X3,
Blue Cricket Design,
Life as Lori,
Domestically Speaking,
Frugal & Fabulous,
The Shabby Nest,
Finding Fabulous,
Remodelaholic,
Just A Girl,
Tatertots and Jello
Be Different Act Normal,
Under the Table and Dreaming,
Thrifty Decor Chick,
Funky Junk Interiors
Somewhat Simple
House of Grace
go look at some of the other projects people are sharing!

Happy Boo-rthday!

Hardy har har. I'm hilarious, aren't I? Happy boo-rthday. Snort.

Take a gander at what I'm working on this week that has my knees knockin' in my boots...


Is that silly that planning a kid's birthday party terrifies me? Yes, my baby is only turning three... but I'll have several older, more discerning children there as well. And I don't want to be known as the mom who throws lame parties. I've got a rep to maintain establish.

I am not someone who worries about tablescapes or sews cute buntings to use as cake decorations. Cute? Absolutely. Practical and in line with my limited skills? Um, absolutely not.

So I'm trying to finalize my last minute list of simple-esque plans (I do love a good list!) so that I can divide and conquer. If you have any fabulous ideas for snackables, treats, or games... send 'em on over. I beg of you.

Here's a bit of what I'm thinkin' right now...

(Mummy Dogs From Our Best Bites)


(Imagine these with one-color banana bread? Cuter-than-mine-will-be cupcakes from Our Best Bites)


(Frankenstein Punch from Be Different...Act Normal)


(Coolest Halloween bowling ever from Jeanetics)

Who am I kidding? I'm for sure going to be the lame party-thrower on the block. Oh well, it's better than being the cat lady... I suppose.

Psst... guest room reveal, tomorrow!

Monday, October 25, 2010

Covering fabric bins with burlap

I've loved reading all the comments on my little blue cabinet post, you guys had some great ideas for what to do with those open cabinet doors. In the end I decided to go with baskets - which wasn't even one of the original options, y'all are good. Baskets will be perfect, esecially since I forgot to share that the right door doesn't actually open.

You see, it's a faux door...probably where the old radio speakers were housed. Even though I removed the interior wall between the two cabinet spaces, using the area behind that right "door" would have been very difficult. I don't know about you, but if it's difficult, I'm probably not going to do it.

Unfortunately, finding a basket that fit turned out to be trickier than I anticipated. All the square milk crate-style baskets I looked at were between 12 and 13 inches, and I needed my baskets to be closer to 11 inches square. I looked at so many stores and searched online for so long, I'm probably going to have nightmares tonight. The horrible 'I-played-tetris-for-too-long-and-I-still-see-it-when-I-close-my-eyes' type of nightmare... you know what I'm talking about.

Yesterday, I stumbled across these at Walmart (not my favorite store in the world, but hey -- desperate basket times call for desperate basket measures!)


They are medium-sized fabric bins, and they cost only $6 each. Unfortunately they're lacking in both the "cuteness" and "basket-like" categories.

What to do, what to do...

Pull out some leftover burlap and a glue gun and sort it out, of course!

I started by wrapping a long strip of burlap around all sides, pulling it tightly and gluing along each corner to secure the fabric.


Then I folded the raw edge under and glued.


The next step was to finish both the bottom and the top of the bin -- I did both the same way. First I glued each corner down, after pulling the fabric tight.


Next I worked my way around the bin, starting in the middle of each side and working toward the corners.


The last thing I needed to do was cut the holes out for the bin's handles.


It might be hard to see, but I cut little V's at each end so that I could more easily pull the fabric tight against the curve of the handle.

Using my skills of a photoshopper, I have enhanced this photo so that you might have an idea of what I'm talking about here:


Then I went crazy with the glue gun, peeps. Don't be afraid, glue that sucker down. You definitely don't want it unraveling or peeling off.


Here is a side-by-side: Walmart $6 bin, meet your surgically enhanced twin.


(Did you see that I replaced the large photo with a mirror? Looooooove it!)

And there ya have it. My $0 fix for a $6 bin.

Sharing this at Hope Studios,
The DIY Show Off,
The Girl Creative,
My Uncommon Slice of Suburbia,
Life as Lori,
Under the Table and Dreaming
and The DIY Club
...go check out other projects!

I've got nothin'

Okay friends, it's a Monday. And it really is a Monday for me too, because I am not cool enough to have tons of posts written and ready to go at a moments notice, and I did not write something last night, as was my plan.

What I Learned This Weekend
an essay in the classic bulletpoint style

  • It is really hard to find a smaller milk crate-style basket that still has some height; I'm looking for 11x11, 15 inch or less deep. Is anybody out there better at finding baskets than I am?
  • When I get hungry and tired, I get cranky. Like eat-your-head-on-a-platter-for-lunch cranky. I'm aware though, and do my best to control my beast.
  • I can't pack lightly. I had 5 pairs of shoes for a two-night stay at my parents' home.
  • I really do hate unpacking.
  • Driving in rainstorms is scarier if I'm the passenger -- it's a control thing, people. Did you know I liked to be in control? Hi, I'm Anna. Nice to meet you.
  • Lightning? Still scares me (don't tell my kids). By "scares me" I mean I buckle the kids into their seats and crawl through the car into the front seat rather than walk around and risk facing certain doom at the hands of Zeus and his lightning bolts.
  • When the aforementioned scary wrath of Zeus does strike a home (for example, your sister's home a block or two away from yours), it melts useful things like wires and large appliances. And it can even start fires.
  • Did I mention I was reaaaally scared of lightning?
  • It is not a good idea to drive 2 1/2 hours to decorate a room, forgetting the gallon of custom-colored paint in your basement and locking all the doors before you have checked (and double checked, probably) that your neighboring sister does indeed have a working key to your home.
  • Pesky carnival-won goldfish can go for several days in a locked home without food flakes.
  • Sauerkraut. Never tried it? It's mushy, and sour...and that about sums it up.  Color me underwhelmed.
  • I should never fill my house with treats and goodies, because I'm not one of those lucky (crazy) people who can walk by said goodies without grabbing a few. Every time.
  By the way, I did defeat the ugly guest room last weekend...


...and aside from the fact that my last minute paint color selection did not have nearly enough yellow in it (sigh) and was not nearly as cute as my original choice (that remained safely locked inside my home all weekend), it looks okay. As soon as the new carpet is installed this week I'll share pictures.

Hope everybody has a good Monday!

Friday, October 22, 2010

Home tour: Master bedroom

Y'all should be so proud of me today.

I'm sharing photos of my master bedroom even though it's not done, and there are a few parts of the room that actually give me the hives. Look at me, stepping out of my comfort zone. (I even made the bed -- and I admit, I'm not a bed maker... I shoot for 50% of the time and call it good)

You know what? I'm willing to bet that most of us live in works-in-progress, not perfect model homes. Perfect doesn't exist in my little world!

So...um... sorry about the picture heavy post. I wanted to establish a baseline for cuteness so any future projects and reveals would be greeted with appropriate awe.

One last warning: I might have the smallest master bedroom... on the planet.


See the dent at the foot of the bed where the cat has assumed permanent residence?

Yeah, me too.


Yeah, that's right, those are paint chips! Oy, I have an illness.


Can't. Stop. Painting. Go...get...help.

Ahem.

It's not my fault that Sherwin Williams "Comfort Gray" reads completely blue in that room. And I do not want frosty blue walls in my dark little bedroom.

And it's also not my fault that I went ahead and painted the ceiling a coordinating lighter shade so my (one-day-it-will-be) white crown would pop.

Well, okay... that last one was sort of my fault. I guess I didn't have to paint the ceiling if I wasn't sold on the wall color. But it was shiney, people! Anything's better than a high gloss 1960's ceiling, right??


You may have noticed that I have unpainted crown molding, no baseboards, zero cuteness happening on my nightstands (aside from my most-awesome-lamps-ever-that-I-lurve) and the worst thing of all...


OH. So very ugly. Makes me so very sad.

Want to know what makes me even more sad? How small the closet behind those ugly doors is -- and no, you don't get a picture. Just take my word for it.

So what do you think?

I'm linking this up to Just a Girl,
Finding Fabulous,
Chic on a Shoestring Decorating,
Tatertots and Jello,
Under the Table and Dreaming,
It's So Very Cheri,
The DIY Club,
House of Thrifty Decor,
My Uncommon Slice of Suburbia,
Frugal & Fabulous,
The Shabby Nest
and Remodelaholic... go check out the other projects!

Thursday, October 21, 2010

It's-a me, Mario!

This year for Halloween, no matter how hard I tried to convince them to be old-man garden gnomes, my boys insisted on dressing up as Mario and Luigi.


The good part is that those seem to be pretty simple costumes, the bad part is that I tend to overthink absolutely everything -- so simple is really a relative term for me.

I found overalls and long-sleeved shirts at a thrift store,


then I used Gorilla Glue (it's tough, peeps) to attach some inexpensive yellow buttons to the overall's original buttons...


Yep, I'm one of those sticklers for costume accuracy. The yellow buttons are vitally important to the integrity of the costume, believe me.

While I was obsessively googling Mario and Luigi costumes online, I stumbled across a fabulous Mario/Luigi hat tutorial. It was incredibly easy, even for someone as horribly inept as I am. They came together very quickly, and I only spent $4 on fleece (with lots of leftover).


I will take credit for the intials on the hats. I downloaded a Mario font (for authenticity, of course) and made a template. I cut them out of white felt and used craft glue to attach them to the hats.

I also created Mario and Luigi moustache templates (authenticity again... or simply my crazy habit of making everything more complicated than it needs to be, coming to the surface?) and I'm planning on cutting the moustaches out of a sheet of black foam and attaching them with double-sided tape.

The only thing I still need to track down are white child-sized gloves -- I've searched all the big box stores for stretchy winter gloves (they usually have them in the girls' section) but apparently 2010 is not the year for white gloves... unless you want a white sparkly hat to go with it.

Any ideas?

By the way,  I've included the template I created if anybody's looking for a good last minute costume idea!
Mario and Luigi Templates

Linking this post up to Hope Studios,
and House of Hepworths... go check them out!

Wednesday, October 20, 2010

Halloween costumes: Just about the only thing I can sew

Who here loves making Halloween costumes?

If you know anything about me (and my sewing machine induced night terrors) you might be surprised to know that when I typed that question just now, I couldn't help but hop up and down in my chair with my arm raised while saying, "ooh! me! memememe! I do, I do!"

For real.

Okay, not for real. But you can imagine what it would be like if I had been doing that, right? Hilarity.

I didn't always have this intense love for poorly constructed disguises...

(cue Halloweens-of-the-past slideshow)

Here's my oldest in 2006, with a (cutest ever) bat costume, courtesy of Old Navy.


Here he is again in 2007, as a monkey...also from Old Navy.


Okay so I hadn't actually made any of the costumes up to that point. I was just starting out slow, warming up for future design masterpieces.

You may be wondering: (but you're probably not since you most likely have no idea when my kids were born) where was my younger boy that year? Well, he was otherwise engaged.


(Aww.)

The next year, in 2008, it really started happenin' for me:


Ohhh yeah, baby. Felt boot shoe-covers? Hand-cut felt skull and cross bones? Grommets with faux leather laces?? Multi-colored feather madness and slightly gonzo-esque parrot beak? Check, check, check, and CHECK.

This was almost certaily the pièce de résistance in my short costuming career.

Evidence? See 2009.


Yes, that's son #2 in #1's old bat costume. And yes, that's a pillowcase ghost costume. And yes, they look mildly miserable. In my defense, (1) I still made that ghost costume, (2) my oldest asked to be a ghost, and (3) I swear they weren't (too) miserable.

Whew. That was a WHOLE lot of cuteness in such a short period. I'm a bit light headed.

Now for 2010... I'm at it again.

Here's a sneak peak:


More information (and a super easy template for any last minute costume makers, I'm geeky like that!) coming tomorrow!
Related Posts Plugin for WordPress, Blogger...