Tuesday, February 28, 2012

Sparkly Things 02.28.2012

Happy Tuesday! I'm posting late, but rather late than never, right? So much for being on top of things this week, sick kiddos and chickens have a way of keeping me busy! 

Speaking of chickens, my mind is officially blown. I have been spending entirely too much energy obsessively planning and re-planning a coop. I have approximately 700 windows open in my internet browser, all of them open to chicken coop related photos and forums. I'm up at night worrying about insulation and dimensions. Mike doesn't even want to talk to me about it anymore because frankly I'm being obnoxious about it. At least I'm self aware.

So because I'm almost done with the boy's room (almost done! almost done! for reals!) and I haven't gotten enough sleep because of my little one with the flu and my bizarre chicken psychosis... let's focus on some fun things that I've been thinking about lately.

You know, sparkly things. For my inner squirrel. Stuff that caught my eye.

First: these Mossimo wedges at Target

(find them online here)

I stumbled across them and accidentally bought them. They are so cute in person, I promise. The photo does not do them justice, and really you need to go get a pair. They also come in black, and how cute would they be with a fun skirt? Not rolled up sweatpants, though... that's not cute. I should know, it's what I've been wearing for the last two days since I've been stuck at home.

Second: dark chocolate mint m&m's 
(am I the last person to know about these?)

(via Amazon)

Here I am being a super bad influence. But these are sort of like a drug... I'm not usually a fan of weird novelty candy flavors, but I hope these stay. I had a bit of trouble finding them but when I got them home, all was right with the world.

Third: Shelley's entryway closet makeover at The House of Smiths


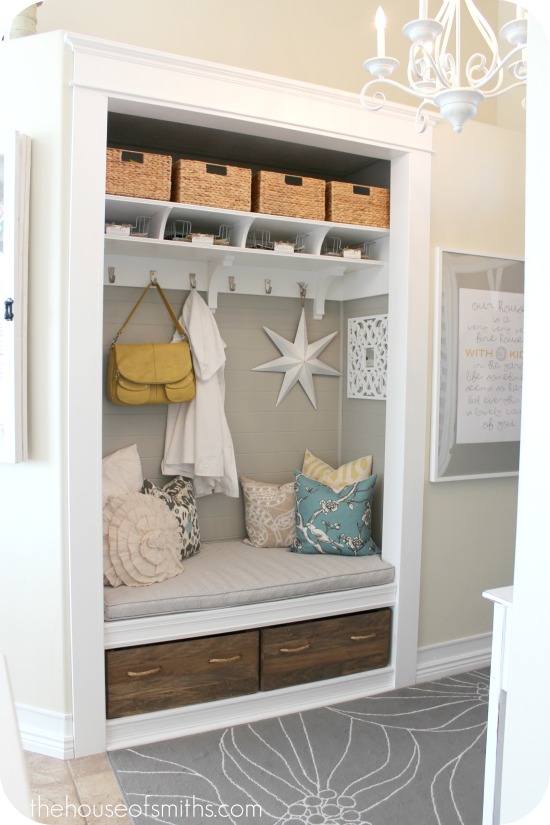
If you haven't already seen it, hop over and check out the amazing transformation. Shelley and her hubby Cason have done some fabulous things... for example, I love those wooden crates, they've been on my "to do" list for a while now.

Be back tomorrow with the last project in my boys' room... reveal at the end of the week! (hold me to it! I'm so good at procrastinating! Somebody hold a maple bar at knife point and tell me to get a move on.)

Interesting reads

Monday, February 27, 2012

Love & Farming--er, Marriage...

Happy Anniversary to meeee (and Mike). Today we've been married for 7 years, and although we've had our ups and downs like any couple, if I could go back in time I would do it all over again. He's kind, loving, smart and funny, an amazing father to our two boys and {secretly} as big a dork as I am. I say secretly because he's usually unwilling to act a fool with me in the aisles of grocery stores, but I know that he can dish out the weird. And he's put up with my brand of crazy for the last decade. That's love, y'all. Plus I really like his tush. 

 We're celebrating by not having our wood floors refinished this week and by taking care of sad kiddos with stomach bugs (so. so. tired.). Oh, and by making impulse purchases of farm animals.


Because that's totally normal anniversary behavior, right? Meet Woodpecker, Cheeto, and Lumpy, our new Rhode Island Reds. Right now they're inside but when they get a little older we'll be moving them outside to a little coop (that we still have to build. Watch for that exciting update sometime soon...ish.) where can start laying eggs and doing chicken things.


It's like I've been possessed and I'm turning into my father.

My dad (whom I love and adore) grew up on a farm in southern Idaho -- pretty close to the town where the film "Napoleon Dynamite" is set, but with 200 chickens and other assorted farm animals large and small, and without the fancy tater tot casseroles or indoor plumbing. Conversely, I grew up in northern Utah 40 years later, where I swore I'd never, ever farm or milk cows or pee outside.

Fast forward to 2012; I live in Idaho and my husband and I have chickens. It's like I hit a certain age and some genetic time bomb went off inside me. If I start wearing calico or churning butter (or, heaven forbid, peeing outside) please call someone.

P.S. Yes, it's legal. We checked!

Friday, February 24, 2012

Hardwood Floor Updates

A while back I shared our plan to have our old, yellowed hardwood floors refinished this spring. I haven't mentioned it since, but we have been taking small steps forward... so it's time for an update!

First, we got bids from three local hardwood floor businesses. All three men were friendly but of course we had to pick one! It turns out that the company we selected has done several (beautiful) floors for homes my brother-in-law has built... which was a happy coincidence. I know I like their work already!

We are going with a water-based, satin finish in a medium-dark tone (I'm not quite sure exactly what that will be, but when the time comes they'll put some samples on the wood and I will, of course, pop them online and share them with you.) The water-based finish did end up costing us a tiny bit more, but I'll gladly pay $100 extra to be able to stay in my home during the process - fewer fumes, quicker recoat times and non-yellowing... worth the money in my mind!


As far as scheduling goes, the hardwood floor guy had a little break in his calendar and offered to come this next week but my blood pressure couldn't handle such short notice. You see, we have to clear out almost 1,000 square feet and stuff all the furniture (including the behemoth of a bunk bed) into our one upstairs carpeted room and the garage. We'll live in the kitchen and the "finished" basement (I use the word finished loosely) for a week. It will be horrid. The thought of it is enough to send me into fits. Somebody pass the smelling salts...

Unfortunately, I really want it done and in the past. Say it with me: pretty floors, pretty floors... so I think we're shooting for the third week of March. Still. So. Close... So. Much. Furniture.

With the new floors will come a few changes:

1. The upstairs bathroom will finally have a threshold. One of the previous owners tiled the room, but they put it on top of the existing floor which has created a couple odd little issues like a partially tiled over heat register cover and a height difference between the bathroom and the hallway. I'm looking forward to having a threshold added for both safety and a more finished appearance to the space.


2. We'll add a few built-in wooden register covers. We decided to have the hardwood floor guys cut around the heat registers in the dining room and front room in order to install wooden covers that sit flush with the reset of the flooring.  I think it will add a nice, finished touch to the main living space for anyone who is detail oriented such as myself! We'll continue to have use regular metal covers in the bedrooms.

3. Our skinny entry hallway will take the first step in its much needed makeover. As you can see from this photo, half of the flooring in our entry is wood and half is a mosaic tile that was added on top, probably in the 60's or 70's, and then painted beige sometime later (it was originally a mixture of red and green, I think). The uneven floor is tricky to work with and I don't care for the combination of peeling beige paint over oddly colored mosaic tiles at all. So we'll be removing both the tile and the wood in the entry up to the point where it meets the front room, and replacing it with lighter colored slate tiles. 


4. The doorway between the dining room and front room was the recipient of a little calculated demo! This door is probably the busiest doorway in the house, but it was a tight squeeze at 36". We opened it up to 48" in order to help traffic flow better. It immediately made a huge difference, and now we find ourselves standing it in chatting with people -- this unfinished doorway is now party zone central in our house. We are so cool.


We were prepared to pay the hardwood floor guys to patch the hole in the floor that would be created, but we were pleasantly surprised to discover that the walls in our 1960 home were placed on top of the flooring, and so no patching will be needed!


I can't wait to get the flooring process underway! Well, no... that's obviously not entirely true as I pushed it off three weeks so I didn't collapse from a panic attack, but I'm still pretty excited for my floors to receive some much needed T.L.C. and be pretty and new (to me). I just wish I could say a little spell and have the 700 pound bunk bed disapparate. And then I want one of those magic tents I can pitch in my basement that includes several bedrooms, jetted tubs and a full sized kitchen. Oh, and a butler. Magic tents need magic butlers.

Don't mind me, I'll just be over here waving my geek flag (it's 14 inches long with a unicorn tail hair core).

Thursday, February 23, 2012

My Life, My Colors

Do you ever feel overwhelmed when it's time to start picking colors? There are literally so. many. colors. I remember several years ago being paralyzed by my fear that I'd mess up... I was so afraid I wouldn't finish right, I couldn't start! Silliness, I tell you. 
Then I finally realized that you can't really mess up, even if the paint color on your walls that you applied during a pregnancy hormone-induced fit of bad decision making only served to help you further refine your tastes in colors and styles, right?

Decor is fixable, so stop stressing out. It also evolves and changes, just like you. The key is to find out what makes you tick; not just what you think is pretty (because there's a bajillion beautifully decorated rooms online and in the pages of magazines that we all subscribe to), but what makes your heart happy and your soul feel at home. That's going to be different for every single one of us, no matter how much we all like the 175,000 DIY chevron {rug, wall, pillow} projects out there.


Take me for instance: I like to be inspired by nature. I love weathered wood in beautiful silvery gray-browns, blue-greens of sea glass, yellow-greens of new spring plants, and warm golden yellows. I like to use those colors in my home, and I'm drawn to them a lot.

I also know that I love bright colors when surrounded and offset by a lot of crisp white moulding or calm, neutral walls. I also like chevron in small unexpected doses, so please no knickers in a twist - I just like to pick on that poor pattern because it seems to pop up everywhere lately!

The problem is, sometimes we don't know where to start. We're so confused by everything we've seen online and in magazines or catalogs that we need a litle help figuring out the difference between the rooms and styles we admire and the rooms we would actually live in happily.

Glidden has introduced a site called My Colortopia that is geared toward just that -- finding out who you are in color! In addition to helpful posts written by some of our favorite home bloggers and an advice column, the site also features a couple tools to help you in your decorating quest.

Today I want to share the "My Life My Colors" quiz -- simply answer a few questions about your (fabulous) self and see some colors pop up that may just be what you were searching for: a fabulous jumping off place. You can find this quiz on the My Colortopia site or right here ('cause I'm magic like that).


Go ahead, I dare you! It's like perfumes, I promise -- just because it smells good doesn't mean you want to wear it. So take the quiz, stay true to yourself and make sure your home avoids being a decor version of your best friend's perfume that doesn't smell as good on you as it does on her when you borrow it on the sly for a hot date. Or something like that. It sounded better in my head. Most things do.


Disclaimer: I have been sponsored by Glidden brand paint to write this post, but the thoughts and opinions expressed are my own.

Wednesday, February 22, 2012

Easiest Envelope Pillow Ever

There are tutorials all over the internet for envelope back pillow covers... I even have one on this blog. So why another? 

Because I stumbled across another way of doing things, and it completely revolutionized my pillow making process. Am I being overly dramatic? Not at all. Okay, maybe a little. But really, this new way is the best way and I was cranking pillows out at top speed, which is saying something for a girl who took a full year to warm up to her sewing machine enough to open the user manual. 

Seriously, if you've never tried making a pillow... now is the time. The time, I say!!!

(I do love some good melodrama)


Prepare yourself for awesomeness. Before, sad Anna would cut 3 separate pieces (2 for the back and 1 for the front) and pin them together. Ha. New, improved Anna laughs at old sad Anna.


That's right. One piece. This pillow measured 20x26" so the piece of fabric I cut was 20x56". If this is your first pillow, try a fabric with a geometric pattern -- it will make it easier to sew a straight line without guides or rulers or marks... just make sure the edge you start with it straight, measure a few places and then cut a straight line, using the fabric's pattern like a grid.

Next, finish both of the short ends. You could mark widths and be all precise about it, but I say it's the back of the pillow and if it looks straightish, it's good enough for me. I eyeball it: fold it once and fold it again. Iron it. Pin it. Sew it. My folds are probably around 1/2" each. Ish.

It's a pillow, not a skyscraper.


Next, lay the pillow on the ground right side up. Fold one of the short sides over, make sure it's straight, then fold the other side over -- all you should see is the wrong side of the fabric now. I doesn't matter where the folds overlap -- remember, it's the back side of the pillow. Center shmenter. Check the width; it should be the width of the pillow (26" in my case). Adjust until it's right, and pin along the top and bottom.


Sew two straight lines (I do reverse the machine and go over each finished end again for reinforcement since that's where the pillow will get the most abuse from inserting and removing inserts, but that takes maybe an extra 10 seconds total). Did I mention this was an easy project?


Use pinking shears to trim the excess fabric and to help prevent fraying.

(ignore the fact that your pillow has suddenly turned green.)

Turn the finished cover right side out, stuff it with a pillow, and admire your work. The fact that you didn't worry about adding length or width for seam allowances (blah blah blah) makes the pillow cover fit nice and snugly, which is how I like them anyway.

Here's the finished pillow again so you don't have to scroll up:


Easiest thing ever. Anybody can sew 4 straight lines, y'all. I just wish it hadn't taken me so long to figure this out, because it is light years easier than my last method (which still wasn't even that difficult).

Are you sewing-challenged like me? Because you can do this, I promise. Throw pillows for everyone!

Sharing at Home Stories A to Z , Thrifty Decor Chick

Tuesday, February 21, 2012

Bias Tape "Hotel" Duvet Cover

Even with this past weekend's silly inexplicable chalkboard fail, I'm still so very close to finishing my boys' room... I'm starting to get antsy. It's a combination of wanting to move on (you know me and starting new things... this whole "finish a room" thing is a new challenge) and being incredibly excited to see and share the end results. 

I have a few packages coming this week to help finish things up, and I. can't. stand. it. Packages send me into orbit anyway (I must need a real hobby), but packages with decor and/or furniture inside? That's even better than opening up a box full of replacement vacuum bags!

It dawned on me this morning that I'm a little behind in sharing some of the projects I've been working on since I've been running around in 18 different directions lately, so I'm going to do my best to get y'all caught up this week. First, I finished the duvet covers for the bunk beds and it was easier than I thought it would be!


I bought 4 packages of navy blue wide single fold bias tape and joined them to make 2 super long strips (2 duvet covers!), then created boxes with mitered corners on top of duvet covers and sewed 'em up.

I found a fabric glue stick at a local craft store and it worked perfectly. Costing less than $4, it was a great replacement for a more expensive basting spray and it held the bias tape securely until I ran it through the sewing machine to produce straight, crisp lines!


1. Grab a duvet cover that needs some fancying.

2. Pull out some pins and a temporary fabric glue stick (or basting spray)

3. Measure a box on the cover, mark the dimensions and lay the bias tape. Fold the corners in to create a mitered look, and secure with the fabric glue stick and an occasional pin (making sure the pins only go through the top layer of the duvet cover so it's still open inside).

4. Stuff that monster through your sewing machine and sew both edges of the bias tape the whole way around.

Easy peasy, and it looks so tailored! I'm love-love-loving it.
 
P.S. You can see that I got the wall lights installed, too -- my brother found them in IKEA, although in his first time shopper sensory overload he ignored my homemade map with the words "do not go up the escalator!" on it and has now pledged never to return to that store. I should have asked for more things if I knew this was my one shot. Drat!

P.P.S. Yeah, we read "Captain Underpants" around here. Nothing funnier to little boys than potty humor, right? We're incredibly high class around these parts.

P.P.P.S. I think tomorrow I'm going to have to share my new and improved envelope pillow sewing process... easiest thing ever. Why did it take me so long to figure this out? 

Monday, February 20, 2012

Chalkboard FAIL

Ugh. I'm so bothered by my recent DIY mess up. If I've got to fail on a craft, why can't it be some ridiculously complicated procedure that's never been accomplished before in competition, like the quadruple axel of craftiness?

But no... I had to fail on a chalkboard. Something that I've done before (along with 90% of the crafty world), with success. Even after I primed (seasoned) my boys' closet doors you'd never know it was supposed to be a chalkboard; it just wouldn't erase. Ghosts of writing past everywhere. I tried seasoning it again, and again. I sanded it. I did a rain chalk dance. I crossed all my fingers. Twice! Boo. Hiss.


Do you know how long it takes to prime a chalkboard this size? How many pieces of chalk it takes? Blerg.

Has anyone else run into a problem like this before? I've pulled the doors down and I'm going to sand them as smooth as possible and then try spray chalkboard paint instead of my old brush-on can (I don't know, maybe it's old? Does chalkboard paint go bad??)

Send any tips my way... I have no idea what went wrong. Wish it had gone wrong on a 5x7 chalkboard instead of two bifold doors. :)

Friday, February 17, 2012

Say It with Me: "This Room Needs to Be Done. Yesterday."

Happy Friday, guys. What will you be up to this long weekend?
 
I will hopefully be finishing my boys' room. Hopefully. Gah. When one has to DIY 80% of a room plan, it can end up being a little time and labor intensive... and I'm not the most patient person in the world. Also, I freely admit that I'm not always stellar at managing my time. So lets all cross our fingers for a giant sprinkling of room redo fairy dust in this room over the next few days.


I have a feeling this brand of fairy dust probably resembles chalk dust. But whatever gets the job done, right?

Edited to add: OH. Downton Abbey season 2 finale. I will most surely be doing that this weekend, too. Anyone else? Don't be coy, identify your awesome selves!

Thursday, February 16, 2012

{Lovelies} 02.16.2012

Valentine's Day is behind us for another year, but now Mike and I are staring down our upcoming anniversary -- we'll have been legally wed lovebirds for 7 years at the end of this month. He's pretty cute, so I think I'll keep him.

These are just some things I'm loving right now and want to call my precious. I figure a list like this is the least I can do for my poor man (since my birthday's coming up soon in April too, and then Mother's Day in May... poor man doesn't stand a chance each year around this time. It. just. keeps. coming. at. him.)

Maybe you'll love some of them too!


west elm's Modernist Bowls


Seychelles Good Intentions sandals
 (reminds me a little of the Saltwater sandals of my youth... only a grown up version!)


west elm's Dimpled Glassware


Garmin Forerunner 110 

 Tiny anchor necklace by Anne Kiel Jewelry

 Spring can't come soon enough for me!

(The birdies that live year-round in the high ceiling of my local Lowe's store are a-tweetin' while they fly around the inappropriately timed patio furniture display... that must mean something. Right? Right?)

Wednesday, February 15, 2012

Have Pendant Light, Will Travel

You know what's annoying? When you drive 3 1/2 hours to an IKEA and forget a few things on your list.

My fabulous Salt Lake-living brother is willing to make his very first IKEA run just for me to pick up what I forgot. Naturally, out of concern for his welfare I drew him a map. I'm sending him back in through the exit area so he doesn't have to wander through the showroom and either spend $200 on impulse purchases or get lost and curl up inside one of the 500 sq. ft. display "homes" until he's found by security that evening, sorting through piles of identical sweaters from Target in a walk in closet. I sure hope he makes it out alive.

 You see, I forgot wall lights for above their bed and a pendant kit -- all of which I wanted to be plug-in, because I strongly suspect my boys won't have bunk beds or the need for a light six feet up on the wall forever. And IKEA has a couple fabulously inexpensive options that aren't hardwired.

And we only even need the pendant because of a combination of the downward facing warehouse pendant light and a tall bunk bed, which both create a dark little nook. And a dark nook is a useless nook.

So while my brother is doing battle with the most overwhelmingly maze-like store in existence, searching for my wall lights, I decided to figure out the pendant on my own (rather than make him search for two separate things on his first trip. See how nice I am?)


Lucky me, I found IKEA's $3.99 lamp cord kit being resold on Amazon for $8.99, which is still $6 less expensive than the clear/silvery version I found at my local Lowe's. I wanted the thick round white cord, so I placed an order and started racking my brain for pendant shade ideas.

 I wanted the light to still look a little industrial, but I didn't want to match the larger pendant in style or finish. I found this utensil crock at a local thrift store for $1.50 and I was sold.


I removed the little round feet with a vice and a little leverage, used wire snips to cut a hole in the base (which was becoming the top) just the right size to accommodate the light socket, spray painted it a glossy orange and hung it up.


I love my little DIY cage light, even if there's still nothing worth mentioning in the nook it's illuminating.


 It makes a huge difference in that dark space.


I'm laying the groundwork, people. Or something.

Monday, February 13, 2012

DIY Faux Metal Arrow

For quite some time I've been planning on making a decorative arrow for above my boys' bunk bed. Just because. I thought it would look cute and take advantage of the weird pocket of above-bunk wall space that is created. (Seriously, bunk beds come with some decorating challenges)

Originally I was going to paint the arrow a few different colors and distress it, but at the end of last week I was lucky enough to stumble across a pin linking to a post on Vivienne's blog, The V Spot, about a paint technique that creates a rusted appearance, and I immediately changed my plan.


Are we so very excited to begin? Ready, okay!

1. Cut your arrow 
(or whatever shape you want -- draw it on a thin piece of plywood and cut with a jig saw. Go crazy. Not literally though, you'll have a very dangerous tool in your hands.) 

Here I am gettin' all crafty. I made my husband take this photo because the only part of me that ever shows up in these blog photos is my hand. Check me out in one of my eleventy billion haaaawt painting ensembles (I swear the majority of my clothes have paint on them because I just can't learn to change before I start projects).

2. Create "seams" in your faux sheet metal
(pretend the arrow is unpainted, I only painted it first so you could see the cuts better)

I laid the arrow on a piece of large scrap and used a utility knife and a scrap piece of MDF as a guide. Cut one line several times to score it neatly, then shift the guide board just a bit to either side and cut another line -- you can see in photo #2 that the thin piece of wood between the cuts will pop out.

3. Add rivets to your seams
(we're nothing if not accurate, right?)

Use wire snips to cut most of the sharp end off lots of flat tacks. Apply hot glue to the back of each tack, push it into the wood and quickly secure with a few firm taps from a hammer.

 
4. Prime (especially the tack heads) and paint your base coat 
Your base coat will be whatever color you want to look like is on top: rust, patina, etc.

I used a combination of 3 cheap-o craft paint colors from Michael's: an orange mixed with brown and a little yellow in spots. Keep it splotchy -- only bits of it will show through in one place, so make sure to give it a varied appearance so it looks more natural.

5. Salt

This was my first attempt -- I didn't love how it looked and would suggest on larger pieces to do larger areas of rust vs. non-rust so it doesn't end up looking splotchy. But of course, I only took photos of the first try. Make sure the thickness of the salt is varied so there are spots that end up looking more peppered and spots that look more solidly rusted.

6. Spray paint
Spray your top color; I went with Krylon's Jade, which I thought most closely resembled the color of a heavy patina. I was going for salty, rusty, patina... you know. An old sign on a dock or something. I don't know, just go with me. Maybe it was painted this color and rusted through... I have no clue. I just liked the combination!


Spray lightly so you don't just spray the salt off.

7. Reveal
This is where it got tricky for me; I love the salt idea in theory, but I had some problems with it. On a piece this size some of the small detail was lost - maybe I should have sprayed more straight up-and-down instead of from the side a bit, but I didn't get as pronounced a grainy look as I was hoping for. Maybe something larger and less melty (to use a technical term) would do better on a bigger piece, like sand?

Also, the salt was difficult to scrape off where it hadn't been piled up, so I did end up using a metal grill brush to scrape it off in places (the brush is now in the trash, no worries!). The bonus here was that I decided that I actually liked the look of the salt bumps and thought it made my "metal" sign look even more weathered. So I kept a lot of them and ended up using a dry brush to stipple rusty highlights and gray lowlights on in places (I just used a gray primer for the gray spots).


I glued a couple sawtooth picture hangers on the back and hung the arrow above my boys' top bunk. Pointing to nothing in particular. I just like the look of it!


Like it? We love it. Even if it is random. And pointing to the corner. Who cares? Have fun!

Resources: Spray paint technique posts at The V Spot and Shortline Modelers

'Just Because' Flowers (from me to me)

I'm working on a post that will hopefully be done later today or early tomorrow (I still underestimate the time it takes to edit photos, especially a lot of them)... but in the meantime, I thought I'd share a little breath of spring that appeared in my house this morning.


Flower bundles like this are so inexpensive, and they make such a happy little statement, so of course they had to hop right into my cart. I love these tulips with their relaxed stems, gracefully arching over the sides of a crystal vase Mike & I got for our wedding.


Happy pre-Valentine's Day to me... maybe you should go pick up some 'just because' flowers for yourself today, too!

"Earth laughs in flowers." 
-Ralph Waldo Emerson

Friday, February 10, 2012

What's Happening in My World 02.12.2012

I love progress, and I'm actually finding this whole "stick to one project at a time" thing pretty fabulous. Granted, I'm still doing little things on the side but I think I'm actually going to have a room done pretty soon over here. Fancy that... a room, done! This is an entirely new concept for me; and of course it won't be done permanently, because I do love a good tweak, but it will be something I can check off my list. I get tingly just thinking about it. 

I think I'm hyperventilating. Where's my paper bag?

Boys' Room


I finished both the duvet covers the other night, and I'm working on the pillows this weekend. I learned a new skill while working on the duvet covers - joining strips of bias tape. Does this count as a skill? I'm going to say that it does. I'd rip out carpet before making a quilt any day of the week, so it's important to savor these small crafty milestones.


Also, the new legs for my oogly thrift store chair arrived yesterday!


Yes, I'm getting rid of the rocker. Don't hate on me -- it's old and broken anyway, every time someone over 40 pounds sits it in and leans back they smack their head on the wall.

Baseboard
If we've been friends for a while, you know that several areas of my house haven't had baseboard in years. We are truly high class around these parts. Well, I am pleased to announce that my living room now has baseboard...

(it's really not short, the carpet ate it. boo on carpet.)

I know, I can't believe it either. And the best part? There's enough leftover base to do the upstairs bathroom (which is also lacking baseboard, naturally) so my handy contractor brother-in-law is cutting a notch in it to accommodate the toilet's water supply line so we can install it. I may have just reached my baseboard quota for 2012. I feel faint.

And last, but not least...


There's a hole in my wall!
Related Posts Plugin for WordPress, Blogger...