Tuesday, May 31, 2011

A Map for the Boys' Room

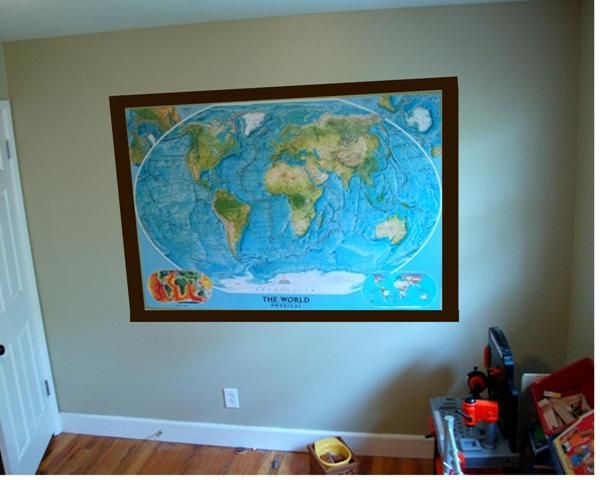
A while back I bought a large map for my boys' room, as the starting place for their room makeover. You know, the makeover that will eventually take place. One day. Hopefully before they graduate from high school. That room makeover.

I love the idea of using maps as decor, and I think it will be nice for my boys' room because it's not really age-specific, and it reminds me of adventure and hopefully it will inspire their imagination and help them grow up thinking about other places and other people. It's educational and cool.


I ordered an oversized physical map from csn.com -- I went with a physical map because I wanted the greens/blues/tans for the room, because those are the colors that I wanted to pull out for the rest of the room. I also wanted a large map to make the most impact on my boys' giant blank wall, and this map is almost six feet wide. So although my boys won't be learning any lessons on state and country capitals, they can ooh and aah at giant lakes and mountains. I'm sure there will be much oohing and aahing. There better be oohing and aahing.

When I hung the map, I originally tried to be all crafty and smart by using some reusable Scotch-brand adhesive squares I found at the store, and even though I ended up using 8-9 of them on the back of the map, they didn't hold well enough and I finally used white thumb tacks to keep the map on the wall where it belongs.

So now, my plan is to use some trim to create a frame around the map and make it look more like a piece of art while hiding the tacks, like this:
(be prepared to be stunned by some awesome photoshopping... you've been warned.)


Now I just need to decide what I want to do under the map, since it does take up a lot of space.


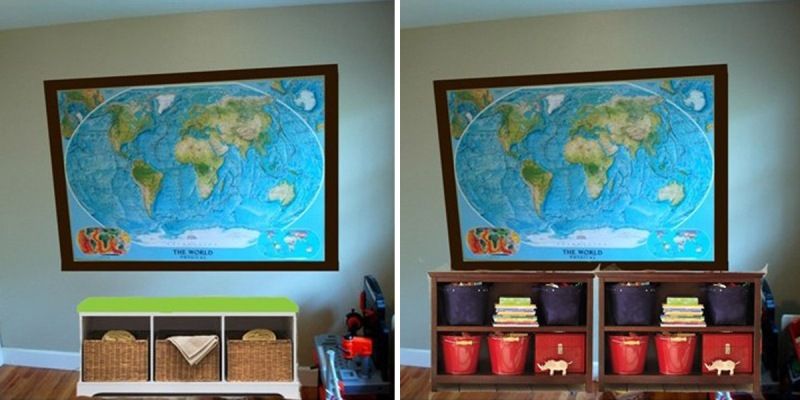
 A bench? Bookshelves?

Decisions, decisions. Y'all know I feel about those.

Sunday, May 29, 2011

05.28 How Does Your Garden Grow?

Rain, rain, rain. We are having such a wet spring that photographing my sad little garden has been a bit difficult. We finally got a little break this morning so I threw some shoes on and ran outside.

In the past week much new green has popped up in my gardens -- they're small still, so I'm crossing my fingers that the green haze I see when I squint and look at the soil belongs to my seeds and not 11,000 baby weeds.

Here's the garden along the fence today:


Yep, my grass is outrageous. Our mower broke and we're working on it. In the meantime, I'm just glad it's early in the year and evil creatures like snakes aren't hiding in my lawn. Blerg.

Here's the garden under my cherry tree:

And here, just 'cause I like you, are some photos of my rainy spring garden.


Interested in following along? Go back to see last week's photos, or skip ahead to the next week's photos.

Friday, May 27, 2011

My Laundry Room Keeps Getting Uglier...

...I'm cool with ugly though, because in my world stuff always gets worse before it gets better. Plus, there is so much more to a room makeover than a couple posts about paint colors and what accessories you're choosing. I'm keepin' in real around here. I am secure in my hot mess of a laundry room.


No ceiling? No problem


Appliances on a 2x4 platform? I call that "construction chic." Don't be jealous, y'all.


Random piles of my shameful little secret littering the ground? A 'rainbow colored explosion of potential brilliance' is more accurate, I think.

Seriously though, you don't want to see how much paint I have hidden away. You know how some husbands are distressed by their wife's shoe collection and are subsequently less than thrilled when a new pair makes its way home? Yeah, that's how my husband is about my paint collection... well, my shoes too. Poor guy.

Back to the topic at hand! Can I win an ugly room award? Does someone want to enter me in some HGTV "pimp my laundry room" contest? Because I'd be okay with that. Someone else can paint my concrete floors. Be my guest, television professionals.

Do I wish this room was complete? Sure. I also wish I had a million dollars and a personal assistant. So I'll work on those and get back to you. Do you have any projects that get stuck in one ugly spot? Any words of encouragement for me?
P.S. If you're still reading, thanks for still loving me this week and hopping back after my brief hiatus. These past few days have been an exercise in craziness, complete with me missing my little boy's end-of-year musical program and the crushing weight of mommy guilt that soon followed and still lingers. I'm just trying to see my way through this blustery, cold (possibly snowy if you believe that) Memorial Day weekend in one piece. Oh, and there will be homemade chocolate chip cookies involved, and my diet can suck it.

Also, I will be posting tomorrow's garden progress photos, and I'm sure everyone is now biting their nails in anticipation. Hey, I don't blame you. Watching plants grow is my favorite pasttime too.

Tuesday, May 24, 2011

Inexpensive No-Sew Curtains

My sadly neglected front room needed a little bit of love, so I went out recently and bought it some curtains. But not really, because I didn't want to pay a lot for two 96" curtains in a room that has zero direction or cuteness happening. I'm not buying real curtains until I have a plan in place.

I bought some sheets instead.

I ventured into my local Walmart and discovered a rainbow of sheeting separates for very little money. I'm not usually a fan of that store, but I am a fan of good deals. And $5 for a twin-sized flat sheet is a good deal.

I bought two flat sheets, turned them upside down so the wide hem would brush the floor like a normal curtain's wide bottom hem, chose my desired length and folded the excess over on top, then added some curtain rings.

voila.


If you didn't want to use rings you could just thread the pole through that wide hem, but then you might need to get rid of some of the extra length at the bottom then hem it, and that would take way too much effort for me.

The only other thing I did was tuck the extra length of sheet that was folded behind into the first ring on either edge so it wouldn't stick out and give my sheet cheat away:


Pretty easy, right? Nobody's seen them and asked me if they were sheets, which I'm taking as a good sign. And for $10 the price can't be beat.

Monday, May 23, 2011

The Power of Paint - A Guest Room Makeover

They say that paint is the least expensive way to completely transform a room. ("they" being the powers that be, of course)

I think that's probably true, unless you're like me and you buy a lot of paint. My husband would like me to inform you that the cost adds up quickly. Do with that information what you will, but I think you should go buy some paint. Today. Bwahaha.


My boys and I were all struck down by a little stomach bug over the weekend, and yesterday I was feeling a little better but I was also feeling completely out-of-sorts and antsy -- you know that cabin fever feeling when you're on the mend but not quite there? Anyway, I decided to paint my guest room. I am an impulse painter like that, and 45 minutes into a project I always realize I have to live with my decision and finish the work.

I started by painting the ceiling, since the guest room was one of the few rooms in the house with the off-white glossy ceilings.

An aside: I know I'm going against the current trend when I say that I like my ceilings white. Sure, there are exceptions -- my bedroom ceiling is a really pale version of the wall color so that the crown moulding (once painted white, ahem...) will pop. I love fun colored ceilings, but as a general rule I'm going to stick to white, thankyouverymuch. I loathe painting ceilings, no matter how many tips and tricks for less-horrid-ceiling-painting-experiences I read. At least with white, I don't have to repaint it every single time I get an impulse to change the look of a room.

Anyway, after I finished the ceiling (sort of. It's going to need another coat the next time I'm in a horribly masochistic mood) I went ahead and painted the walls, too.  While this exercise didn't didn't entirely relieve my weekend funk, at least I can say I accomplished something.

Here's a reminder for what my guest room looked like approximately 24 hours ago:


When we bought the house it was a darker sage green. Not a bad color, mind you... but not really my style, so I painted it an off-white when I was going through my white-breezy-neutral phase. You know how Picasso had a Blue Period? Yeah, well that all-white thing turned out to be my Blah Period (hardy har har!). It turns out that while they're pretty, I don't enjoy living in them. I sure do like color.

I recently had a color mixed for my laundry room, and then I realized that I'm going to have an ugly laundry room for a while; I have so many other things to do. So instead, I used the color to paint my guest room! When I have time and money I can go have some more paint made up for my laundry room.


I love the color. Love, love, love. It's such a pretty blue. I think the green in it keeps it from reading icy or cold (which I hate), but it's not so much that it overwhelms the blue. This is definitely going in my file of fabulous colors.

I want to be a guest in my house so I can stay in there now, and the room isn't even finished!

Sharing this at Thrifty Decor Chick

Saturday, May 21, 2011

May 21: How Does Your Garden Grow?

I don't usually post on the weekends, because I'm busy walking around in my pajamas sipping coffee doing all those important things I do on weekends.. But just for (my) fun I've decided to post an ongoing series of photos dedicated to capturing the baby step progress I make in my totally bare backyard flower gardens.

We're going to have so much fun watching plants grow!
Ha. ha. ha. Okay, I'll have so much fun.

A little back story, just so you don't think I'm an extraordinary flower hater or killer (I'm really just a mediocre one):

The side garden along the fence was just created last year when we laid sod in the yard. It had previously been a rotting side deck with wooden planter boxes that housed a giant man-eating yellow jacket nest. All that exposed wet dirt action in the planters was busy rotting the bottom of the fence posts, so we wanted to plant something with a little height to hide the bottom of the fence until we could replace the boards.

The garden under the cherry tree and back window used to be home to some sort of vine spreader with pretty flowers that turned into burrs. After picking gross amounts of burrs off of the boys and dog a couple times, I ripped the offending plant out and was left with another sadly bare space.

This spring I sprinkled a wildflower mix in both gardens, then I added cosmos and snapdragons to the sunnier spots. My heart beats for cosmos in the summer.


Here's a side garden right after sprinkling the seeds...


And here it is today, several weeks and several squirrel invasions later.


At this point I'm not sure what's a flower and what's a weed. I'm not touching anything, I'm just so glad the squirrels left me a few greent hings.

Here's the back garden after I planted the seeds,


And here it is today:


By the way, anything large and/or tall in this garden is either a weed or the garden's lone surviving inhabitant, a bleeding heart.

Hopefully these photos will become more dramatic as time goes on. Stay tuned for more!

Interested in following along? Skip ahead to next week's photos.

Friday, May 20, 2011

A Backyard Tour & DIY Summer List

An alternate title: "What I'll do on my next 10 summer vacations." Oy!

{Picture heavy post ahead. You've been warned!}

When we looked at this house two years ago, one of my favorite things was the backyard. It was so private and green (you know, except for the no-grass-dirt-yard thing) and I rejoiced in the fact that I was getting my dream with mature trees + DIY needs. The yard is small, so I want to make the most of it.

Immediately after we moved, we pulled out some shrubs, tore a rotting side deck out, removed a tree, and added sod in what I like to affectionately call "The Great Mess of 2009."

Behold:


Last year I spent my entire summer building a bunk bed (yeah it took me that long) so I didn't make any real progress in the backyard... but now I have a blog to keep me motivated!

Here's my big to do list for our backyard:

- Remove all the wire from the backs of the bench decks, build a new support behind the benches to maintain and increase the green wall look while increasing the comfort level for bench sitters.

- Fill in the gaps in the bench backs with 2x4's for a more solid look.

- Add cushions, tables, and other wonderfully colorful and soft items for instant fabulousness.


- String up some more twinkle lights, 'cause I'm all about the twinkle lights.

- Convert back door into a dutch door, and paint it a fun color.


- Add a planter box underneath back window for some more green.

- Landscape under pine trees what we little we'll be able to -- any suggestions?


- Dig up rotting railroad ties and add stone pathway to potting bench and compost pile

- Add a hammock? I just might! I'm a fan of lounging.


- Build a door for the "shed" below the treehouse to keep kiddos out.

- Paint treehouse exterior trim and door, and "decorate" interior, what fun!


-Get some flowers to grow in the empty garden beds. 


- Remove wooden pathway (it's in really bad shape) and replace with stones or pavers leading to the side garden.


-Speaking of the side garden, remove the back gate so we can take advantage of that space too.


-Remove cement from side garden (doesn't that sound like fun?) and use the below inspiration photo to transform the space into an awesome party zone. Or at least a useable space.

inspiration photo source

It goes without saying that these projects will undoubtedly span many years, and I'm sure by the time I cross the last one off my list I'll have an even longer list of new changes. I think it's safe to say I have an addiction.

I can't wait to get my hands dirty... bring on the sun!

Thursday, May 19, 2011

Dish Love

I love dishes. Some people loooooove dishes and have 17 different interchangeable sets, and I don't love them that much. But I still think they're swell.


When my husband and I got married, I we picked a china pattern and a regular everyday set of dishes. I am ashamed to admit that we have used the china a grand total of twice in the six years of our marriage, and both occurrences were in the last six months. Oops. I'm going to work on that, I swear... but china is a topic for another, fancier day.

I can't even remember what the everyday set we registered for looked like, only that the pieces started losing their finish the first time I ran them through the dishwasher... not okay with me! And before you email me about it, they were marked dishwasher safe, so it definitely wasn't my fault. I took those puppies back to the store and bought some Fiesta dinnerware in plum, shamrock, turquoise and tangerine.


Those were and still are fun dishes. Do any of you collect Fiesta plates? I love that you can play around with the different colors, and it would be a fun way to introduce bold splashes of color into a neutral or white kitchen. However, there were a few things that always bothered my neurotic little brain about them:
  • Flat bowls. I don't like my bowls to have corners, is that too much to ask?
  • The dinner plate was big, but the small plate was absolutely itty bitty. Too small for lunch, definitely more of a salad plate, which rendered it pretty useless in my house. I make eleven million lunches around these parts, and if I can't fit a sandwich and a sliced apple on the same plate we're gonna rumble ('cause I'm hardcore like that when it comes to defending my plate choices.)
  • Here's where I embarrass myself. I don't like serving food on similarly colored plates, or plates that 'clash' with the color of my food. Salad on green plates? Preposterous. Spaghetti on an orange plate? Um, no thanks, I just lost my appetite.
I toughed it out like a champ for six years, and this year I melodramatically decided that enough was enough. I had eaten my last monochromatically plated meal, darn it!


I asked for these plates for my birthday last month. 


I'm no plate snob, but if I can get the same look for less money then I'm happy and my husband is happy, and if our lives were a movie this would be the point where a heartwarming musical montage would begin.

These less expensive plates my husband bought for my birthday gift are almost dead ringers for these other plates which rhyme with Shmottery Shmarn Shmemma Shlates. Did you get that? Oooof course you did, I'm sure you're fluent in shneaky talk.


So why did I choose white plates?
  • I think white is a classic choice, but the beading on this set adds some charm and whimsy and keeps it from veering into restaurant dish territory. 
  • No more monochromatic or clashing dinner presentations! Unless I serve white rice and vanilla ice cream, and then I'm sunk and should just close my eyes and start eating.
  • I only have to supplement my one collection with fun salad plates to completely change the look for holidays or different times of year -- no need to buy 17 different sets of dinnerware!
I waited a couple weeks before writing about these plates, because I wanted to be sure, but I am thrilled with them! The beading detail is fabulous, plus they wash nicely, the lunch plate is the perfect size, and the bowls are round... be still my neurotic little heart.

Now that I have found a great classic set of dishes, I can't wait to go find some fun accents like salad plates or dipping bowls to throw into the mix for an entirely custom look.

Do white dishes make your heart go pitter patter, or do they make you want to yawn?
Related Posts Plugin for WordPress, Blogger...