Friday, September 30, 2011

When Horror Struck the Hammock

Take a look at this idyllic scene from only a couple months ago:


And now I present a photo of that very same hammock, today (sensitive readers should consider looking away): 


Where is it, you might be asking? Oh. Well, it's at the very bottom of the photo... on the ground. Chewed to shreds. By squirrels.

In the past I was a friend, nay, a champion, of our four-legged furry-tailed friends. Between this hammock carnage and the mysterious "invisible hummingbird invasion" of 2011... well sirs, I say to you: no longer! 


What on earth would possess an animal that ends up as a mascot on various children's products because of its "loveable" and "furry" nature, to completely decimate an unsuspecting human's hammock (and a Father's Day gift at that) after ignoring it all summer?

Is it bizarre autumnal nesting behavior, or merely the true colors of a descipable and soulless rodent appearing? I'll let you decide, only not really because it's obviously the latter.

Thursday, September 29, 2011

Wood Putty Tips and Tricks

First off, I wanted to let everybody know that my sofa table is being featured at Knock Off Decor today! I'm flattered that Beckie found and liked another one of my projects, and if you haven't checked out Knock Off Decor before, hop over and do so today -- it's full of fabulous projects inspired by designer decor and furnishings.

Now, back to regularly scheduled programming. I told y'all I would be back with some helpful ideas for working with wood putty... and here I am. I use wood putty for a lot of projects -- in fact, the only time I use spackle is when I'm patching walls or when I'm selecting a funny word to say 10 times in a row. Spackle. Ha.

See, spackle is softer and it will flake off and dent (like the wall). For things made of wood or wood products like furniture, trim, and cabinet doors, wood putty is really the way to go. It's stronger, harder, and will last longer. This is the type I always buy:

(image from Elmer's)

There are also stainable versions available, but I have yet to tackle a project like that (I do love my paint) so I can't advise you on that one.

If you've worked with wood filler before you're aware that it dries very hard. Because of that, you're not going to want to overfill it a whole bunch or you'll be sanding it down forever.

I fill it once as close to level as possible and then sand smooth. Because it also shrinks when it dries, you're not usually going to achieve a perfectly smooth finish after one go around, so at that point I repeat the fill/sand process once more and this usually produces a finish that's both level and smooth.
A trick I've found for larger flat surfaces with multiple problems like my newly painted black door with its pet nail marks (or a square bedbunk post that's also been shredded by a naughty kitty) is to use a wide flat tool, like the smooth side of a tile trowel or a large putty knife, to help smooth the entire surface out while the wood putty is still wet -- then after you sand it down the first time you can focus on the remaining divots instead of trying to sand a lumpy surface level as you go.
Another tip: after you fill and sand and you're 80% sure the surface is smooth, it's time to prime. It's much harder to see in the above photo that the surface is smooth, so when it's all the same color you can look for any remaining issues in the surface and they'll be much easier to spot.

Hopefully these tips will help you the next time you decide to whip out a bottle of wood filler and be the handy rockstar that you know deep down you are.

(Spackle, spackle, spackle. I love that word.)

Wednesday, September 28, 2011

A Black Door

Surprise, I painted the door! See how on task I am?

Yesterday morning my sweet husband took the door off the hinges for me and helped me carry it into the garage (it must weigh about 700 pounds) so I could work my magic. I decided to use spray paint, since it was just a basic black semi-gloss paint and I didn't want the hassle of a roller and a brush (which are both necessary when I paint these paneled doors).

First I used my trusty stapler to attach a plastic sheet to the wall and surrounding areas in order to protect from overspray, raised the door off the ground with scrap wood, and addressed some of the major issues. (like the naughty pet scratches all over the bottom from some previous owners)


Come back tomorrow for some tips and tricks for working with wood putty, especially over large flat surfaces (like a door or a flat post or leg on a piece of furniture).

I cleaned the door, forgot to sand it (oops) and then sprayed two thin coats of tinted primer...


...and then I started painting. You've heard it a million times, but several thin coats is the way to go.


You might be able to see in the above photo that I worked my way back and forth like a typewriter, always keeping the spray paint can moving and going past the edge of the door before I changed directions. This helps eliminate spots that receive more paint and end up looking like glossy blotches in the finished surface; this technique is especially important for higher gloss paints (in my experience). If you want an even finish you need to be mindful of how you paint.

I replaced the old doorknob with a satin nickel one we had sitting around, but I needed to address the brass hinges. I didn't want to buy new ones, so I decided to paint them too. And while there are some great tutorials out there for painting doorknobs, I wasn't as concerned with these hinges since they won't be handled constantly like a knob.

I started by using a hosuehold cleaner to remove as much dirt and oil as possible.


Then I sprayed them with primer and followed it with a metallic spray paint and then a clear coat in a satin finish.

Late last night Mike and I hung the door, and I think it turned out fabulously... but this sneak is all you get right now!


 I really am going to finish the entire garage entry area and unveil it in a dramatic fashion as is only fitting, considering my melodramatic streak.


Tuesday, September 27, 2011

Roasting Tomatoes to Freeze

I love pretty much everything about tomatoes: the way they smell when you pick them fresh from the vine, the sweet acidic flavor that screams of summertime, the beautiful patterns that appear when you slice into an heirloom...


...the only thing I don't love is that I can't grow them in my shady yard.

Thankfully I have fabulous parents (one of whom grew up farming and can't seem to stop himself from working the earth each year to my delight) who planted several different varieties of tomatoes this year. Even though they came on late because of our cold spring, they had such a crop that the fruit was bending the tomato cages with their weight.

I gladly volunteered to take some of the bounty; I stuffed myself with fresh tomato sandwiches for a couple days, and then had to decide what to do with the rest. The answer? Roast and freeze them, of course.


I washed and quartered the tomatoes (unless they were super big ones, then I cut them into sixths). I scooped a lot of the seeds and their surrounding tomato goo out (but I wasn't worried about getting it all).


Next I laid them out on a cookie sheet with sides and covered them in liberal amounts of extra virgin olive oil, kosher salt, freshly ground black pepper, italian herbs, and minced garlic. I even splashed some balsamic vinegar on there for good measure and some extra deliciousness.


I slid the pan into my oven and roasted the tomatoes at 400°F for 45 minutes or so. Warning: the smell in your kitchen will drive you insane, it's unbelievably good.

You want the tomatoes to reduce down in size, but you don't want them to be black and shriveled. There will most likely be plenty of juice in the pan that cooked out, and there might be some spots that are darkened. As long as they're not tough little hockey puck tomatoes you're okay -- the point is to leave them soft and squishy so you can mash them up instead of roasting them down to the point of tomato paste or sun-dried tomato status.

Remove the tomatoes from the pan and roughly chop them with a kitchen knife. It will be messy and the juices will run everywhere, so just make peace with that. Scoop the tomatoes into freezer bags in whatever quantities your heart desires, and you are set for life (or at least until you run out). I even left the skins on -- except for a few big pieces that were really noticeable -- but I'm a daredevil and the skins on these were nice and thin; feel free to peel them before you cut them up if you prefer.

Now I can have that gorgeous fresh roasted flavor for sauces, or soups, or even bruschetta. And the best part? Even in the dead of winter, if you buy sad little Roma tomatoes at the grocery store and roast them like this, they will taste incredible (I'd probably peel those ones after I roasted them, though).

Sharing at The Shabby Nest, Just A Girl

Monday, September 26, 2011

Deshaming my Nook of Shame: A Plan (Really!)

I haven't talked about the hook nook turned nook of shame for a long time; we try to pretend it doesn't exist around these parts. Problem is, my entire family walks through it multiple times every. single. day. and hang our heads in sadness. (Except really it's only me)

This has been an unfinished project of mine for a loooong time. One of my 2011 resolutions was to finish what I started, and since I have been failing miserably in grand fashion, I decided to go way back, back to one of the first projects I started at this house, and turn over a new leaf. And really do it this time. For serious. Honest, I promise. Pinky swear even.

So. ahem. Let's take a tour of what will be happening, okay?

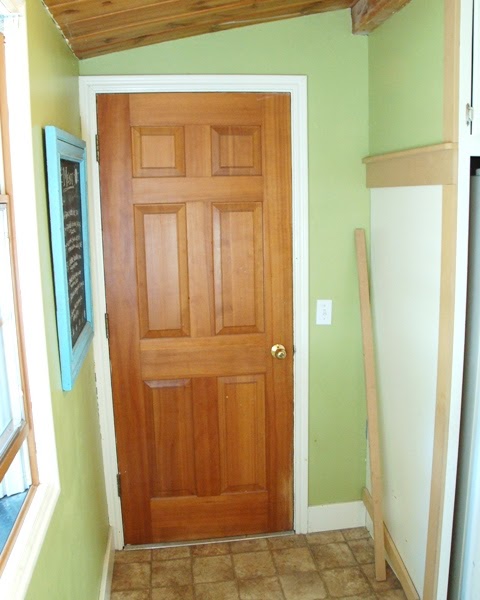
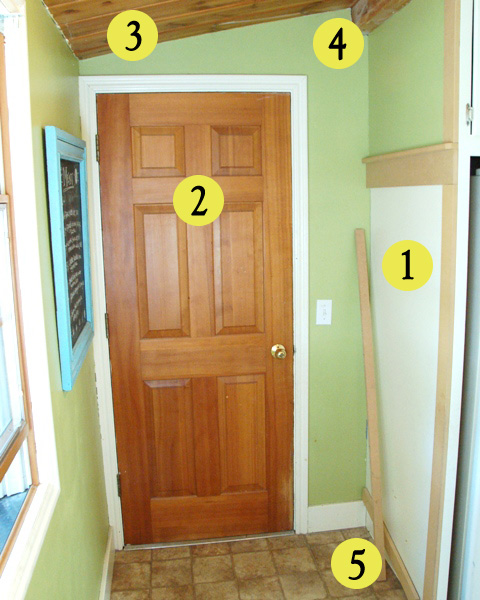
The first phase of my project is going to be the actual entryway area from the garage into the kitchen; like I said, it's the door we use 80% of the time. For shame.


You can see that two years ago I started dressing up the end of my fridge cabinet -- I didn't want a big white cabinet box greeting me when I came inside, so we put a piece of masonite on the top section, had it textured with the rest of the walls, and I had planned to finish the bottom to look like molding, complete with hooks for backpacks.


Well, it never happened. I kept putting it off because in my kitchen remodel master plan the entire fridge cabinet will be replaced with cubbies. The problem is, that still hasn't happened either -- and until we can budget for a new kitchen, I need some sort of entry hook system to keep myself from going batty.

So here's the plan:


1. Finish the molding on the bottom of the fridge cabinet, caulk and paint. Add hooks. Breathe a sigh of relief as backpacks (hopefully) get hung.
2. Paint the back door. I'm thinking black?
3. Paint the angled tongue-in-groove ceiling white.
4. Stain the beam at the top a darker color. (Down with orange wood!)
5. Possibly add a boot tray at the bottom

Re-painting the room is in my long term plans too, but I think I'll like the apple green much more once I get rid of all that orange wood and MDF.

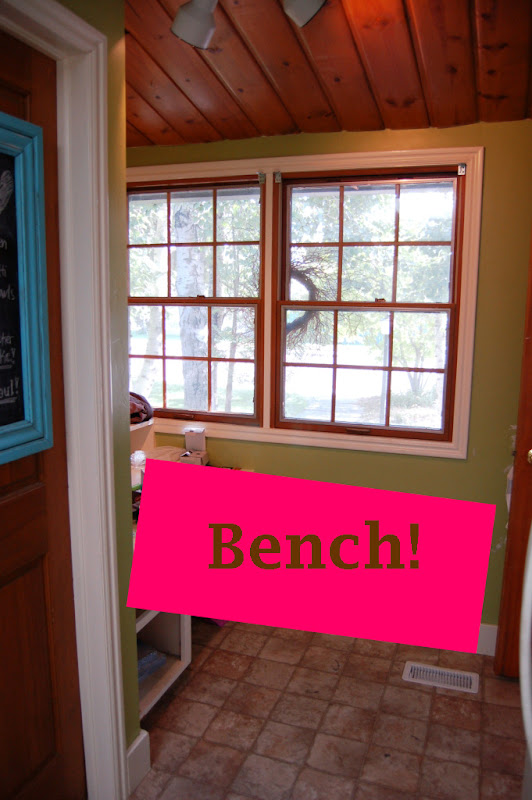
As for the other side of the nook, the plan hasn't changed from the last time I wrote about this sad little area of my house.


I may be getting help for that part of the project. And by 'may be getting help,' I mean I have absolutely no idea how to build a bench. Eep.

Thursday, September 22, 2011

A Big Fat Fail

I've been debating about whether or not I should share this post, since I'm sort of a perfectionist and a tiny part of me shrivels up and dies every time I make a mistake or something doesn't turn out the way I want. (I kid, I kid...sort of. ha.) The more I thought about it though, I realized that everyone has DIY/crafty fails. So I'm putting on my big girl pants and I'm sharing one of mine today.

Picture it: Idaho, September 2011. It was the night before we left for my friend's wedding, and I was still fretting that I hadn't been able to find a cropped navy cardigan because I'm neurotic like that. Suddenly, I recalled a post on Young House Love I had seen over the summer about dying fabric in a washing machine, and I had a brilliant plan -- to make my own navy cardigan.

At this point I'm thinking that I'm unstoppable! I'm like Laura Ingalls Wilder or something -- there's nothing I can't handle, be it wild animal or incorrectly colored cardigan.


I selected a green cardigan I already had, thinking that it was lighter than the navy so I shouldn't have any problems. Next I went to the craft store, picked up a packet of iDye for natural fibers in Navy, and got down to business.

(check out my sweet polish job.)


I admit that my plan had some flaws, the least of which was the fact that I tied up the washing machine for hours and hours the night before a trip, when I'm usually doing last minute loads of laundry because I'm a procrastinator and laundry sucks my will to live.

However.

I was shocked and dismayed to see a pure black cardigan emerge from the dryer a couple hours later. Black, people. Not navy.


(Don't let the dog's calm attitude in that photo fool you; we were all devastated by the turn of events.)

I googled, I soaked in hot water, and instead of lightening the color I was ultimately left with a streaky, dark green hot mess of a cardigan. Boo. Hiss. I'm so over dye and fabric and even cardigans in general.

So instead of trying again, I've moved on to a new crafty venture: crochet. I purchased a pattern for a hat on a whim two years ago because I figured it couldn't be too hard to learn, right? Well two years later, I'm finally goin' for it; I will have this hat, even if it kills me.


Or, you know, seriously cramps my fingers or something.

Do you have any crafty fails you want to share? Please, please do. Let's have a crafty fail party.

(Um, does anyone else besides me think that's a genuinely hilarious idea -- a crafty fail link party?)

Monday, September 19, 2011

Playing Dress Up

I love shopping for the same reasons that I love decorating. My forté is really pretend online shopping, because I never have enough cash (or closet space) to feed my real addiction passion.

Have you ever heard of Ruche? It's got a lot of fun finds, a bit of an Anthropologie-esque vibe but much easier on the budget. This past weekend I decided to go on a pretend shopping trip and see what I could put together, just for fun. Here's a few outfits -- aside from one item each, they're exclusively from Ruche.

How do you feel about the bow tie blouse trend? Because I can't decide, but I think I might love it. Especially this particular blouse, I love the rust color and the shorter sleeves -- perfect for bracelets, which I'm a big fan of.

Sheer blouse
$33 - shopruche.com

Tweed pencil skirt 
$29 - shopruche.com

Missoni black pumps
target.com

Chain clutch
$36 - shopruche.com

Bangle bracelet
$13 - shopruche.com

Beaded earrings
$25 - shopruche.com

My favorite part of this next one is the supah fly clock necklace. Flavor Flav! (Is anyone surprised to see those wedges I fell in love with show up on this blog again? Of course not.)


Floral top
$40 - shopruche.com

Pants
$39 - shopruche.com

Wood wedge
$119 - bloomingdales.com

Faux leather handbag
$49 - shopruche.com

Flower jewelry
$17 - shopruche.com

Wide bracelet
$13 - shopruche.com


And finally, we have the required mustard cardigan ensemble, because I've been on the hunt for one I loved for what feels like forever, and I just can't shake my obsession.


Sleeved dress
$40 - shopruche.com

Aubin Wills merino wool top
$140 - net-a-porter.com

Opaque hosiery
$9.99 - shopruche.com

Chelsea crew shoes
$65 - shopruche.com

Gold tone jewelry
$9.99 - shopruche.com

Tribal belt
$15 - shopruche.com


If you're paying attention and you like to buy Christmas gifts, feel free to send me the two shirts and the dress. And... okay, the cardigan and brown purse, too.

What's your favorite?

P.S. Oh, and the loafer wedges. Dear Santa, maybe I need a job?

P.P.S. This coat too. Stepping away from the computer now...

{Note: Ruche has no idea I'm writing this post, I received no compensation for sharing my opinions -- I just had a bit of fun on their site. However, they're welcome to send me anything they want. HA!}

Friday, September 16, 2011

Friday Show & Tell

It's a chilly, rainy morning here -- I made apple cinnamon cornmeal pancakes for my boys and I'm wearing boots and a scarf. Translation: I'm lovin' this weather.

You know what else I'm loving? My husband's new tie.
Confession: I did not catch the Missoni at Target bug the way most everyone else did, but I did love some of the accessories/home goods. Like that sweet tie. Call me boring but I'd much rather have a pop of zigzaggy fabulousness than be head-to-toe Austin Powered.

I thought I'd share a few other things that I loved this week. Isn't show & tell grand?

Shelley made some beautiful DIY "vintage" crates over at The House of Smiths.
  
Gabby of Design Mom made some monogrammed mugs that could be just the ticket for you if you like to DIY your way through the holiday season.

Kate at Centsational Girl whips up some thick cutting boards that would also be perfect gifts (can we tell that I'm already thinking 2 months ahead?)

Just a Girl's Chris shares some amazing and sophisticated boy bedrooms... I'm a sucker for this post in particular because I've got two boys; blog projects/clothing stores/everything in the world is always 80% girl, 20% boy. "Let's hear it for the boooooy(s)...."

Emily of Remodeling This Life reminds us to find contentment in unexpected places in a post over at SimpleMom.

The Nester (that wise woman) writes about 5 signs that you are decorating out of fear. (Been there, done that. Fear is laaame.)

I hope you have a fabulous fall weekend!

{found via Pinterest}

P.S. I want to go to there.
Related Posts Plugin for WordPress, Blogger...