


There are tutorials all over the internet for envelope back pillow covers... I even have one on this blog. So why another?
Because I stumbled across another way of doing things, and it completely revolutionized my pillow making process. Am I being overly dramatic? Not at all. Okay, maybe a little. But really, this new way is the best way and I was cranking pillows out at top speed, which is saying something for a girl who took a full year to warm up to her sewing machine enough to open the user manual.
Seriously, if you've never tried making a pillow... now is the time. The time, I say!!!
(I do love some good melodrama)

Prepare yourself for awesomeness. Before, sad Anna would cut 3 separate pieces (2 for the back and 1 for the front) and pin them together. Ha. New, improved Anna laughs at old sad Anna.
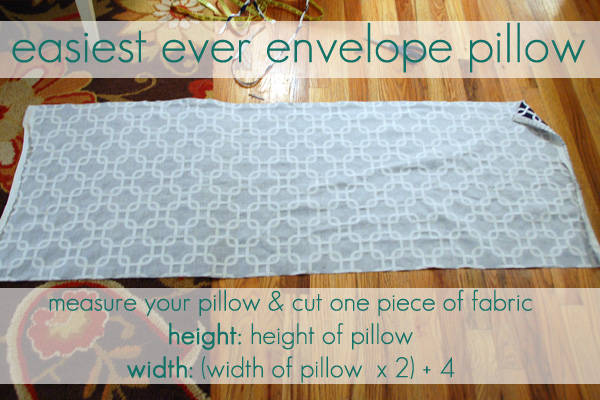
That's right. One piece. This pillow measured 20x26" so the piece of fabric I cut was 20x56". If this is your first pillow, try a fabric with a geometric pattern -- it will make it easier to sew a straight line without guides or rulers or marks... just make sure the edge you start with it straight, measure a few places and then cut a straight line, using the fabric's pattern like a grid.
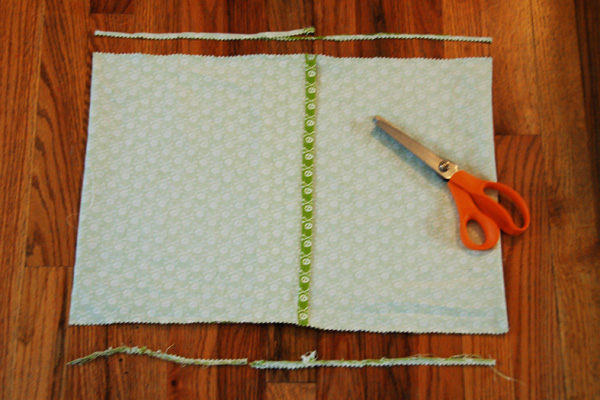
Next, finish both of the short ends. You could mark widths and be all precise about it, but I say it's the back of the pillow and if it looks straightish, it's good enough for me. I eyeball it: fold it once and fold it again. Iron it. Pin it. Sew it. My folds are probably around 1/2" each. Ish.
It's a pillow, not a skyscraper.
It's a pillow, not a skyscraper.
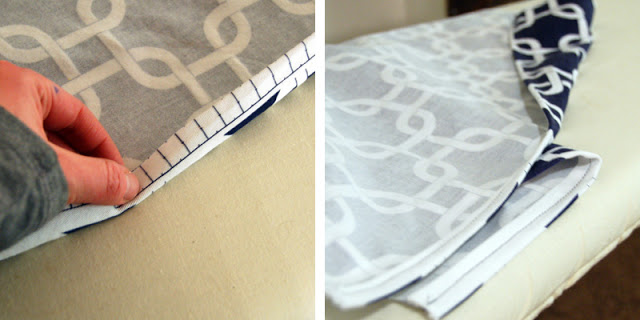
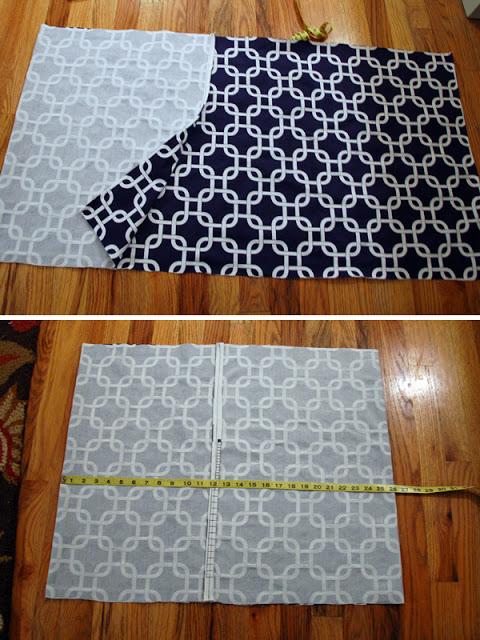
Next, lay the pillow on the ground right side up. Fold one of the short sides over, make sure it's straight, then fold the other side over -- all you should see is the wrong side of the fabric now. I doesn't matter where the folds overlap -- remember, it's the back side of the pillow. Center shmenter. Check the width; it should be the width of the pillow (26" in my case). Adjust until it's right, and pin along the top and bottom.
Sew two straight lines (I do reverse the machine and go over each finished end again for reinforcement since that's where the pillow will get the most abuse from inserting and removing inserts, but that takes maybe an extra 10 seconds total). Did I mention this was an easy project?
Use pinking shears to trim the excess fabric and to help prevent fraying.
(ignore the fact that your pillow has suddenly turned green.)
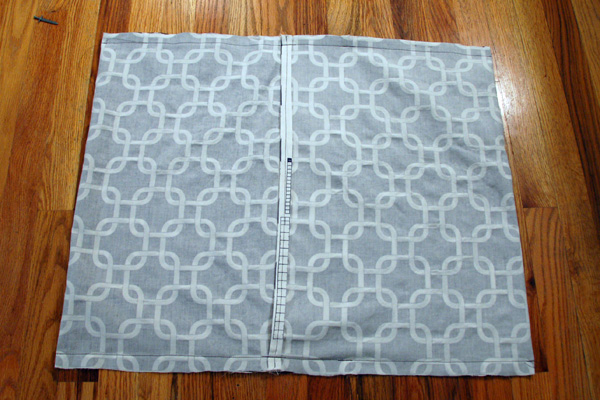
Turn the finished cover right side out, stuff it with a pillow, and admire your work. The fact that you didn't worry about adding length or width for seam allowances (blah blah blah) makes the pillow cover fit nice and snugly, which is how I like them anyway.
Here's the finished pillow again so you don't have to scroll up:
Easiest thing ever. Anybody can sew 4 straight lines, y'all. I just wish it hadn't taken me so long to figure this out, because it is light years easier than my last method (which still wasn't even that difficult).
Are you sewing-challenged like me? Because you can do this, I promise. Throw pillows for everyone!
Sharing at Home Stories A to Z , Thrifty Decor Chick
Sharing at Home Stories A to Z , Thrifty Decor Chick


I am hesitant to say that this looks easy enough for even myself but I will say it looks easy enough not to scare me off entirely! ;) Thanks for the tutorial...will definitely be giving this one a try.
ReplyDeleteThanks for the tutorial! I often wondered how people make the envelope pillows. I use polyfill and do the 4 stitched sides thing but I'm going to give this a whirl!
ReplyDeleteI seriously think this is the smartest pillow tutorial I have ever seen. In fact, this is the first pillow tutorial I have ever lent a comment to! Super-love this!
ReplyDeleteOh my gosh this rocks my world, now I can make new pillows for every season!
ReplyDeleteGenius :-)
Love your tutorial! I've sewn for many years and just recently started doing pillows. Will have to be like Jessica@Decor Adventures and do them for every season! Thank you!
ReplyDeleteGuerrina in CT
Wonderful wonderful tip! I always cut three pieces...not sure why I've never thought of this! Thank you!
ReplyDeleteAre you reading my mind?! Or spying through my living room window?
ReplyDeleteI had three perfect pillows on my couch for several years, but my disgustingly messy boys have turned them into decorating disgraces.
I've spent countless hours searching for just the right replacements, but luck has not favored me.
I do have a set of matching curtains, no longer in use and still pristine, but I didn't want to pay someone to transform them into pillows.
The MIL gave me a simple Singer eight, maybe even 10, years ago, but the poor thing has never seen the light of day! It's still in it's box, collecting dust in my basement.
I kept thinking I should start searching Pinterest for pillow turtorials...then you're post popped up!
Guess what project I'll be tackling next week when the kids are back in school?
I just finished doing 2 pillows the "old fashioned" way -- I'll have to try this on my next project -- looks super easy!
ReplyDeleteOh My you are hilarious!! and this is sheer genius!!! Thank you for making it even easier!!
ReplyDeleteCompletely genius!!! I just finished my first pillow. Now I'm on a roll :) Thank you so much for this tutorial.
ReplyDeleteNow that I've hit "publish" I guess I'm committed to starting & finishing this project...
ReplyDeletehttp://www.fortuitoushousewife.com/2012/03/sew-scary.html
How simple...seems like it's stupid ez... I'm bound to mess it up... Will try it though
ReplyDeleteI am still in the warming up the machine stage of making pillows, but I am about ready to get started. This tutorial might be the boost I need!
ReplyDeleteThis is FABULOUS!!!! If I weren't lying around looking at projects to do I'd actually get up and do this one. Will definitely try it out.
ReplyDelete