


Even with this past weekend's silly inexplicable chalkboard fail, I'm still so very close to finishing my boys' room... I'm starting to get antsy. It's a combination of wanting to move on (you know me and starting new things... this whole "finish a room" thing is a new challenge) and being incredibly excited to see and share the end results.
I have a few packages coming this week to help finish things up, and I. can't. stand. it. Packages send me into orbit anyway (I must need a real hobby), but packages with decor and/or furniture inside? That's even better than opening up a box full of replacement vacuum bags!
It dawned on me this morning that I'm a little behind in sharing some of the projects I've been working on since I've been running around in 18 different directions lately, so I'm going to do my best to get y'all caught up this week. First, I finished the duvet covers for the bunk beds and it was easier than I thought it would be!
I bought 4 packages of navy blue wide single fold bias tape and joined them to make 2 super long strips (2 duvet covers!), then created boxes with mitered corners on top of duvet covers and sewed 'em up.
I found a fabric glue stick at a local craft store and it worked perfectly. Costing less than $4, it was a great replacement for a more expensive basting spray and it held the bias tape securely until I ran it through the sewing machine to produce straight, crisp lines!
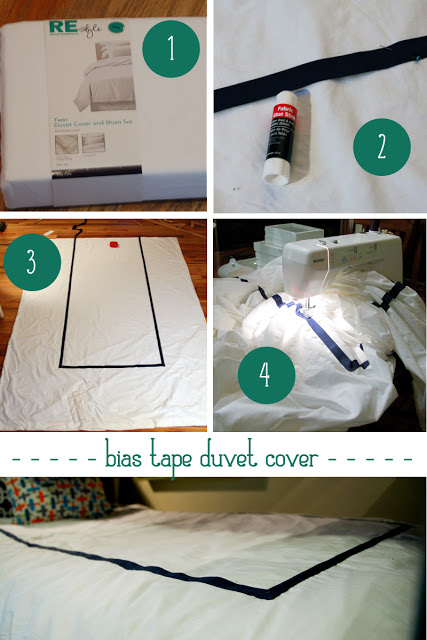
1. Grab a duvet cover that needs some fancying.
2. Pull out some pins and a temporary fabric glue stick (or basting spray)
3. Measure a box on the cover, mark the dimensions and lay the bias tape. Fold the corners in to create a mitered look, and secure with the fabric glue stick and an occasional pin (making sure the pins only go through the top layer of the duvet cover so it's still open inside).
4. Stuff that monster through your sewing machine and sew both edges of the bias tape the whole way around.
Easy peasy, and it looks so tailored! I'm love-love-loving it.
Easy peasy, and it looks so tailored! I'm love-love-loving it.
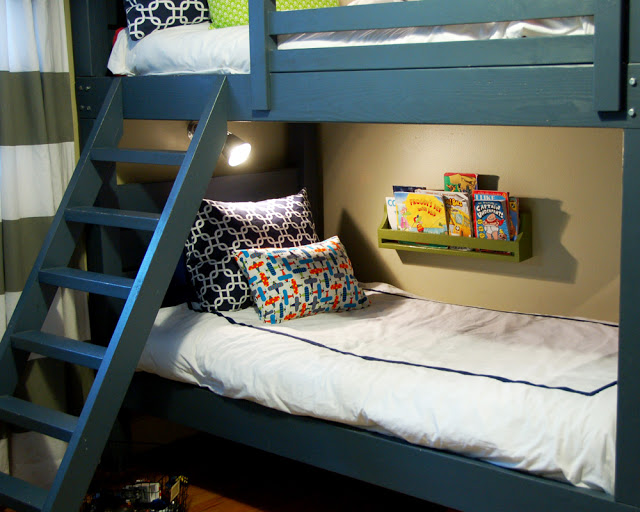
P.S. You can see that I got the wall lights installed, too -- my brother found them in IKEA, although in his first time shopper sensory overload he ignored my homemade map with the words "do not go up the escalator!" on it and has now pledged never to return to that store. I should have asked for more things if I knew this was my one shot. Drat!
P.P.S. Yeah, we read "Captain Underpants" around here. Nothing funnier to little boys than potty humor, right? We're incredibly high class around these parts.
P.P.P.S. I think tomorrow I'm going to have to share my new and improved envelope pillow sewing process... easiest thing ever. Why did it take me so long to figure this out?
P.P.P.S. I think tomorrow I'm going to have to share my new and improved envelope pillow sewing process... easiest thing ever. Why did it take me so long to figure this out?


The boys room is really coming along! Its looks really great! I'm not sure if you've mentioned this before, but where did you get that cute little book shelf above their bed? Or beside it.
ReplyDeleteWhat a good idea! I had not thought about just adding bias tape to make your own bedding!
ReplyDeleteThe bed and bedding and lights look great! I just started on my oldest son's room...bought him bunk beds and I just painted the walls this afternoon. I've never painted a room by myself before!
ReplyDeleteI'm not usually a finisher either - everything is always in a constant state of progress. I'll be anxious to watch you declare it done! The duvets turned out super - so smart and simple to add the bias tape. Great mix of colors and fabrics too. I'd love it if you'd share this at my Show & Tell party, going on now @ the Delectable Home.
ReplyDeleteThose look really good -- like very expensive bedding! I'm going to keep this idea in mind.....
ReplyDeletelove the small bookshelf for the lower bunk...where did you find it?
ReplyDeleteI actually built it from plans at ana-white.com :)
ReplyDeleteOh my gosh, I just did almost the same thing with a white duvet from Target for my daughters room! I hope you don't think I copied you and didn't give you credit. I swear I'm just now seeing this tut! Great minds think alike I guess. ;)
ReplyDeleteAnyway, I'm loving your blog.
No worries, I wasn't the first person to stumble across this idea anyway :) Your daughter's bedding looks fantastic and I'm happy you dropped by!
Delete