


Have you ever made jam? Growing up, my mother made it every year without fail, so naturally I assumed it was a necessary component of adult life. I tried it, failed miserably, and decided it wasn't so important after all. Canning is hard, y'all. That's my story and I'm sticking to it.
Last year out of domestic desperation, I decided to try making freezer jam. When I was younger I dismissed the idea, thinking that freezer jam was for underachievers who didn't want to be bothered with making the real stuff. Then I tried it and realized there was no competition; freezer jam is crazy good. Way better than the regular stuff, because it tastes like fresh fruit instead of cooked fruit and sugar. I was an instant convert.
Freezing or canning fruits and vegetables is a fabulous way to use up your extra produce and enjoy those delicious flavors in the dead of winter. I already showed you how to roast tomatoes for freezing, and have a heavenly smelling kitchen in the process. Today we're going to talk about freezer jam.
I use the the pink box of pectin for no sugar/less sugar freezer jam recipes (2.5 cups of sugar per batch versus 5.5 cups of sugar) so more of the fruit taste comes through, and also because the jam is healthier and has less calories. But mostly because of the taste.
The first step is to peel and prepare your peaches, which is really simple if you know the trick:
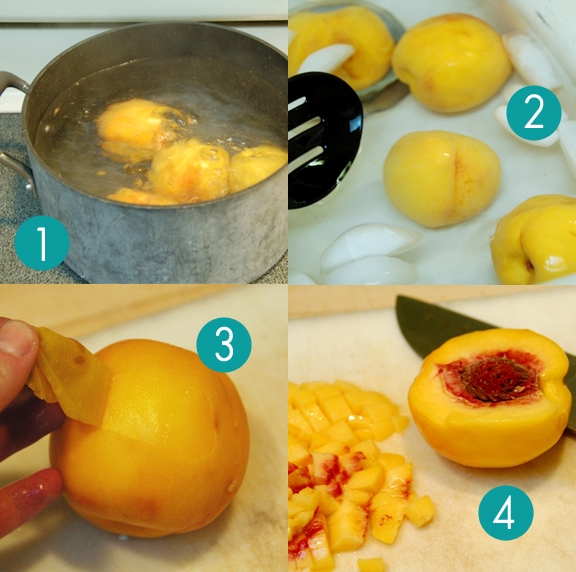
1. Place your peaches in boiling water for 30-60 seconds.
2. Transfer them to an ice water bath to halt the cooking process.
3. The peel should slide right off easily. (This trick also works for tomatoes)
4. Roughly chop your fruit. I do this because I mash them by hand and don't want any large bits sneaking through, but you can also pulse them in a food processor quickly -- just avoid pureeing them, as jam should have chunks of fruit in it.
Now it's jam making time:
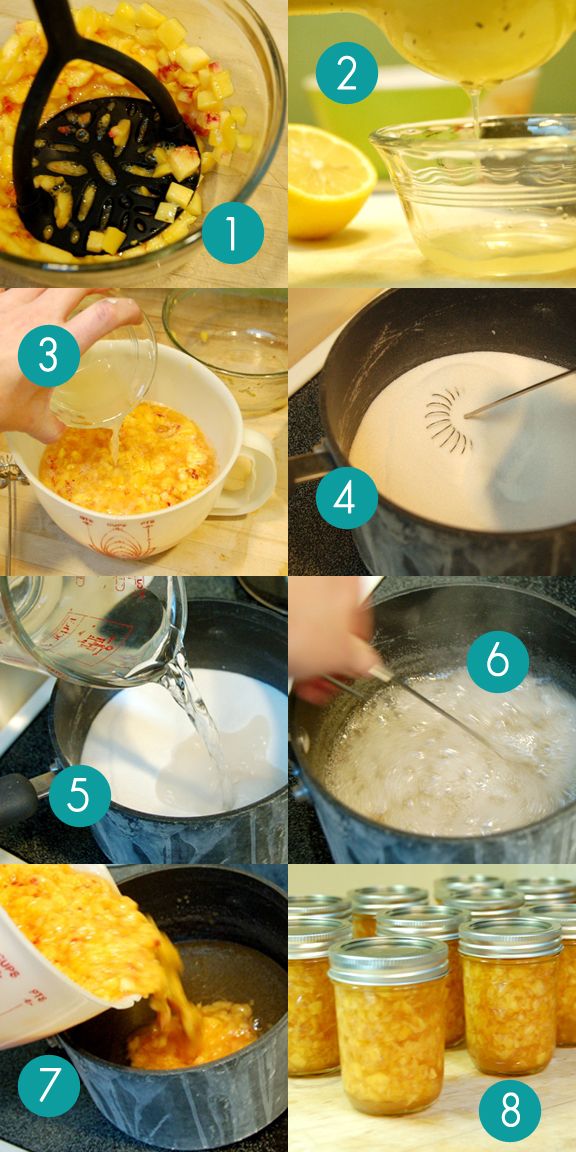
1. Mash 4 cups of peaches (or pulse in a food processor)
2. Measure 2 Tablespoons of lemon juice.
3. Add lemon juice to fruit mixture.
4. Mix one box of less/no sugar pectin and 2 1/2 cups granulated sugar.
5. Add 1 cup water to sugar/pectin and stir until moistened.
6. Heat pectin/sugar/water to a boil over medium heat, stirring constantly. Boil for 1 minute while stirring.
7. Remove from heat, add fruit, and stir for 1 minute to make sure it's mixed well.
8. Pour into small jars or plastic containers, leaving 1 inch of space at the top for expansion during freezing. Leave at room temperature for 24 hours, then move to the freezer.
Note: The only glass jars that are safe for freezing are the kind with straight sides; ones with "shoulders" like classic canning jars can break more easily when frozen.
Easy peasy. Delicious. Even if it doesn't set up firmly ('cause mine didn't this year) it makes fabulous topping for ice cream, pancakes, or waffles. See me rolling with the punches?
{Click here to see the other posts in my 31 Days of Fall Nesting series...}


4 comments:
I put up 50 pounds of cherries for my grandparents last month. After that I was thinking no more canning ever--EVER. But, now looking at those peaches I'm thinking maybe a little more canning wouldn't hurt... much. Thanks for the post, Anna! :)
We used to have peach trees when I was growing up. Never knew about this trick for peeling, though. Heh. Would've saved my mom, aunt, and grandma a lot of peeling had we known. :-)
One reason I'm so inordinately fond of making raspberry, strawberry, and apricot jams is because you don't have to peel the fruit. :)
Still, the blanching trick is a timesaver.
love,
mom
Oh my goodness! I am reading your steps and realizing I can actually do this!
Question, how many glass jars did you end up using with the above recipe?
Post a Comment
I ♥ comments. Me + you = BFFs 4VR.
(P.S. URAQT)