Thursday, September 20, 2012

Concrete Walkway Update

So, big news -- still working on that broken concrete pathway. Mike was done with his contractual portion of the project after he took the jackhammer for a spin, and I've been working on it a little at a time in the afternoons. Okay, confession, I'm being lazy about it.

I've been digging out the path so that the concrete will sit down into the ground and not above everything, and in addition to puzzling the pieces together I've been having to do my best to level them all as the bottoms are uneven and the pieces are different widths -- it's not difficult but it is a little time intensive. I've had plenty of time to consider how manual labor is not really my forte.

Now I've reached the point where it's time to branch off the previous walkway and blaze my own trail: I think I'm going to extend the new path into a little mini patio spot for Mike's grill before turning the corner and continuing through the side yard where the concrete pad used to be.

I think it's going to look really nice when it's all done and there are plants in the cracks between concrete pieces...

Now to just focus on getting there.

Wednesday, September 19, 2012

Entry Inspiration Board

This morning I spent a few minutes making a little inspiration board for my entry project (and then a few more remaking it when my computer shut itself off and I hadn't hit the 'save' button once... yuck!)


Here's a shot of my entry right now, complete with peeling red paint on my door.


Have I mentioned that my entry and front room embarrass me whenever people come over? My goal is to have them presentable by my Christmas party, and even though we all know I'm a fan of inappropriately timed, last minute projects, I figure starting now might actually be a good idea.

Here's my entry plan:

1. Remove the old raised tile and the remaining old orange hardwood (I didn't have the floor guys refinish that section) and replace with new tile throughout the entire entry hall
2. New casings around doors in entry and front room
3. New baseboards throughout both spaces
4. Add board and batten wainscoting to both spaces
5. Paint wall above board and batten treatment -- I'm thinking Benjamin Moore's Palladian Blue right now.
6. Sand, prime & paint the backside of the front door - white or gray? We'll have to cross that bridge once a bit more of the room is done so I can feel it out.
7. Built a narrow bench from these plans.
8. Makeover the closet door by creating some faux panels.
9. Install a new light fixture --  I'm loving the look of the rustic lantern in my design board, but we'll see.
10. Accessorize the space to decrease my guest-induced-shame.


Monday, September 17, 2012

Narrow Entries

Our front room and entry are on my list of things that need to change this fall. They are the first thing guests see when they come over, and both spaces are in sad shape (complete with missing door casings!) My entry is shaped like a short hallway and while I like that I have an actual entry space, being narrow presents a unique set of challenges when planning an attractive and functional entry. I thought I'd share a few narrow entries I found online for those of us who want to take full advantage of all the nooks and crannies available in our home's floorplan!

This space is very tight, but it's still useable:

 (via Houzz)

These people found a nice piece of narrow furniture for storage (reminds me of IKEA's HEMNES shoe cabinet) and kept the design simple -- a light wall color and only a few decorative accents. Adding things like hooks and coats could easily have made this entry feel like a crowded closet, don't you think? I do like the pattern on the floor -- I think it was smarter to put the detailed touches on the floor instead of the walls in this space.

I really like the taller wainscoting in the photo below:

 (via Houzz)

You can have a color on the walls above and some architectural interest while still having an open looking space with clean lines overall, which I think helps make a narrow entry feel wider.

These next entries are wide enough for benches and cubbies which are great details that makes any entry a truly functional space (which we desperately need):

 (via Houzz)

(via Houzz)

I love the semi-gloss paint on the wainscoting and ceiling in that second room -- the light bounces around and makes it feel bright and open. The larger tiles also make the room feel more spacious. Between you and me, I also really like the cedar shingles used on the interior walls - what a fun detail! (I do no love the brick bench legs though. Just saying)

The unique light fixture and colored door in this entry are fun details in an otherwise sleek, white space!

(via homelife)

And the floating console table is a great fix for a narrow space. I can't decide if I like the look of the white door with white wainscoting or the pop of a colored door more.

This last entry I had to throw in here just because I think the tile is so fun and fresh and fabulous next to all the white, even though I'm not brave enough to do something like that in my own home:

(via Red Online)

I sort of have an entryway crush on that house.

I can't wait to tackle my narrow entry and add some form (and function!) to the space -- this has definitely given me some food for thought. Are there any other fabulous narrow entry spaces out there that I should check out? Tell me in the comments section!

Thursday, September 13, 2012

Easy Skirt Tutorial (Just One Yard of Fabric Needed!)

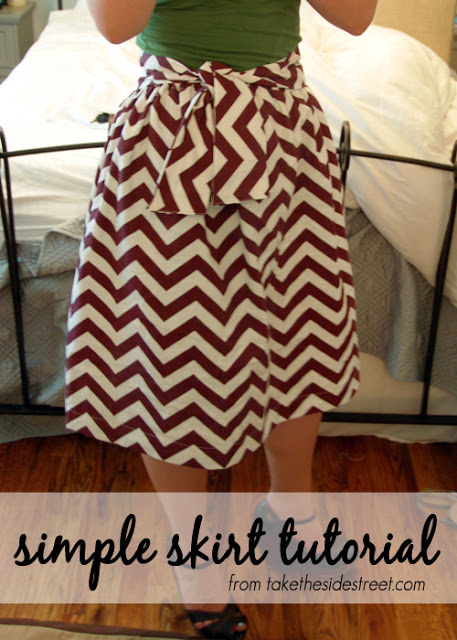
I made a skirt. That's right, I. made a skirt. As in an article of clothing. As in, I'm practically a seamstress now. Who wants to pay me to ruin tailor their clothing?


Earlier this year when I was working on my boys' bedroom makeover, I ordered several fabrics for pillows and was sent a wrong fabric by mistake. The company sent the correct fabric out right away and told me to keep the 1 yard of chevron fabric I received by mistake. I had no idea what I was going to do with it as maroon is not a color I use in my house.


Then one day, I had nothing to wear (which probably meant I needed to do laundry). I decided to get creative. My one yard of free chevron fabric was home decor grade which  meant it was a little heavier, but it was still 100% cotton and I decided to make it work.

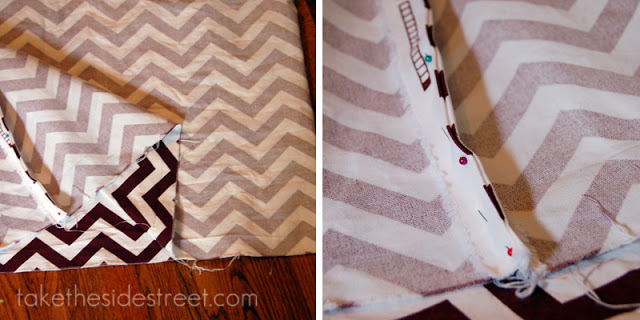
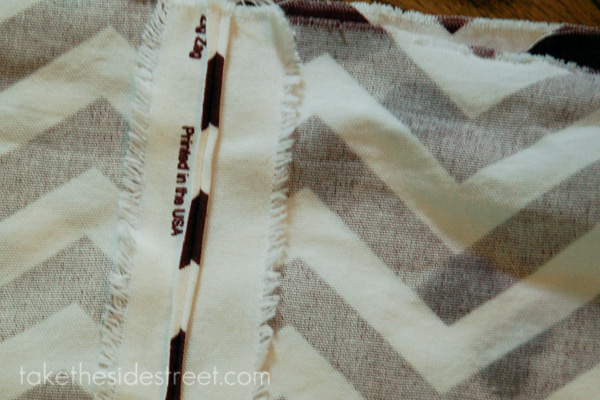
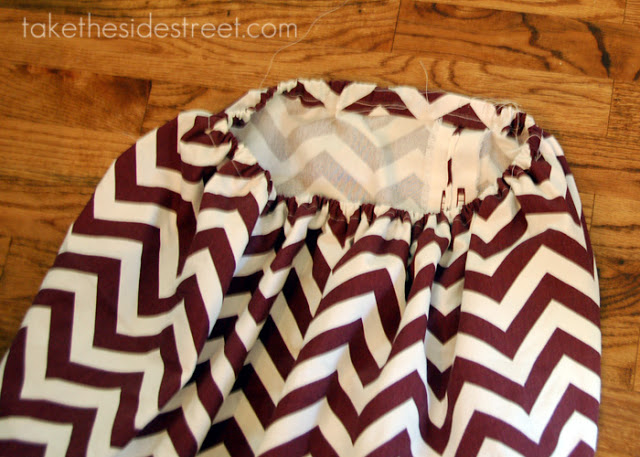
This home decor fabric is 54" wide, which means I only needed a yard to make a nice short skirt. I folded it in half hamburger-style to make a giant tube 36" long. Next, I folded the selvage edges back, did my best to match the zig zag print and pinned it.


After running it through the sewing machine I pressed the seam open so it laid flat.


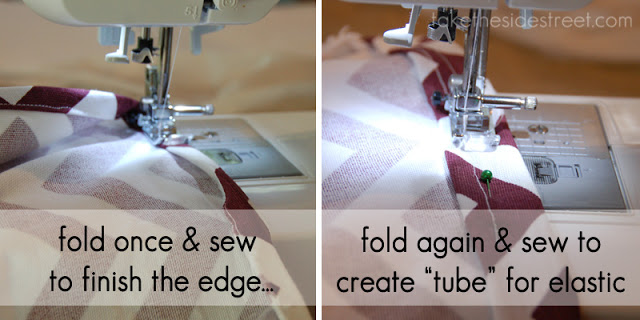
Then I picked one of the ends of the big tube to be the top of the skirt, and created a place to run a band of elastic for the waist (leaving about 4 inches open so I could thread the elastic in):


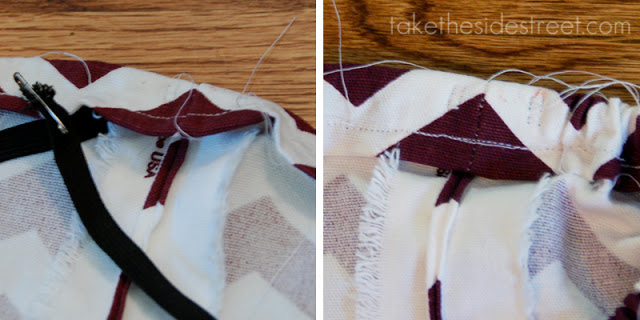
I used some elastic I already had -- just wrapped it around my waist and then subtracted a good 3-4 inches before cutting it to length. My skirt fabric was heavier so I needed to make sure the elastic was snug enough to hold it on my waist!

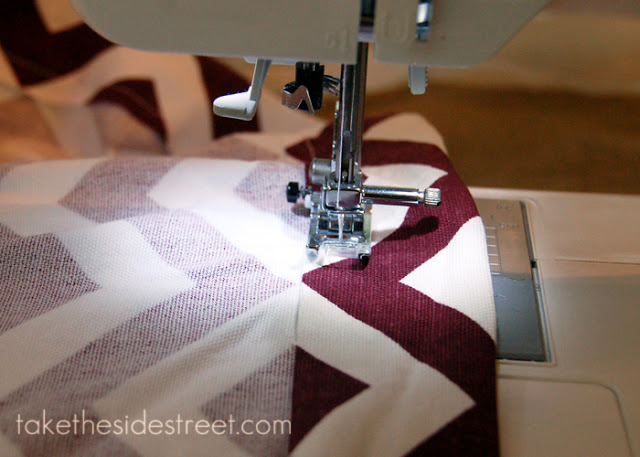
I sewed one end of the elastic into the skirt and threaded the other end through the waistband I created by using a safety pin in the other end of the elastic. Sometimes this takes some wiggling! Once I got the elastic all the way through, I pinned it in place and then sewed it securely. Then I sewed the last few inches of the waistband closed.


Voila. Instant elastic waistband.


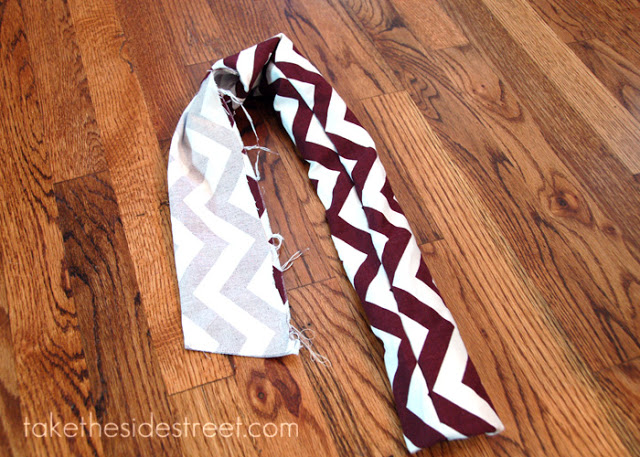
Next, I threw the skirt on and decided where I wanted to cut it length wise. I cut a band off the bottom of the skirt and finished the edge:


Finally, I used the fabric I cut from the bottom of the skirt to make a sash in order to hide the elastic waistband -- if you have more skills than I do, make a real waistband... zippers frighten me, so this is what I did.


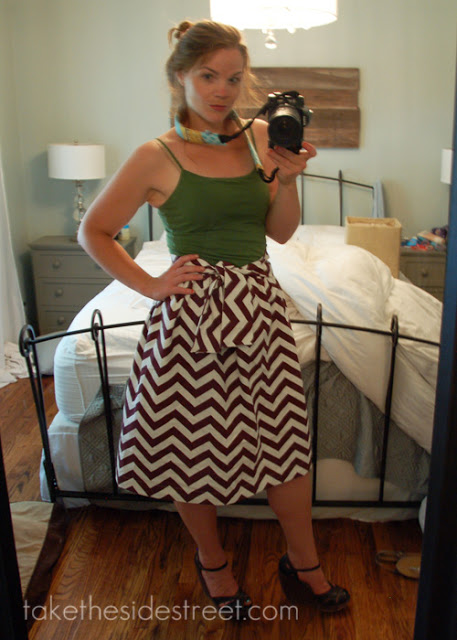
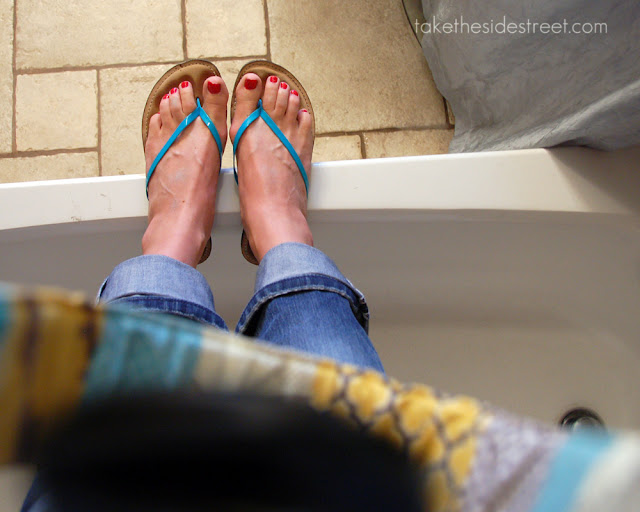
And, it's done. Easy peasy. I tried to take photos of myself and out of 30 or so (I'm one of those girls), this is the most in focus. And I look like I'm doing Blue Steel or something. You win some, you lose some... we're friends though, right? No judging. :)


It was a quick, simple project -- no real skills necessary. If I can do this, you can too! Bad sewers of the world, unite!

Friday, September 7, 2012

Walking On, Walking On Broken...Concrete

Last weekend, we rented a jackhammer and Mike spend a few miserable hours breaking up the concrete on the side of our house. Mike hates jackhammers, and (to be honest) most DIY or construction type jobs. I love him anyway, especially when he takes one for the team and does hateful jobs out of love and adoration. Or at least to make me stop asking :)
 
Jackhammer aren't cheap to rent (I mean it's cheaper than buying for sure, but still...) and I sort of wish the price included some sort of Mary Poppins cleaning snap-your-fingers magic.  


The sad truth is where there is demo, there are giant messes. I'm a fan of recycling whenever possible to minimize the amount of clean up, because picking up demo cramps my impatient style.

I had seen articles online about turning broken concrete into retaining walls in the garden and about recycling it into stepping stone pathways. The second option seemed to be just what we were looking for, as the wooden walkway in our backyard has seen better days.

 (from last Spring, pre-seed sprinkling)

 As much fun as monthly tetanus shots are, it was time for something new!


The entire pathway came apart really easily as it had been sitting in the dirt for years and was nice and rotten in places. I did, unfortunately, come across more slugs than any human should have to endure at once.

I've been working on our new path for the last few days --  we're going away for this weekend so I'm not going to be able to finish it, but I wanted to give you a peek! 


I can't wait to see what it looks like when it's done -- and then to share it with you guys. I'm already loving its potential. Imagine little plants growing in the cracks next year. Imagine stubbed toes instead of stabbed toes. It'll be brilliant!

Wednesday, September 5, 2012

Bathroom Mini-Makeover {Reveal}

 My dining room is being featured over at Remodelaholic today... stop over and say hello
 and check our some of Cassity's beautiful work!

--------------------------------

As promised, I spent Labor Day weekend laboring -- I'll show you what I'm working on outside tomorrow, but today I wanted to unveil the changes I made to our upstairs bathroom. I had asked for your thoughts on painting the vanity a creamy white, and that's just what I did...


I knew I wanted a change, but I still wasn't sure how I would feel about the whole thing. What a pleasant surprise it was to discover that I liked it! I switched out the knobs for a darker set which now makes my bathroom a mix and match wonderland -- something that would have made my eyeballs twitch 7 years ago. Now I like it... but now I also wouldn't buy a matched furniture set. Matching is overrated.


The knobs go with the mirror, the faucet matches the light, we have pops of blue in the tiles, a jewelry bowl, towels and the shower curtain... we're just plain crazy adventurous over here, guys. This is how I get my adrenaline rushes as I will never, ever (ever) do things like jump out of planes or stand over the Grand Canyon or Chicago on clear glass platforms. My stomach is twisting just writing about it... blerg.


I also bought a set of craft finials at Lowe's and turned them into bun-style feet with the help of a vise and a jig saw.

And I cut and installed baseboard -- this is exciting in my world as I'm much better at tearing stuff apart than putting it back together.


My bathroom is so small, I thought I'd share a little glimpse into how I have to take photos -- I call it the 'bathtub wall lean.' I'm gettin' pretty good at it:


P.S. I did seriously consider removing the middle set of doors and adding basket storage -- for a number of reasons it would make the tiny space more functional. Unfortunately, I can't find the right size basket anywhere and unless I fit the space perfectly I'll be losing storage area which I absolutely can't afford to do. I've got a lot of stuff! So if anyone finds baskets that are about 18" x 20" and 7-8" deep, email me, STAT!

Tuesday, September 4, 2012

Strawberry Cheesecake Frozen Yogurt

Frozen yogurt is so deceptive. You're sitting there eating it,  thinking to yourself, "yogurt is so healthy! Look at me eating this health food!" and... you're completely right!

(Except not really... sigh.)
 

But we're not going to talk about that today. There will be no bubble bursting going on here; I'm already dealing with the bittersweet excitement of the first day of school, and I don't need to think about silly things like calories.

My boys are starting 2nd grade and Pre-K today, and while I am looking forward to my school day break and getting back to a routine, I can't help but feel a twinge of sadness at summer's end and the boys' insistence on growing up. We marked the occasion yesterday by making some frozen yogurt and then eating it, because that's what normal people do with frozen treats.

I used frozen strawberries because it takes one 16-ounce bag (easy!) once they thaw in the microwave they're so soft I was able to mix all the ingredients with a hand mixer instead of a blender or a food processor. I like things that are easy.


Just mix all the ingredients together and freeze according to your ice cream maker's instructions.

This is our ice cream maker, 'cause we're awesome and retro like that:


Notice that it came with a record? Jealous? Of course you are, and nobody could blame you! Five minutes before it's done freezing, throw in your mix-ins...


... and then move it to the freezer to set up for a few hours.


I love how the lemon and greek yogurt add a little tangy flavor that works with the cheesecake vibe -- I'm not usually a big fan of ice cream or frozen yogurt, but I liked this enough to sneak a couple extra spoonfuls sensibly admire it from afar.


What a nice way to end the summer!

Strawberry Cheesecake Frozen Yogurt (tweaked from this recipe)
16 ounces frozen no-sugar-added strawberries
8 ounces cream cheese, softened (I used light)
1 cup plain Greek yogurt (I used non-fat)
1/2 c. heavy cream
1 Tbs. fresh lemon juice
1 cup sugar
1 tsp. salt
1/2 c. graham cracker crust, crumbled

Thaw strawberries. Finely chop or mash 5-10 of them and set aside. Mix remaining strawberries, cream cheese, yogurt, cream, lemon juice, sugar, and salt with a hand mixer, making sure to break apart softened strawberries. Pour the mixture into an ice cream maker and freeze according to the manufacturer's instructions. Five minutes before it's finished, pour in the reserved chopped strawberries and graham cracker crust. When cycle is complete, move frozen yogurt to the freezer to set up.
Related Posts Plugin for WordPress, Blogger...